網路指令與技巧
Tutorials
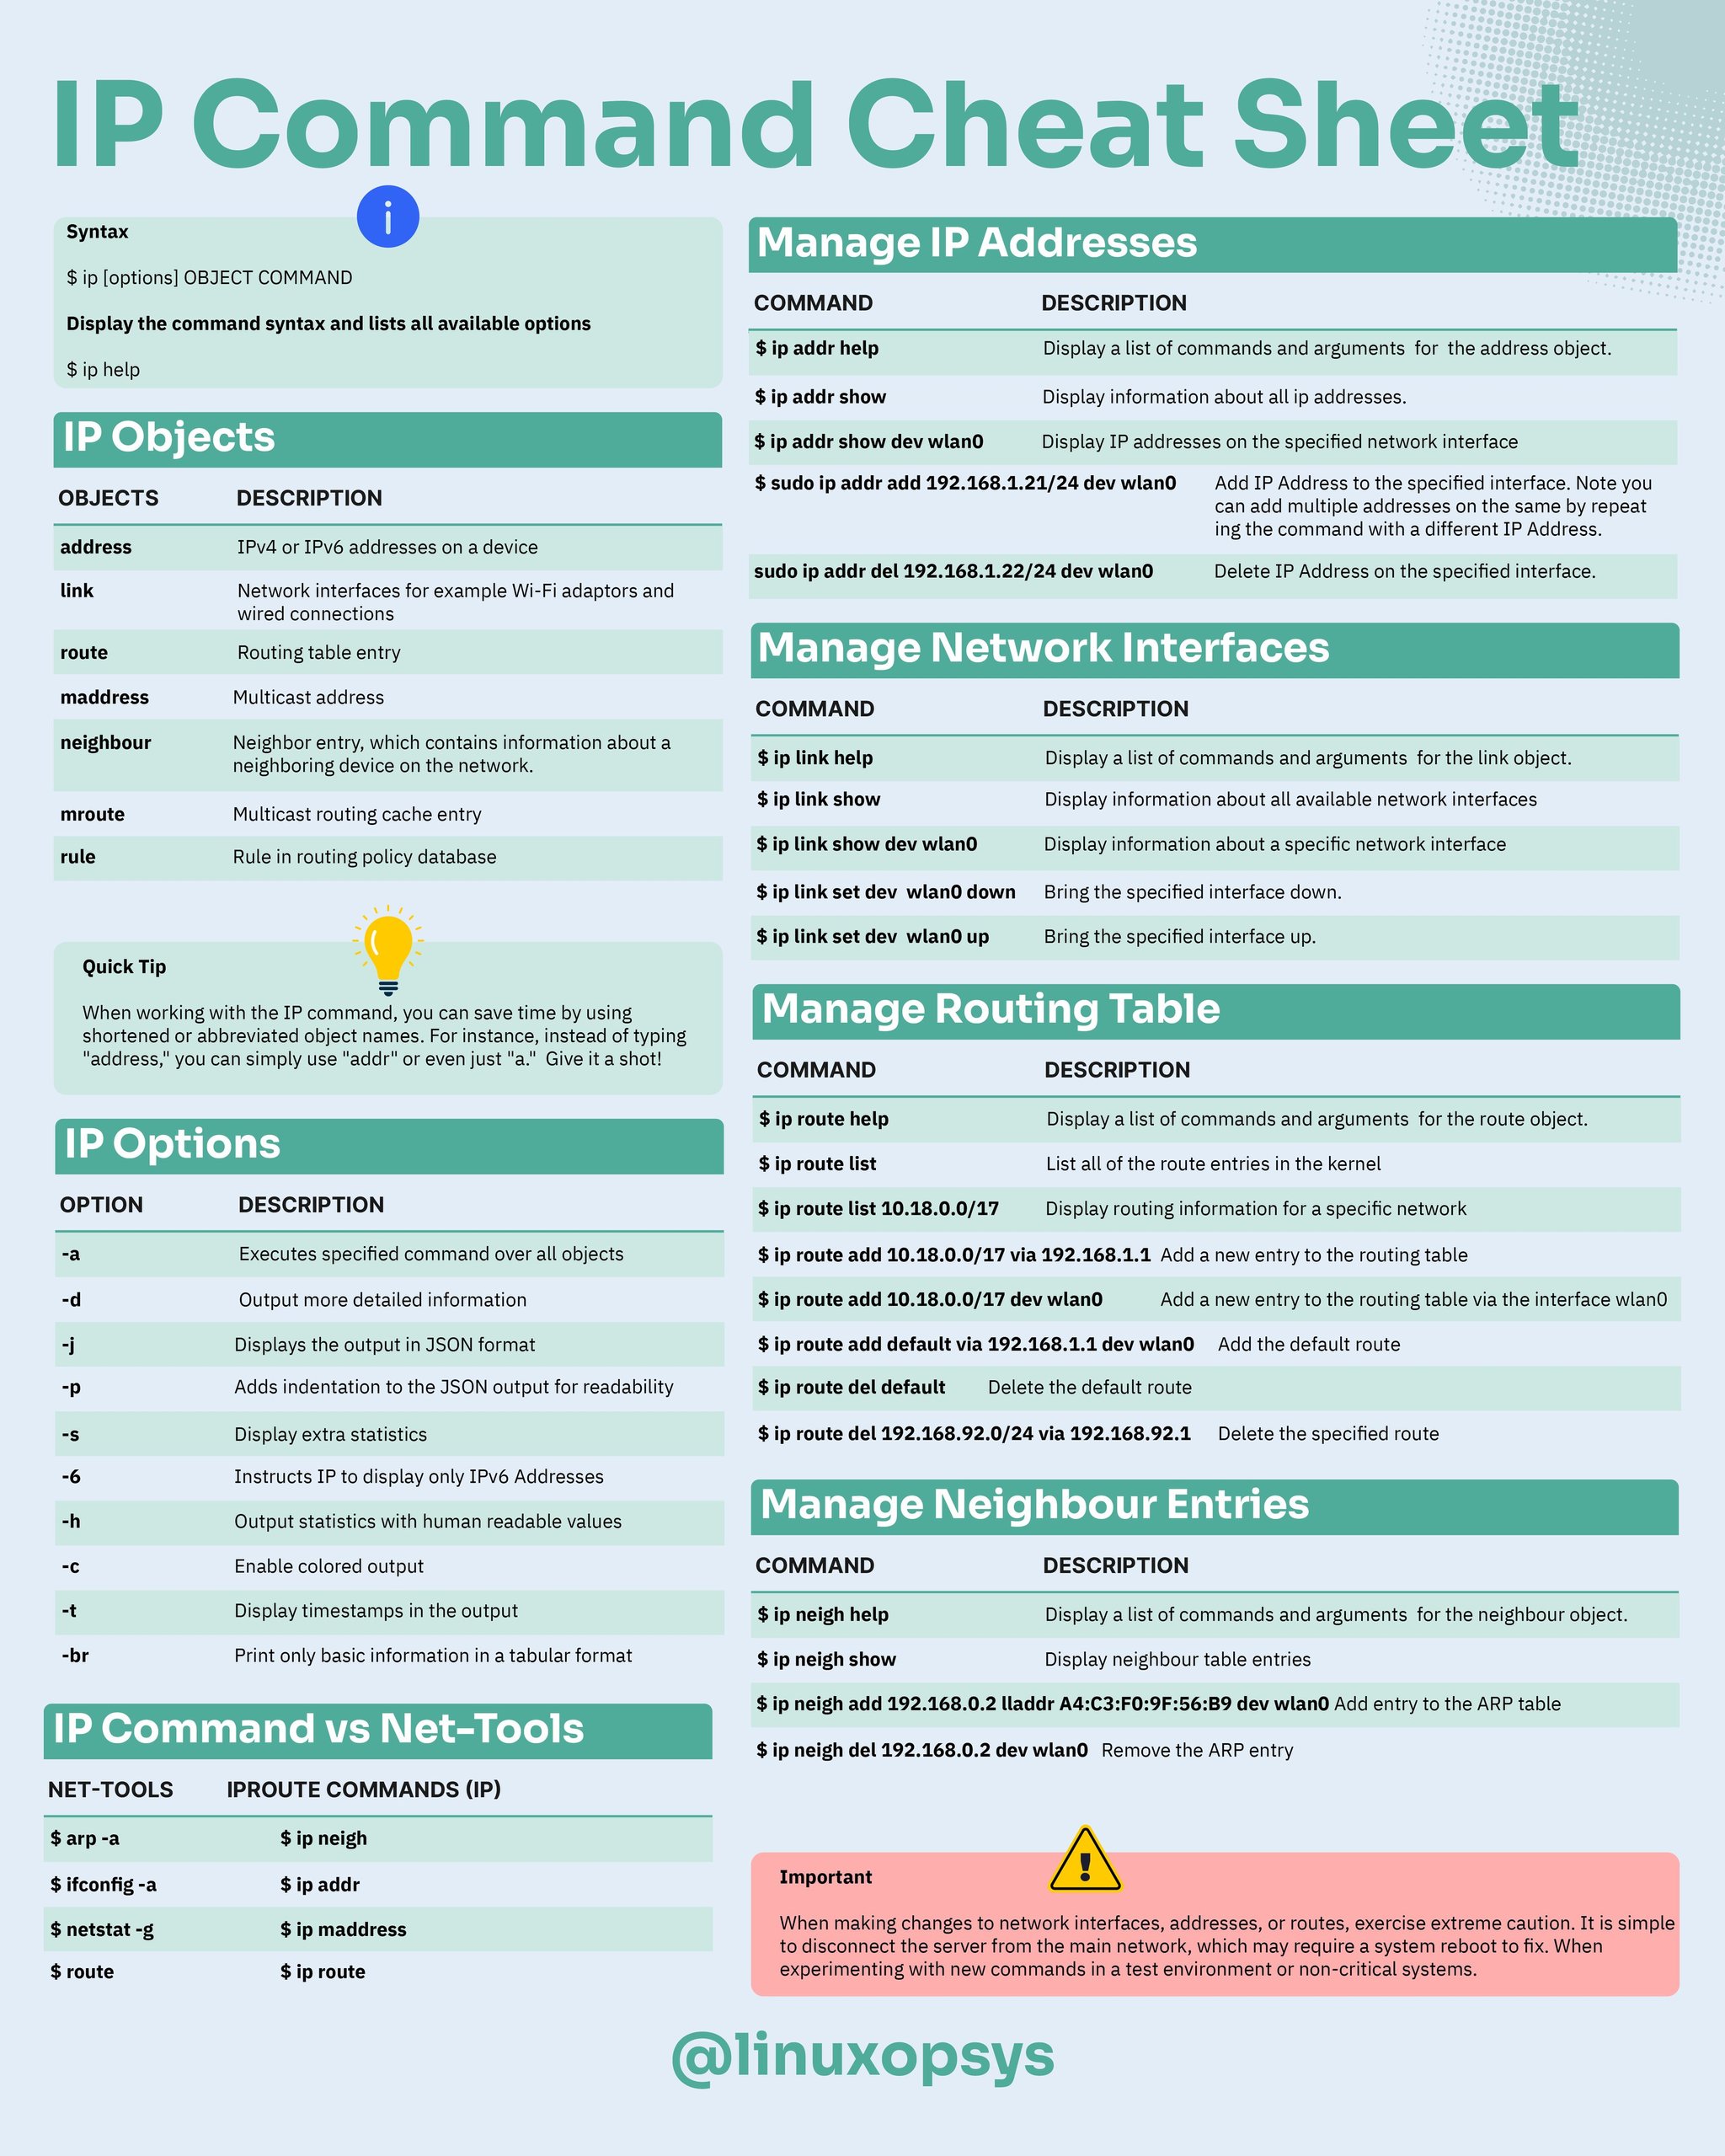
ip
# 顯示所有網卡資訊
ip addr
ip a

# 顯示所有網卡的 IP
ip -br -c addr show  # 需要較新版 ip

# 顯示 eth0 網卡資訊
ip a show eth0

# 開啟/關閉網卡
ip link set eth0 { up | down }

# 顯示所有的網路裝置
ip link show
ip -br -c link show
ip l show

# 設定 IP (非永久)
ip a add 192.168.1.200/255.255.255.0 dev eth0

# 移除 IP (非永久)
ip a del 192.168.1.200/255.255.255.0 dev eth0

# 顯示 default gateway 及路由表
ip route show
ip r show
ip route add 10.10.20.0/24 via 192.168.50.100 dev eth0
ip route del 10.10.20.0/24

# Default gateway
ip route add default via 192.168.50.100

# 網路即時狀態
ip -s link

# 顯示 ARP 紀錄 (NOTE: 查詢連接網路設備的 MAC address 與 IP 對應表)
ip neigh show
ip n show

# 清除 ARP 清單裡的某個 IP 紀錄
ip -s -s n f <ip-address>

# 線上求助
ip a help
在多個網路埠的主機上,如何得知哪些埠有接上網路線
# 1. 列出所有網路埠
ip link show  如果埠號顯示 DOWN 必須先啟動

# 2. 啟動網路埠 NOTE: 啟動前要注意 IP 是否會衝突
ip link set eth6 up

# 3. 啟動後檢測線路
ethtool eth6 | grep detected
Cheat Sheet
nmcli
# List all of ethernet devices
nmcli con show
nmcli con show <conn-name>
nmcli dev status
# see only the active connections
nmcli con show -a

# Restart the network adapter enp0s3
nmcli con down enp0s3 && nmcli con up enp0s3

# Configure the static ip
nmcli con mod enp0s3 ipv4.addresses 192.168.20.170/24
nmcli con mod enp0s3 ipv4.gateway 192.168.20.1
nmcli con mod enp0s3 ipv4.method manual
nmcli con mod enp0s3 ipv4.dns "8.8.8.8"

nmcli con down enp0s3
nmcli con up enp0s3

# make a new ethernet connection with name Myhome1, assigned to device enp0s3
nmcli con add type ethernet con-name Myhome1 ifname enp0s3 ip4 192.168.1.50/24 gw4 192.168.1.1
cat /etc/sysconfig/network-scripts/ifcfg-Myhome1
GUI to Configure Network
# For Ubuntu/Debian
sudo apt install network-manager

# Console Command
nmtui
netplan
Recommended on Ubuntu/Debian
- A declarative approach to Linux networking with Netplan | Ubuntu
- Netplan brings consistent network configuration across Desktop, Server, Cloud and IoT | Ubuntu
sudo vi /etc/netplan/01-network-manager-all.yaml
network:
  version: 2
  renderer: networkd
  ethernets:
    ens18:
      dhcp4: no
      addresses:
        - 192.168.1.22/24
      gateway4: 192.168.1.101
      nameservers:
        addresses: [8.8.8.8, 8.8.4.4]
Commands
# Validate Configuration File
sudo netplan try

# Apply the Configuration
sudo netplan apply

# Check the network stack
sudo netplan status

# Optional: Restart the Network Service
sudo systemctl restart systemd-networkd
ethtool
# ethtool ens192
Settings for ens192:
        Supported ports: [ TP ]
        Supported link modes:   1000baseT/Full
                                10000baseT/Full
        Supported pause frame use: No
        Supports auto-negotiation: No
        Supported FEC modes: Not reported
        Advertised link modes:  Not reported
        Advertised pause frame use: No
        Advertised auto-negotiation: No
        Advertised FEC modes: Not reported
        Speed: 10000Mb/s
        Duplex: Full
        Port: Twisted Pair
        PHYAD: 0
        Transceiver: internal
        Auto-negotiation: off
        MDI-X: Unknown
        Supports Wake-on: uag
        Wake-on: d
        Link detected: yes
# ethtool -i ens192
driver: vmxnet3
version: 1.4.17.0-k-NAPI
firmware-version:
expansion-rom-version:
bus-info: 0000:0b:00.0
supports-statistics: yes
supports-test: no
supports-eeprom-access: no
supports-register-dump: yes
supports-priv-flags: no# ethtool -S ens192
NIC statistics:
Tx Queue#: 0
TSO pkts tx: 540499
TSO bytes tx: 28911908774
ucast pkts tx: 10060867
ucast bytes tx: 29602317140
mcast pkts tx: 0
mcast bytes tx: 0
bcast pkts tx: 5655
bcast bytes tx: 237510
pkts tx err: 0
pkts tx discard: 0
drv dropped tx total: 0
too many frags: 0
giant hdr: 0
hdr err: 0
tso: 0
ring full: 0
pkts linearized: 0
hdr cloned: 0
giant hdr: 0
Tx Queue#: 1
TSO pkts tx: 317
TSO bytes tx: 599134
ucast pkts tx: 1702836
ucast bytes tx: 101410145mii-tool
# Installation
sudo apt install net-tools

# CHECK A SINGLE INTERFACE
sudo mii-tool <interface_name>

# SEE DETAILED INFORMATION
sudo mii-tool -v <interface_name>

# SET NETWORK INTERFACE SPEED
sudo mii-tool –force 10baseT-FD <interface_name>

# RESTART AUTO-NEGOTIATION
# Network devices use an auto-negotiation protocol to communicate the technologies they support.
# It will then select the fastest mutually supported technology.
# To restart the auto-negotiation of the interface, run the following command.
sudo mii-tool –restart <interface_name>

# CHANGE THE DUPLEX MODE
# For example, here I have set the speed of the eth0 interface to 10 Mbps and the duplex mode to half-duplex.
sudo mii-tool -F 10baseT-HD eth0

# REPORT LINK STATUS CHANGES
# Run the following command to watch a single interface and report changes in the link status.
# That is to say, the interfaces are listed at one second intervals by default.
sudo mii-tool -w <interface>

# REPORT LINK STATUS
sudo mii-tool -l <interface_name>

# RESET THE CONFIGURATIONS
# Most importantly, you should be able to reset it to its default configuration
# if something goes wrong. For that, run the following command
sudo mii-tool -R <Interface_name>
systemctl
# Bringing UP/Down Network Interface
systemctl restart network
# or
systemctl restart network.service
speedtest CLI
# Ubuntu/Debian
curl -s https://install.speedtest.net/app/cli/install.deb.sh | sudo bash
sudo apt-get install speedtest

# CentOS/RedHat
curl -s https://install.speedtest.net/app/cli/install.rpm.sh | sudo bash
sudo yum install speedtest
State of Network Cable
# Device: enp5s0
# Output: 1 means Connected
cat /sys/class/net/enp5s0/carrier
# Output: Up  means Connected
cat /sys/class/net/enp5s0/operstate

# Using ethtool
# Output: Link detected: yes
sudo ethtool enp5s0

# Using ip
# Output: state UP
ip a
Network Adapters
Modern Linux
lshw -class network -shortOld Linux
lspci | egrep -i --color 'network|ethernet'Disable IPv6
Ubuntu 20.04
sudo vi /etc/default/grub

# Change the line as follows
GRUB_CMDLINE_LINUX_DEFAULT="ipv6.disable=1"

# Update the GRUB
sudo update-grub

# Reboot
systemctl reboot
Debian 10
/etc/sysctl.conf :
# Disable IPv6 on all network adapters
net.ipv6.conf.all.disable_ipv6 = 1
Apply the change :
sysctl -pRedHat 4
1. Remove the following line (if present) from the /etc/modprobe.conf file:
alias net-pf-10 ipv62. Add the following line to the /etc/modprobe.conf file:
alias net-pf-10 off3. Comment out any IPv6 addresses found in /etc/hosts, including ::1 localhost address
cp -p /etc/hosts /etc/hosts.disableipv6
sed -i 's/^[[:space:]]*::/#::/' /etc/hosts
RedHat 5/6
/etc/sysctl.d/ipv6.conf :
# For v5/6
# IPv6 support in the kernel, set to 0 by default
# Disable IPv6
net.ipv6.conf.all.disable_ipv6 = 1
net.ipv6.conf.default.disable_ipv6 = 1
RedHat 7
/etc/sysctl.d/ipv6.conf :
# To disable for all interfaces
net.ipv6.conf.all.disable_ipv6 = 1
重建開機映像檔
如果沒有重建開機映像檔,會使得 rpcbind.service 無法正常運作,這會影響 NFS 的掛載。
RedHat 8
Create the file /etc/sysctl.d/ipv6.conf :
# First, disable for all interfaces
net.ipv6.conf.all.disable_ipv6 = 1
# If using the sysctl method, the protocol must be disabled all specific interfaces as well.
#net.ipv6.conf.<interface>.disable_ipv6 = 1
Reload sysctl :
sysctl -p /etc/sysctl.d/ipv6.confCreate a backup of the initramfs :
cp /boot/initramfs-$(uname -r).img /boot/initramfs-$(uname -r).bak.$(date +%m-%d-%H%M%S).imgRebuild the Initial RAM Disk Image :
dracut -f -vVerifying file inclusion :
lsinitrd /boot/initramfs-<version>.img | grep 'etc/sysctl.d/ipv6.conf'Comment out any IPv6 addresses found in /etc/hosts, including ::1 localhost address
cp -p /etc/hosts /etc/hosts.disableipv6
sed -i 's/^[[:space:]]*::/#::/' /etc/hosts
WiFi Management
# Replace 'wlan0' with your wifi interface
sudo iwlist wlan0 scan | egrep "Cell|ESSID|Encryption|Quality"
Block Attackers IP Address
Drop or Block Attackers IP Address With Null Routes On a Linux
# Using route command
route add 65.21.34.4 gw 127.0.0.1 lo
# veryfy it
netstat -nr
route -n
# Or
route add -host 64.1.2.3 reject
ip route get 64.1.2.3

# Using ip command
ip route add blackhole 202.54.5.2/29
ip route add blackhole 192.0.130.0/24
# verify it
ip route

# Removing null routing
route delete 65.21.34.4
# Or
route del -host 65.21.34.4 reject
# Or
ip route delete 1.2.3.4/26 dev eth0
重設/移除不存在的網路裝置名稱
製作 Linux VM Template 時,每一次修改 Template 後都會產生新的編號作為網路裝置名稱。
然而透過這個 Template 新增的 Linux VM,系統的網路介面其實只有一個,不過裝置名稱可能已經編到 eth1 或 eth2 以後。正常來說,系統如果只有一個網路介面,網路裝置名稱通常為 eth0。
假使想要清除那些已經不存在的裝置名稱,或者讓系統對目前的網路裝置重新以 eth0 開始編號,步驟如下:
RedHat 6.x: 編輯 /etc/udev/rules.d/70-persistent-net.rules
# PCI device 0x15ad:0x07b0 (vmxnet3)
SUBSYSTEM=="net", ACTION=="add", DRIVERS=="?*", ATTR{address}=="00:50:56:83:7c:eb", ATTR{type}=="1", KERNEL=="eth*", NAME="eth0"

# PCI device 0x15ad:0x07b0 (vmxnet3) (custom name provided by external tool)
SUBSYSTEM=="net", ACTION=="add", DRIVERS=="?*", ATTR{address}=="00:50:56:83:7c:eb", ATTR{type}=="1", KERNEL=="eth*", NAME="eth1"
註解或移除那些舊裝置名稱,只保留目前的裝置 eth1,然後將該行的 NAME 改成 eth0。
# PCI device 0x15ad:0x07b0 (vmxnet3) (custom name provided by external tool)
SUBSYSTEM=="net", ACTION=="add", DRIVERS=="?*", ATTR{address}=="00:50:56:83:7c:eb", ATTR{type}=="1", KERNEL=="eth*", NAME="eth0"
存檔後重起 VM。
VM 啟動後,使用 setup 或 system-config-network 新增網路介面 eth0 的網路設定。
Disable WiFi
With nmcli
# nmcli dev status
DEVICE  TYPE      STATE     CONNECTION
enp2s0  ethernet  已連線    enp2s0
wlp1s0  wifi      離線      --
lo      loopback  不受管理  --

# nmcli radio wifi off

# nmcli dev status
DEVICE  TYPE      STATE     CONNECTION
enp2s0  ethernet  已連線    enp2s0
wlp1s0  wifi      無法使用  --
lo      loopback  不受管理  --
查詢 DNS Server 位址
cat /etc/resolv.conf
nmcli dev show | grep -i dns
dig <domain-name>
Custom MAC Address
RedHat 4
/etc/sysconfig/network-scripts/ifcfg-eth0
DEVICE=eth0
ONBOOT=yes
BOOTPROTO=static
IPADDR=10.15.9.32
NETMASK=255.255.0.0
GATEWAY=10.15.8.254
#HWADDR=00:0C:29:B1:18:A3
MACADDR=00:0C:B1:B1:B1:B1
No Comments