Install DB2 V7.2 on SuSE Enterprise Server 9
內容表格
沒有標頭文/A-Lang ( alang[dot]hsu[at]gmail[dot]com ) *轉貼時請註明作者*
雖然在舊網誌[Installing DB2 on Linux]已經有寫過相同標題的文章,不過當時是第一次安裝,花很多時間在 Study 技術文件,所以就沒有很詳實的紀錄整個過程,現在重新再安裝一次,就趁機好好把步驟寫完整。
系統環境說明:SuSE Enterprise Server 9(kernel 2.6.5-7.97-default) + DB2 V7.2
步驟一:取得DB2 for Linux 的安裝光碟,並將目錄 db72eeux ,上傳至主機內。
步驟二:以 Root 登入主機,進入安裝目錄,執行安裝檔。
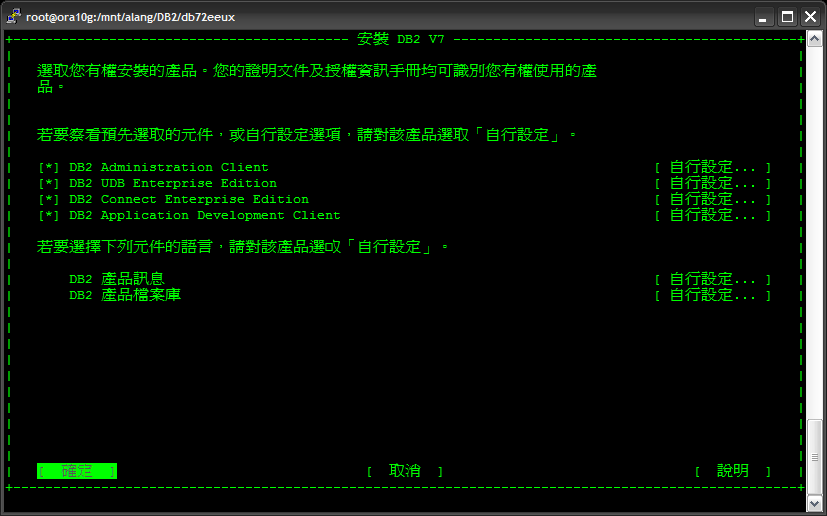
1. 以導引介面安裝有較多選擇項
#cd db72eeux
#chmod u+x db2setup
除項目 DB2 Connect Enterprise Edition 不要選以外,其餘均設為安裝; 除非有相應的 License 檔,否則安裝後將會有錯誤訊息。


2. 以指令介面安裝,簡易選項
#chmod +x db2_install
#./db2_install
調整系統參數:
建立/編輯 /etc/sysctl.conf
kernel.sem=250 25600 32 1024
kernel.shmmax=268435456
kernel.shmall=117965
kernel.msgmni=1024
kernel.msgmax=65535
kernel.msgmnb=65535
編註:
shmmax -> for x86, here is 268435456 byte(256MB); for 64bit, here is 1073741824 byte(1GB)
shmall -> physical memory(KB) * 90% / 4, 512M * 1024 * 90% /4= 117964.8, 請注意不可小於 Table 所需的 buffer pool的總值.
載入參數檔
#sysctl -p
檢視系統參數
#ipcs -l
// 這裡輸出的值會轉成 kb 喔
下次開機時自動載入
#chkconfig boot.sysctl on
步驟三:建立 instance 的帳號及群組 'db2adm'
#groupadd db2adm
#useradd -g db2adm db2inst
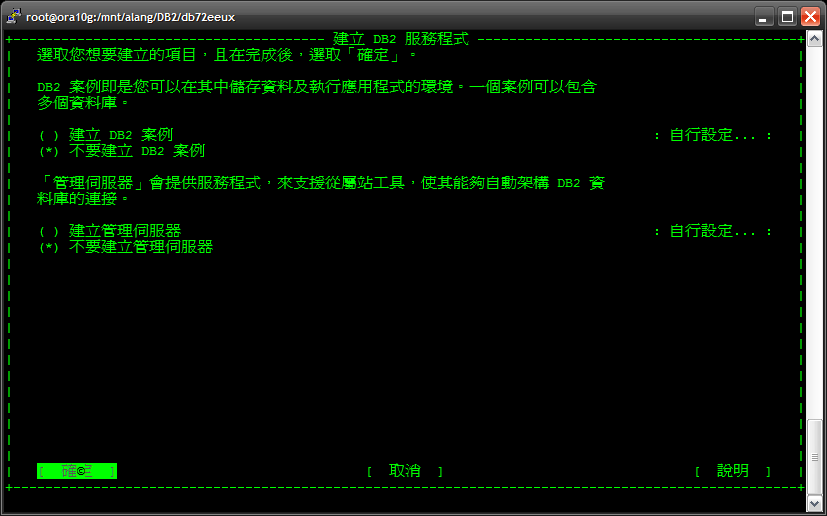
步驟四:建立 DB Instance
#vi /etc/services //加上 service port 如下
# For DB2 Instance
db2inst 50020/tcp
db2insti 50021/tcp
#cd /usr/IBMdb2/V7.1/instance
#./db2icrt -a server -u db2inst db2inst // -a <AuthType> -u <user_name> <instance_name>
#su - db2inst
$db2ilist //list instance name
$db2 "update dbm cfg using svcename sminst" //update service name as the above as well as this name must existed within file /etc/services .
Check the service port:
#netstat -lt
#./db2idrop <instance_name> //如果需要重建的話.
Tips:
當 Server 與 Client 不在同一機器時,資料庫預設認證方式為 Server,設定權限時,除了執行 Grant , Server 上還需建一個認證的系統帳號,如果想用 Client 端的系統帳號,需修改 Server 上的 DBM CFG 選項 AUTHENTICATION = CLIENT。
步驟五:檢查及匯入 License
# cd /usr/IBMdb2/V7.1/adm
# db2licm -l
Product Name = "DB2 Enterprise Edition"
Product Password = "DB2UDBEE"
Version Information = "7.2"
Expiry Date = "Expired"
Concurrent Connect User Policy = "Disabled"
Registered Connect User Policy = "Disabled"
Enforcement Policy = "Soft Stop"
Number of processors = "1"
Number of licensed processors = "1"
Annotation = ""
Other information = ""
因 Expiry Date = expired, 所以無法啟動 instance
匯入 license key 'db2udbee.lic'
# cd /usr/IBMdb2/V7.1/adm
# db2licm -a db2udbee.lic
步驟六:啟動 Instance
#su - db2inst
#db2start //如果結果和我一樣,表示啟動成功。
SQL1063N DB2START processing was successful.
步驟七:建立資料庫 'mydb'
#su - db2inst
$mkdir mydb
$db2start
$db2 "create database mydb on /home/db2inst/mydb using codeset IBM-850 territory En_US collate using identity"
$db2 list db directory //列出現有資料庫名稱
$db2 connect to mydb //連接資料庫
步驟八:以 RAW device 方式移轉原本在 AIX 平台的所有資料,在 Linux 建立 raw revice
以 fdisk 建立一個 partition,或改用 LVM 方式管理磁碟,建立一個 LV
#lvcreate -L 500M -n rmydb001 vg01 // LV name = rmydb001, VG name = vg01
#raw /dev/raw/raw1 /dev/vg01/rmydb001
#raw -a
#chown db2inst:db2adm /dev/raw/raw1
刪除 raw device 時可執行
#raw /dev/raw/raw1 0 0
8.1 請依原始 AIX 資料庫的各個 tablespace 使用空間狀況,為新 Linux 資料庫建立足夠空間的 raw device
8.2 由於這是跨平台的資料庫轉移,無法使用 backup/restore 的方式; 單純使用 export/import 因為這指令是針對 Table ,如果有幾百個 Table 要轉移, 真的會是惡夢。
在使用 Google 搜尋後,我們找到了可行的方法。
8.2.1 先從 AIX 導出資料庫的所有架構,如 Tablespace, Table 定義,但不包含資料
$ db2look -d mydb -a -e -l -x -f -o mydb_db2look.ddl
8.2.2 修改 mydb_db2look.ddl 的內容符合 Linux 平台的資料庫環境,主要在各 DB Name, Tablespace 的定義
Tips:
如 Tablespace 使用 SMS (System Managed Mode), 其使用目錄需先行手動建立。
若 AP 特別需對 DB 作 bind, 其 schema name 需配合 AP 的設定。
8.2.3 在 Linux 建立資料庫所需的元件
$ db2 -tvf mydb_db2look.ddl | tee mydb_db2look.log
8.2.4 回到 AIX 導出資料庫的所有紀錄,因為一個 Table 就會產生兩個匯出檔,要先建一個目錄來存放。
$mkdir mydb_ixf
$cd mydb_ixf
$db2move mydb export
8.2.5 將剛剛完成的所有匯出檔將它們壓縮後複製到 Linux 上, 然後執行解壓縮, 接著導入這些匯出檔
$cd mydb_ixf
$db2move mydb import
Tips:
當匯出與匯入之間的 schema 不同時,可修改檔案 db2move.lst 。
步驟九: 更新 FixPak V11
請參考這個連結[ Install FixPack for DB2 V7.2 on Linux ]
Tips:
在步驟 8.2.2 如 Tablespace 使用 SMS (System Managed Mode), 其使用目錄需先行手動建立。
當 Server 與 Client 不在同一機器時,資料庫預設認證方式為 Server,設定權限時,除了執行 Grant , Server 上還需建一個認證的系統帳號。
如果想用 Client 端的系統帳號,需修改 Server 上的 DBM CFG 選項 AUTHENTICATION = CLIENT
Error: SQL0863W A successful connection was made, but only single byte characters hould be used. SQLSTATE=01539
Ans: db2set DB2CODEPAGE=850,登出然後在登入才會生效。
ERR: SQL30081N A communication error has been detected. Communication protocol
being used: "TCP/IP". Communication API being used: "SOCKETS". Location
where the error was detected: "". Communication function detecting the error:
"connect". Protocol specific error code(s): "79", "*", "*". SQLSTATE=08001
Ans: Check DB2 network service with command 'netstat', if the service port doesn't open, check the instance configuration.
Reference Links:
- 標籤 (Edit tags)
- 什麼連接到這裡
文件 7
| 文件 | 大小 | 日期 | 附件上傳者 | |||
|---|---|---|---|---|---|---|
| db2_linux-1.png Install DB2 on SUSE 1 | 32.42 KB | 11:11, 26 Feb 2009 | alang | 動作 | |
| db2_linux-2.png Install DB2 on SUSE 2 | 32.41 KB | 11:11, 26 Feb 2009 | alang | 動作 | |
| db2_linux-3.png Install DB2 on SUSE 3 | 24.66 KB | 11:12, 26 Feb 2009 | alang | 動作 | |
| db2_linux-4.png Install DB2 on SUSE 4 | 29.14 KB | 11:12, 26 Feb 2009 | alang | 動作 | |
| db2_linux-5.png Install DB2 on SUSE 5 | 32.47 KB | 11:12, 26 Feb 2009 | alang | 動作 | |
| db2_linux-6.png Install DB2 on SUSE 6 | 18.93 KB | 11:12, 26 Feb 2009 | alang | 動作 | |
| db2_linux-7.png Install DB2 on SUSE 7 | 15.18 KB | 11:13, 26 Feb 2009 | alang | 動作 | |
| Images 7 | ||
|---|---|---|
 Install DB2 on SUSE 1db2_linux-1.png |  Install DB2 on SUSE 2db2_linux-2.png |  Install DB2 on SUSE 3db2_linux-3.png |
 Install DB2 on SUSE 4db2_linux-4.png |  Install DB2 on SUSE 5db2_linux-5.png |  Install DB2 on SUSE 6db2_linux-6.png |
 Install DB2 on SUSE 7db2_linux-7.png | ||