內容表格
- 1. 安裝前注意事項
- 1.1. 需要 64 bit 安裝模式
- 1.2. Guest OS 支援列表
- 1.3. 軟體的使用限制
- 2. 開始安裝
- 3. 新增 Guest OS - RHAS3
- 4. 延伸閱讀
RedHat 自版本 RHEL5.4 起,開始改用 KVM Virtualization,但 5.4 版仍會有 Xen + KVM 兩套不同方案選擇,但之後的新版本,將會以 KVM 為主,使用 RedHat 的人可能要注意了。
RHEL KVM 最大可以支援 16 vCPU/per guest,而 VMware vSphere 或 Citrix XenServer for free 都只能到 8 vCPU。
RHEL 5.4 已經內含 KVM Hypervisor 虛擬化引擎以及 virt 簡易型管理工具,如果不要求管理功能,這樣要作系統虛擬化已經夠用。
假設需要有較完善的集中化管理,以及 Live Migration(類似 vmware 的 live-motion)、HA等功能,就需要購買 RHEV(RedHat Enterprise Virtualization) Server 版,這個產品包含有 KVM Hypervisor、RHEV Manager。
詳細資訊請見 http://www.redhat.com/virtualization...ures-benefits/
簡介影片 http://www.redhat.com/v/swf/rhev/demo.html
RedHat 官方線上手冊
http://www.redhat.com/docs/en-US/Red...ide/index.html
安裝前注意事項
需要 64 bit 安裝模式
為了要在安裝時能選用 KVM 套件,必須要選擇 64-bit 安裝,才能看的到 KVM 套件的選項,如果看不到,表示您的版本不是 64-bit,如圖示。
Note: 為了要能安裝 64-bit RHEL,CPU 也必須能支援 64-bit。
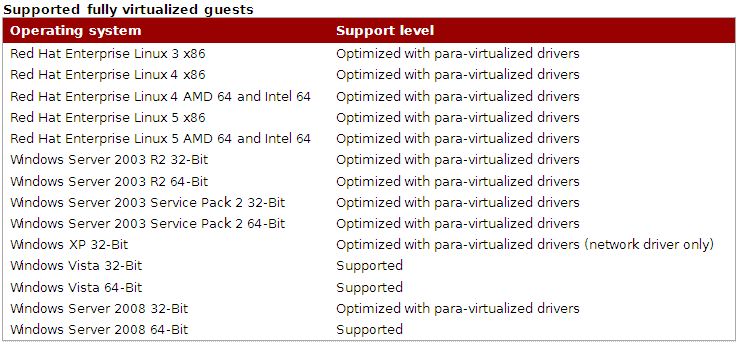
Guest OS 支援列表
開始安裝
使用 RHEL for x86_64 光碟開機,按一般方式來安裝,在到了選擇套件的步驟時,只選擇 Virtualization,其餘的套件就不要選,勾選 Customize Now,選擇 KVM,取消 Virtualization(這是 Xen 套件)。
安裝完成後,重新開機。
新增 Guest OS - RHAS3
以 root 登入 Host OS,執行指令開啟管理介面。
virt-manager &
1. 按 New 新增 Guest OS(virtual machine)。
Notes: KVM 只能使用 Fully Virtualized。

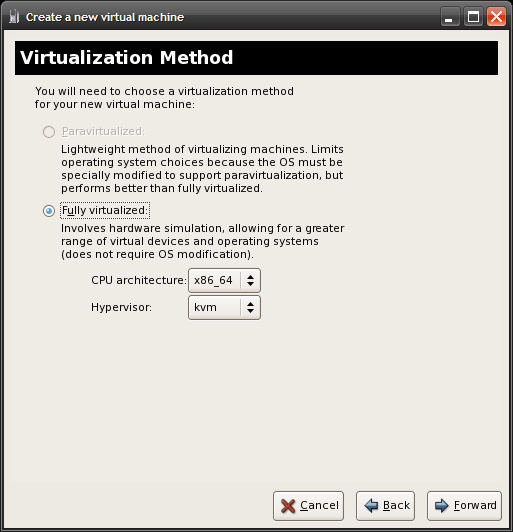
2. 選擇 Guest OS Type

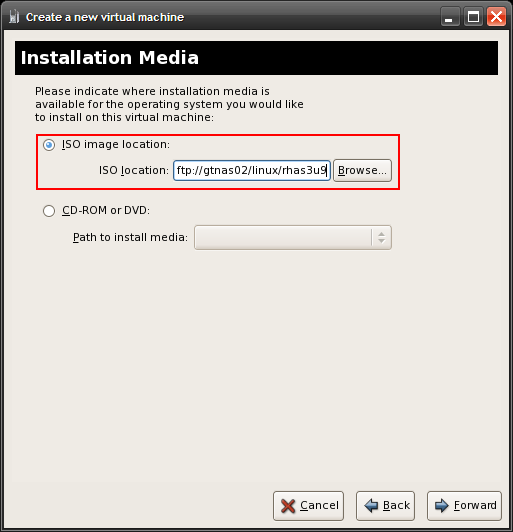
3. 選擇 安裝映像檔 ISO 的路徑。
Tip: ISO 檔路徑可為本機磁碟或遠端 FTP 主機。
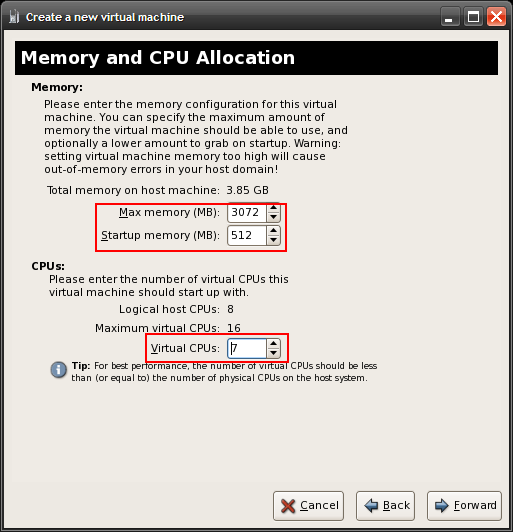
4. 分配 CPU & Memory 資源
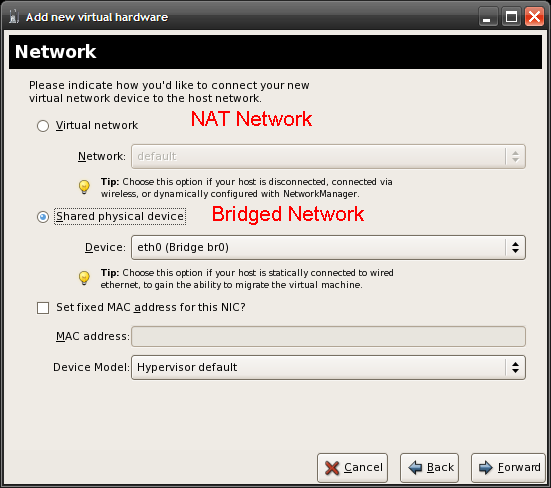
5. 設定虛擬網路介面,預設的網路類型只有 NAT 虛擬網路可選。
Tip: 系統在安裝後,預設所支援的網路類型只有 NAT,若要使用 Bridge 模式和現有 LAN 連接,請繼續以下設定:
如何設定 Bridged Network 橋接的網路
// 停用 Xen network scripts, 如果沒有安裝 Xen, 請忽略
編輯 /etc/xen/xend-config.sxp
(network-script network-bridge)
修改為
(network-script /bin/true)
// 停用 NetworkManager 服務
#chkconfig NetworkManager off
#chkconfig network on
#service NetworkManager stop
#service network start
// 新增橋接網路設定檔
#cd /etc/sysconfig/network-scripts
#vi ifcfg-eth0
DEVICE=eth0
...
ONBOOT=yes
BRIDGE=br0
MTU=9000
Note: 增加 BRIDGE, MTU 兩個參數。
#vi ifcfg-br0
DEVICE=br0
TYPE=Bridge
BOOTPROTO=dhcp
ONBOOT=yes
DELAY=0
Notes: TYPE=Bridge,要注意大小寫的英文字。
#service network restart
// 設定 iptables
#iptables -I FORWARD -m physdev --physdev-is-bridged -j ACCEPT
#services iptables save
#services iptables restart
#vi /etc/sysctl.conf
增加這幾行
net.bridge.bridge-nf-call-ip6tables = 0
net.bridge.bridge-nf-call-iptables = 0
net.bridge.bridge-nf-call-arptables = 0
#sysctl -p /etc/sysctl.conf
#service libvirtd reload
// 檢查 橋接網路
#brctl show
bridge name bridge id STP enabled interfaces
br0 8000.0a4e52d7f15c no eth0
virbr0 8000.000000000000 yes
Notes: br0 是 bridged network; virbr0 是 NAT network,兩者各自獨立運作。
VM 設定完成。
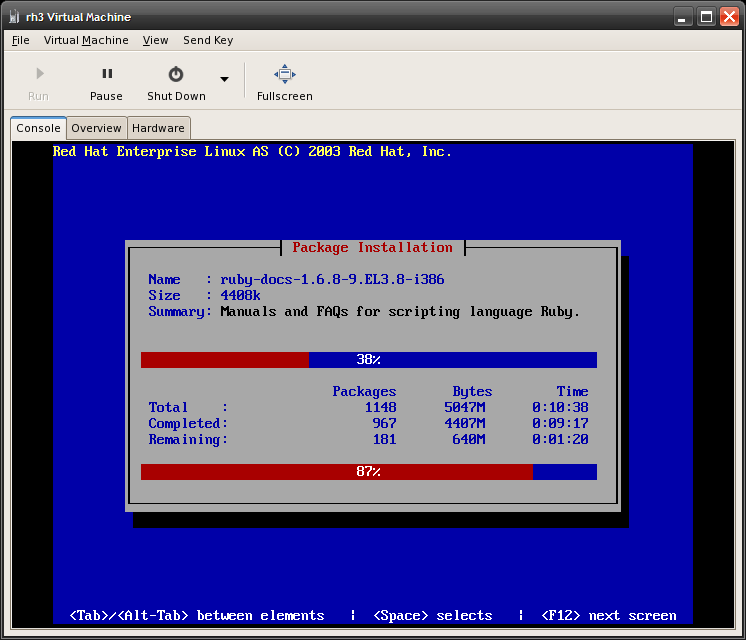
開始安裝 Guest OS

- Was this page helpful?
- 標籤 (Edit tags)
- 什麼連接到這裡
文件 11
| 文件 | 大小 | 日期 | 附件上傳者 | |||
|---|---|---|---|---|---|---|
| guest_os.png RHEM KVM - Guest OS | 22.64 KB | 13:09, 24 Dec 2009 | alang | 動作 | ||
| kvm_comparison.jpg KVM.VMware.Hyper-V Comparison | 99.85 KB | 17:32, 24 Dec 2009 | alang | 動作 | ||
| rhelkvm-boot_starting-2.png Guest OS Starting 2 | 22.96 KB | 12:20, 25 Dec 2009 | alang | 動作 | ||
| rhelkvm-boot_starting.png Guest OS Starting | 25.65 KB | 12:14, 25 Dec 2009 | alang | 動作 | ||
| rhelkvm-cpu_mem.png Allocate CPU & Memeory | 34.13 KB | 11:54, 25 Dec 2009 | alang | 動作 | ||
| rhelkvm-iso.png ISO Image | 23.65 KB | 11:49, 25 Dec 2009 | alang | 動作 | ||
| rhelkvm-method.png Virtualization Type | 28.86 KB | 11:46, 25 Dec 2009 | alang | 動作 | ||
| rhelkvm-network.png Network Type | 35.47 KB | 14:41, 25 Dec 2009 | alang | 動作 | ||
| rhelkvm-new_guest.png New guest OS | 20.59 KB | 11:43, 25 Dec 2009 | alang | 動作 | ||
| rhelkvm-os_type.png Guest OS type | 34.24 KB | 11:49, 25 Dec 2009 | alang | 動作 | ||
| RHELkvmSelect.png RHEL KVM - Select | 84.35 KB | 12:51, 24 Dec 2009 | alang | 動作 | ||
| Images 11 | ||
|---|---|---|
 RHEM KVM - Guest OSguest_os.png |  KVM.VMware.Hyper-V Comparisonkvm_comparison.jpg |  Guest OS Starting 2rhelkvm-boot_starting-2.png |
 Guest OS Startingrhelkvm-boot_starting.png |  Allocate CPU & Memeoryrhelkvm-cpu_mem.png |  ISO Imagerhelkvm-iso.png |
 Virtualization Typerhelkvm-method.png |  Network Typerhelkvm-network.png |  New guest OSrhelkvm-new_guest.png |
 Guest OS typerhelkvm-os_type.png |  RHEL KVM - SelectRHELkvmSelect.png | |


