內容表格
- 1. 【安裝及初始化設定】
- 2. 【基本操作】
- 2.1. 1.新增 SIP Trunk
- 2.2. 2.新增 Outbound Route
- 2.3. 3.新增 Dial Plan
- 2.4. 4.新增分機
- 2.5. 5.新增 Inbound Route
- 3. 【升級版本】
- 4. 【進階操作】
- 4.1. 與另一個 Asterisk 作互連
- 5. Q & A
- 6. 【延伸閱讀】
Asterisk GUI - Digium Inc. 釋出的Web管理介面工具,開放原始碼授權,使用 Asterisk 內建的 mini-HTTP server,所以無須額外的 Web Server engine。
我們把這篇放這目地是,因為目前大家已用慣FreePBX管理介面.大概只有用於embedded system上 才會有必要換此輕量GUI管理介面.
更多文章
【基本操作】
1.新增 SIP Trunk
以 iptel.org 為例
UI > Trunks > VOIP Trunks > New SIP/IAX Trunk
Type: SIP
Context Naming: Assigned by Asterisk GUI
Provider Name: iptel
Hostname: iptel.org
Username: <sip_username>
Password: <sip_password>
儲存設定後,再做一次編輯,可以看到一些其他的設定項,修改這一項
insecure: very

以 Pennytel 為例

注意:
在 UI 上做完任何設定後,必須按右上角的 Apply Changes,系統才會套用新設定。
2.新增 Outbound Route
以指定外線需要先撥一個前置碼 013 為例
UI > Outgoing Calling Rules > New Calling Rule
Calling Rule Name: iptel
Pattern: _013
Send this call through trunk:
-> Use Trunk: iptel
-> Strip: 3
-> and Prepend these digits: 空白

3.新增 Dial Plan
建一個分機可內撥及外撥的 dial plan,命名為 internal。
UI > Dial Plans > New Dialplan
DialPlan Name: internal
Include Outgoing Calling: iptel
Include Local Contexts: 全選
註:
include outgoing calling 可外撥的 Trunk。
include local contexts 可撥內部分機、群組等等內線功能。

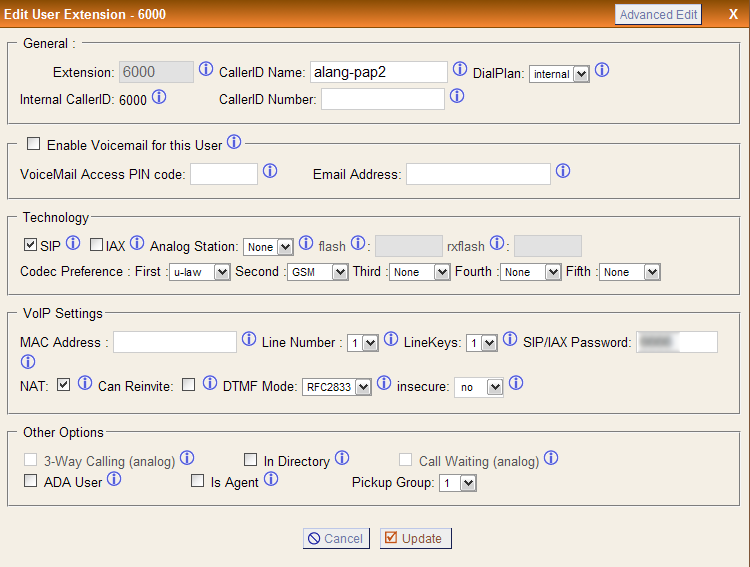
4.新增分機
UI > Users > Create New User
Extension: 6000 預設起始分機號
CallerID Name: 分機名稱(英文)
DialPlan: internal
Technology:
-> SIP
VoIP Settings:
-> NAT, Password
其他欄位:保持空白或預設值
註:
這裡所作的分機設定不管是 SIP 或 IAX2 都會寫入 users.conf,而非較常見的 sip.conf/iax.conf 設定檔,不過兩者用法是一樣的。
5.新增 Inbound Route
UI > Incoming Calling Rules > New Incoming Rule
Trunk: iptel
Time Interval: None
Pattern: s
Destination: 分機號碼
Tips:
s 表示接受所有 CallerID 的來電。
_2NXXXX 接受 CallerID 是 2 開頭的來電。
【升級版本】
使用 Linux 安裝)
#>cd /usr/src/
#>svn co http://svn.digium.com/svn/asterisk-gui/branches/2.0 asterisk-gui
#>cd asterisk-gui
#>sh configure && make && make install
使用 Embedded System 安裝)
由於在 embedded system 無法直接進行編譯作業,所以請下載本站預先編譯好的程式,安裝注意事項如下:
- 適用 DD-WRT 環境。
- 主要指令/設定檔的路徑必須是
Asterisk 設定檔 - /opt/etc/asterisk
Asterisk GUI - /opt/var/lib/asterisk
Asterisk Sound - /opt/var/lib/asterisk
從本篇的附加檔案區下載最新版本,並使用 WinSCP 工具上傳到 DD-WRT 的 USB drive,路徑以本站教學-IP PBX ASUS WL-520GU 改裝篇 為例是 /mnt/。
先備份舊版本 >
#>cd /opt/var/lib/asterisk
#>mv scripts scripts_bak
#>mv static-http static-http_bak
安裝新版本 >
#>cd /mnt
#>tar -xzf astgui20_build-r4991_ddwrt_by_20091122.tar.gz
#>cd astgui20_build-r4991_ddwrt_by_20091122
#>cp -R scripts static-http /opt/var/lib/asterisk
重啟 Asterisk 服務
註:如果 GUI 網頁無法正常進入,可以將 /opt/etc/asterisk 的所有設定檔,先回復成預設狀態後再試試看。
【進階操作】
與另一個 Asterisk 作互連
Asterisk#1)
Host IP = 192.168.1.1
Extension = 1XXX
Context Name = default-ast1 ;這個 context 必須可以撥 1XXX 所有分機,可以和分機所用的 context 相同。
Asterisk#2)
Host IP = 192.168.1.2
Extension = 2XXX
Context Name = default-ast2 ;這個 context 必須可以撥 2XXX 所有分機,可以和分機所用的 context 相同。
在 Asterisk#1
1. 開啟進階功能選項
UI > Options > Advanced Options > Show Advanced Options
2. 新增 IAX trunk
UI > File Editor > iax.conf > Add Context > 輸入 ast-2-interconnect,內容有
type=friend
host=192.168.1.2
trunk=yes
disallow=all
allow=ulaw
qualify=yes
context=default-ast1
peercontext=default-ast2
3. 新增 Outbound Route
UI > File Editor > extensions.conf > Add Context > 輸入 trunk_out,內容有
exten=_016.,1,Macro(trunkdial,IAX2/ast-2-interconnect/${EXTEN:3})
註:這裡的撥號規則設定是 016 + 對方的分機號碼。
在 Asterisk#2
1. 開啟進階功能選項
UI > Options > Advanced Options > Show Advanced Options
2. 新增 IAX trunk
UI > File Editor > iax.conf > Add Context > 輸入 ast-1-interconnect,內容有
type=friend
host=192.168.1.1
trunk=yes
disallow=all
allow=ulaw
qualify=yes
context=default-ast2
peercontext=default-ast1
3. 新增 Outbound Route
UI > File Editor > extensions.conf > Add Context > 輸入 trunk_out,內容有
exten=_016.,1,Macro(trunkdial,IAX2/ast-1-interconnect/${EXTEN:3})
註:這裡的撥號規則設定是 016 + 對方的分機號碼。
Q & A
Q: 設定 URL 只要輸入位址就能導向首頁登入
A: 編輯 /etc/http.conf
bindaddr = 0.0.0.0
bindport = 80
prefix =
enablestatic = yes
redirect = / /static/config/index.html
驗證設定
>asterisk -rx "http show status"
HTTP Server Status:
Prefix:
Server Enabled and Bound to 0.0.0.0:80
Enabled URI's:
/httpstatus => Asterisk HTTP General Status
/phoneprov/... => Asterisk HTTP Phone Provisioning Tool
/amanager => HTML Manager Event Interface w/Digest authentication
/arawman => Raw HTTP Manager Event Interface w/Digest authentication
/manager => HTML Manager Event Interface
/rawman => Raw HTTP Manager Event Interface
/static/... => Asterisk HTTP Static Delivery
/amxml => XML Manager Event Interface w/Digest authentication
/mxml => XML Manager Event Interface
Enabled Redirects:
/ => /static/config/index.html
Q: 開啟 Debug 模式,以方便程式開發及除錯
A:編輯 config/js/session.js
log: true, /**< boolean toggling logging */
- Was this page helpful?
- 標籤 (Edit tags)
- 什麼連接到這裡
文件 8
| 文件 | 大小 | 日期 | 附件上傳者 | |||
|---|---|---|---|---|---|---|
| AST-AsteriskGUI-201112-0125-51272.pdf 安裝教學 | 13.3 KB | 15:34, 20 Nov 2012 | alang | 動作 | ||
| astgui-dialplans.png Dial Plans | 9.12 KB | 14:45, 1 Nov 2009 | alang | 動作 | |
 | astgui-home.png Home | 89.4 KB | 14:32, 1 Nov 2009 | alang | 動作 | |
| astgui-outgoing_call.png Outgoing Call | 20.25 KB | 14:45, 1 Nov 2009 | alang | 動作 | |
| astgui-pennytel.png Pennytel Trunk | 35.29 KB | 08:51, 3 Jan 2010 | alang | 動作 | |
| astgui-trunks.png Trunks | 18.85 KB | 14:44, 1 Nov 2009 | alang | 動作 | |
| astgui-users.png Users | 33.65 KB | 17:08, 1 Nov 2009 | alang | 動作 | |
| astgui20_build-r4991_ddwrt_by_20091122.tar.gz Asterisk GUI r4991 for DD-WRT | 468.34 KB | 00:28, 28 Nov 2009 | alang | 動作 | ||
| Images 6 | ||
|---|---|---|
 Dial Plansastgui-dialplans.png |  Homeastgui-home.png |  Outgoing Callastgui-outgoing_call.png |
 Pennytel Trunkastgui-pennytel.png |  Trunksastgui-trunks.png |  Usersastgui-users.png |