- Gather feedback on your content with community scoring - these ratings weight results in adaptive search. Through curation analytics, ratings are used to highlight pages in need of attention. Learn more on enabling these capabilities with MindTouch 2010.
內容表格
沒有標頭

直接使用市面上玩家現有 Atmega 168 LCD 模組 改成Arduino bootloader 可以在開發方面簡化
原作品資料:
http://www.syyyd.com/forum.php?mod=v...extra=page%3D1
原作品應用方向:
1.自動與電腦對時顯示時鐘.有獨立供電
2.內建熱敏電組 ,溫度計顯示.
3.內建紅外線接收.可被搖控器搖控
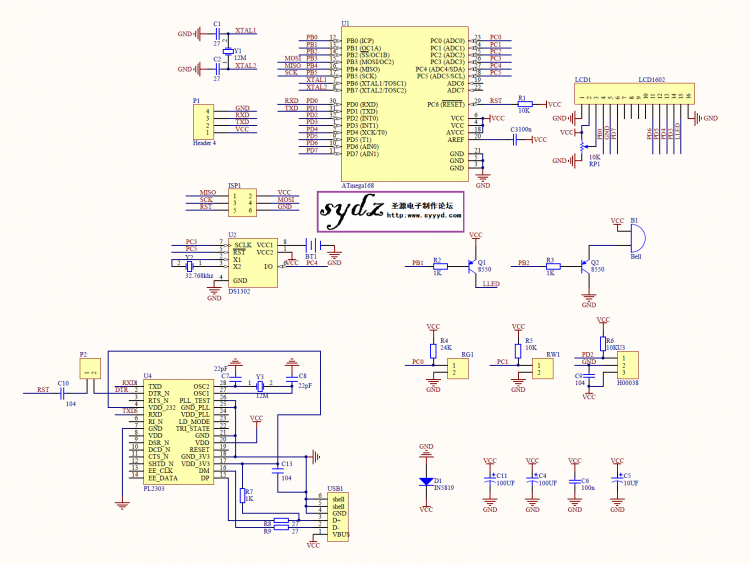
電路圖: 點擊可放大
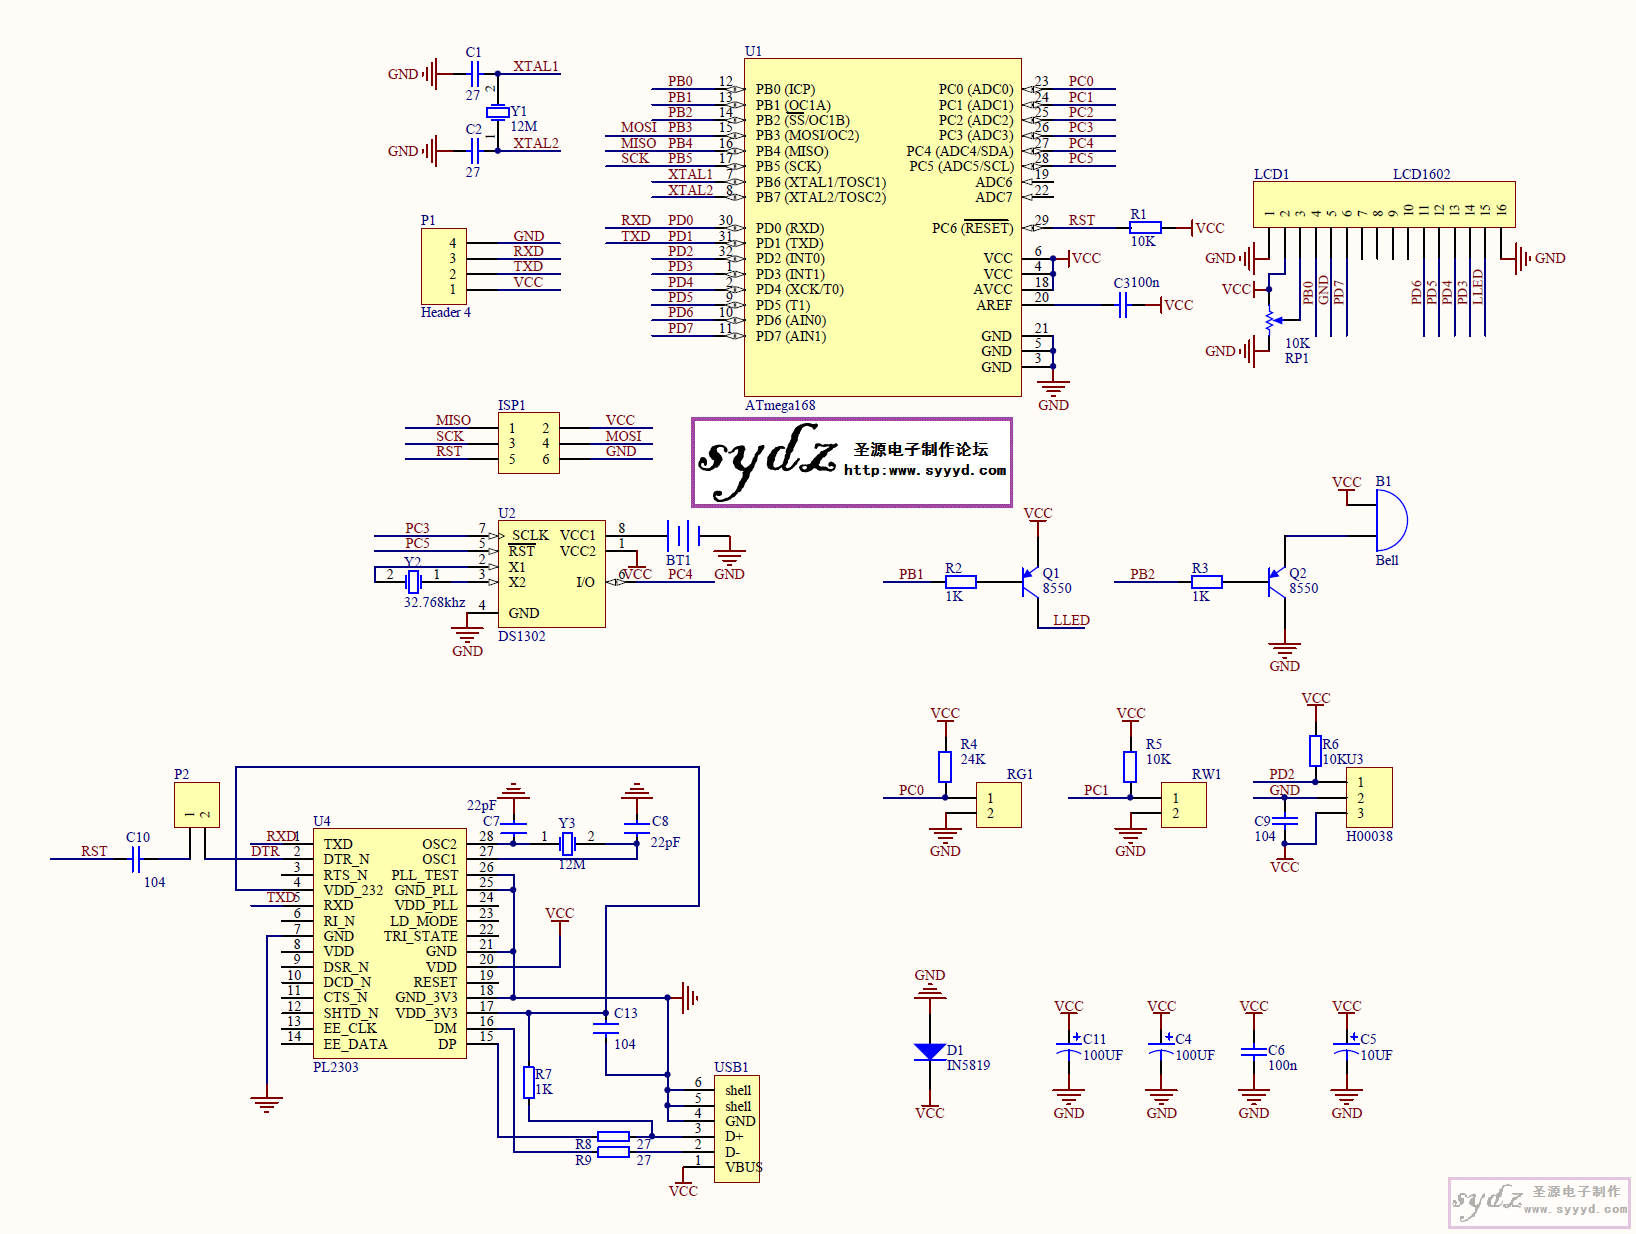
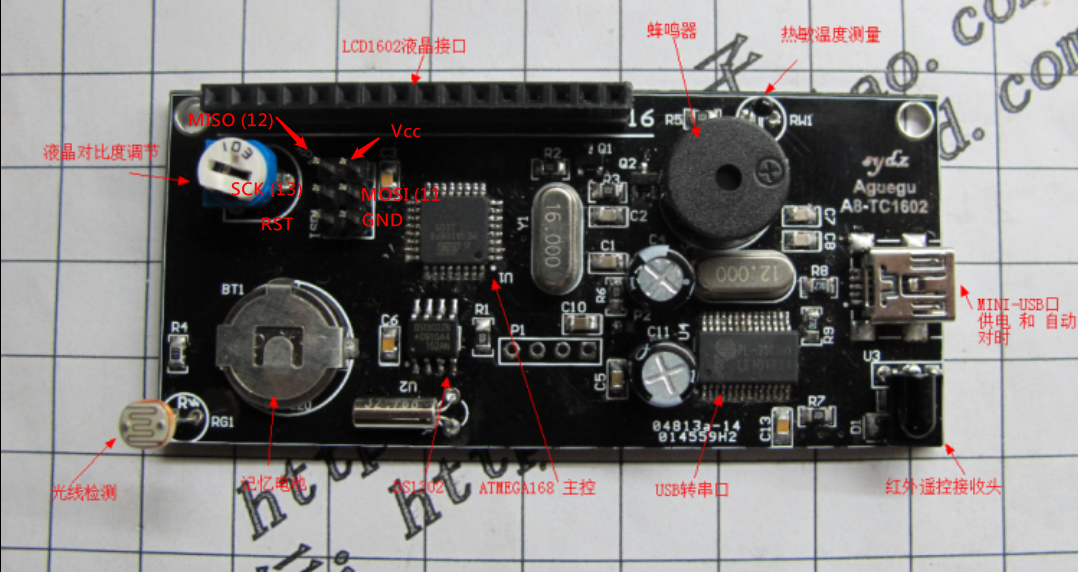
腳位定義:
OSSLab 預定修改應用
1.IRDA 解碼器.解碼後再輸入於Sling box 或是等智慧型家電應用
2.增加紅外線發射電路.
3.可用於一些embedded 設備 (WR703 或ARM 設備) 開發一些需要用到LCD 顯示的應用
包含Router 監控
網路電台等應用..
目前完工
要短路Auto reset J4 enable 後 在板上P1 點 啟動(圖待補)
才能以另外一張Arduino uno 燒錄Arduino nano 16Mhz bootloader 進此硬體電路板 (圖待補)
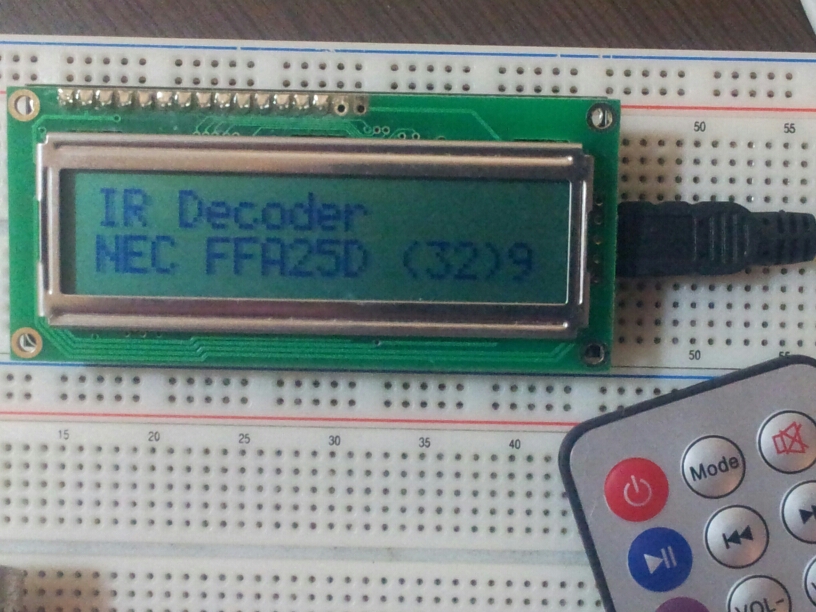
上傳紅外線解碼程式成功 可在串口終端看到正確解碼訊號
LCD 測試
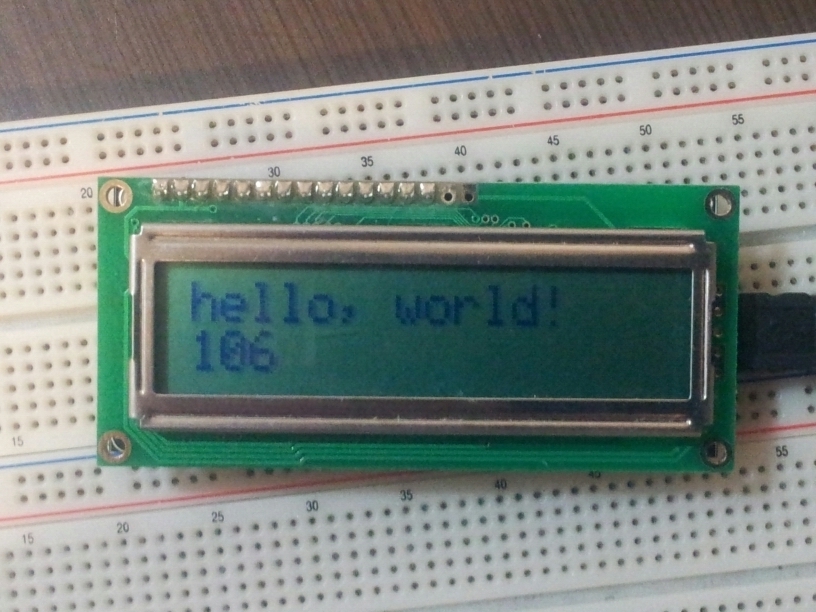
/*  在 2x16 LCD 上顯示 "Hello World" 訊息

  The circuit 電路:

 * LCD RS pin to digital pin 8

 * LCD Enable pin to digital pin 7

 * LCD D4 pin to digital pin 6

 * LCD D5 pin to digital pin 5

 * LCD D6 pin to digital pin 4

 * LCD D7 pin to digital pin 3

 * 10K Potentiometer:

 * ends to +5V and ground

 * wiper to LCD VO pin (pin 3)


 This example code is in the public domain.

 http://www.arduino.cc/en/Tutorial/LiquidCrystal

 */

// 引用 LiquidCrystal Library

#include <LiquidCrystal.h>


// 建立 LiquidCrystal 的變數 lcd

//                 LCD 接腳:  rs, enable, d4, d5, d6, d7

//                 LCD pin    4,   6,     11, 12, 13, 14

//      對應到 Arduino 接腳:  8,     7,  6,  5,  4,  3

LiquidCrystal lcd(8, 7, 6, 5, 4, 3);


void setup() {

  // 設定 LCD 的行列數目 (2 x 16)

  lcd.begin(16, 2);


  // 列印 "Hello World" 訊息到 LCD 上

  lcd.print("hello, world!");

}


void loop() {

  // 將游標設到 column 0, line 1

  // (注意: line 1 是第二行(row), 因為是從 0 開始數起):

  lcd.setCursor(0, 1);


  // 列印 Arduino 重開之後經過的秒數

  lcd.print(millis()/1000);

}
----------------------------------------
讓 LCD 可以顯示紅外線解碼
參考資料:
http://coopermaa2nd.blogspot.tw/2011...r-decoder.html
http://coopermaa2nd.blogspot.tw/2011/03/irremote.html
參考資料: http://coopermaa2nd.blogspot.tw/2011/03/14-lcd-ir-decoder.html
符合本PCB程式碼:
/*
* IRDecoder_LCD.pde: 自製 LCD 介面的紅外線解碼器(IR Decoder)
*/
#include <LiquidCrystal.h> // 引用 LiquidCrystal 函式庫
#include <IRremote.h> // 引用 IRRemote 函式庫
// 建立 LiquidCrystal 的變數 lcd
// LCD 接腳: rs, enable, d4, d5, d6, d7
// LCD pin 4, 6, 11, 12, 13, 14
// 對應到 Arduino 接腳: 8, 7, 6, 5, 4, 3
LiquidCrystal lcd(8, 7, 6, 5, 4, 3);
const int irReceiverPin = 2; // 紅外線接收器 OUTPUT 訊號接在 pin 2
IRrecv irrecv(irReceiverPin); // 定義 IRrecv 物件來接收紅外線訊號
decode_results results; // 解碼結果將放在 decode_results 結構的 result 變數裏
void setup() {
lcd.begin(16, 2); // 設定 LCD 的行列數目 (2 x 16)
lcd.print("IR Decoder"); // 列印 "IR Decoder" 訊息到 LCD 上
irrecv.blink13(true); // 收到紅外線時, 讓板子上 pin 13 的指示燈閃爍幾下
irrecv.enableIRIn(); // 啟動紅外線解碼
}
// 顯示紅外線協定種類
void showIRProtocol(decode_results *results)
{
// 判斷紅外線協定種類
switch(results->decode_type) {
case NEC:
lcd.print("NEC");
break;
case SONY:
lcd.print("SONY");
break;
case RC5:
lcd.print("RC5");
break;
case RC6:
lcd.print("RC6");
break;
default:
lcd.print("Unknown");
}
// 把紅外線編碼印到 LCD 上
lcd.print(" ");
lcd.print(results->value, HEX); // 紅外線編碼
lcd.print(" (");
lcd.print(results->bits); // 紅外線編碼位元數
lcd.print(")");
}
void loop() {
// 將游標設到 column 0, line 1
// 注意: line 1 是第二行(row),line 0 是第一行(row)
lcd.setCursor(0, 1);
if (irrecv.decode(&results)) { // 解碼成功,收到一組紅外線訊號
if (results.value != -1) {
showIRProtocol(&results); // 顯示紅外線協定種類
}
irrecv.resume(); // 繼續收下一組紅外線訊號
}
}
預定進度
1.增加紅外線發射Led 模組 硬體簡單
目前IRremote Lib 用Pin 3做 IRDA PWM out
LCD Lib 也會用到... 要修改Lib
2.增加 Linux LCD to Kenrel 顯示
http://www.harbaum.org/till/lcd2usb/index.shtml
http://ssl.bulix.org/projects/lcd4linux/
...porting 到mips or arm上 分享出Arduino code 以方便大家處理
希望 可在openwrt 架構下硬體 用LCD 顯示 IP ,router 狀況,用紅外線遙控器 設定IP 或是基本無線網路設定
http://milesburton.com/USD_LCD_Displ...ux_via_Arduino
- Was this page helpful?
- 標籤 (Edit tags)
- 什麼連接到這裡
文件 7
| 文件 | 大小 | 日期 | 附件上傳者 | |||
|---|---|---|---|---|---|---|
| 123245cewgjjv0ok3ygk0m.png 無描述 | 239.64 KB | 23:59, 18 Aug 2012 | thx | 動作 | |
 | 123245cewgjjv0ok3ygk0m.png.thumb.jpg 無描述 | 362.45 KB | 16:34, 18 Aug 2012 | coopermaa | 動作 | |
| 2012-08-18_16h10_06.png 無描述 | 1176.34 KB | 16:33, 18 Aug 2012 | coopermaa | 動作 | |
| 60718614612.jpg 無描述 | 345.7 KB | 22:46, 18 Aug 2012 | coopermaa | 動作 | |
| 60734089559.jpg 無描述 | 366.72 KB | 23:00, 18 Aug 2012 | coopermaa | 動作 | |
| A168++TC160时钟+V2.0+20120816.rar 無描述 | 10.69 MB | 16:53, 18 Aug 2012 | thx | 動作 | ||
| TCA1602_20120526.hex 無描述 | 39.06 KB | 17:08, 18 Aug 2012 | thx | 動作 | ||


