OSSEC & FreePBX
內容表格
在SheevaPlug Debian Squeeze上安裝Asterisk/FreePBX後, 在網路安全防護機制上有欠缺,功能強大,有支援Asterisk安全防護機制又免費的網路安全防護系統,那就非OSSEC主機型入侵偵測系統莫屬了.
OSSEC主機型入侵偵測系統自1.5版開始支援Asterisk安全模組,截至目前為止(2010-11-30),版本為2.5.1.
有關OSSEC主機型入侵偵測系統詳細說明,請參閱所附參考資料來源.
A.安裝OSSEC主機型入侵偵測系統步驟:
Code:
cd /root

wget http://www.ossec.net/files/ossec-hids-latest.tar.gz

tar -zxvf ossec-hids-*.tar.gz

rm ossec-hids-*.tar.gz

cd ossec-hids-*

./install.sh
執行./install.sh後會出現對話式問答, 以下 *號部份可能會出現亂碼,不必理會, 要注意紅色字樣部份:
** Para instalaA§A£o em portuguAas, escolha [br].
** e|a??c”‥a﹐-a–?e??e!?aR?e£…, e¯·e€?a?c [cn].
** Fur eine deutsche Installation wohlen Sie [de].
** I“I1I± IμI3IoI±I?I?I?I?I±I?I· I?I?I± I‧I?I?I·I?I1IoI?, IμI€I1I?I-I?I?Iμ [el].
** For installation in English, choose [en].
** Para instalar en EspaA±ol , eliga [es].
** Pour une installation en franA§ais, choisissez [fr]
** Per l'installazione in Italiano, scegli [it].
** a—¥a??ea?a§a??a?3a?1a??a??a??a—a?a?i??e﹐a??a—a|a﹐?a‧a?i??[jp].
** Voor installatie in het Nederlands, kies [nl].
** Aby instalowaA? w jA?zyku Polskim, wybierz [pl].
** D”D?N D﹐D?NN?N€N?DoN?D﹐D1 D?D? N?NN?D°D?D?D2DoDμ D?D° N€N?NNDoD?D? ,D2D2DμD’D﹐N?Dμ [ru].
** Za instalaciju na srpskom, izaberi [sr].
** TA?rkA§e kurulum iA§in seA§in [tr].
(en/br/cn/de/el/es/fr/it/jp/nl/pl/ru/sr/tr) [en]: 按Enter鍵
OSSEC HIDS v2.5.1 Installation Script - http://www.ossec.net
You are about to start the installation process of the OSSEC HIDS.
You must have a C compiler pre-installed in your system.
If you have any questions or comments, please send an e-mail
to dcid@ossec.net (or daniel.cid@gmail.com).
- System: Linux debian 2.6.32-5-kirkwood
- User: root
- Host: debian
-- Press ENTER to continue or Ctrl-C to abort. -- 按Enter鍵
以下安裝類別選用說明:
a.server:除了監控自身主機外還可將區網內其它Windows, Linux等主機納入監控,這樣所有主機的安全狀態都在這裡,當然就是選用它了.
b.agent:這須與a.server併用,將自身主機完全依附由server主機端監控,自身主機無監控功能.
c.local:僅負責監控自身主機,既不受server主機端監控,也不能監控其它主機,如果Asterisk/FreePBX主機不必監控其它主機,就選它.
1- What kind of installation do you want (server, agent, local or help)? server
- Server installation chosen.
2- Setting up the installation environment.
- Choose where to install the OSSEC HIDS [/var/ossec]: 按Enter鍵
- Installation will be made at /var/ossec .
3- Configuring the OSSEC HIDS.
3.1- Do you want e-mail notification? (y/n) [y]: 按Enter鍵
- What's your e-mail address? jackooo@gmail.com
- We found your SMTP server as: gmail-smtp-in.l.google.com.
- Do you want to use it? (y/n) [y]: n
- What's your SMTP server ip/host? localhost
3.2- Do you want to run the integrity check daemon? (y/n) [y]: 按Enter鍵
- Running syscheck (integrity check daemon).
3.3- Do you want to run the rootkit detection engine? (y/n) [y ]: 按Enter鍵
- Running rootcheck (rootkit detection).
3.4- Active response allows you to execute a specific
command based on the events received. For example,
you can block an IP address or disable access for
a specific user.
More information at:
http://www.ossec.net/en/manual.html#active-response
- Do you want to enable active response? (y/n) [y]: 按Enter鍵
- Active response enabled.
- By default, we can enable the host-deny and the
firewall-drop responses. The first one will add
a host to the /etc/hosts.deny and the second one
will block the host on iptables (if linux) or on
ipfilter (if Solaris, FreeBSD or NetBSD).
- They can be used to stop SSHD brute force scans,
portscans and some other forms of attacks. You can
also add them to block on snort events, for example.
- Do you want to enable the firewall-drop response? (y/n) [y]: 按Enter鍵
- firewall-drop enabled (local) for levels >= 6
- Default white list for the active response:
- 192.168.1.1
以下如果要讓區網內其它主機不受Ossec server主機阻斷,就再加入特定IP或全區網段通行,都是自家人使用,所以我選用全區網段:
- Do you want to add more IPs to the white list? (y/n)? [n]: y
- IPs (space separated): 192.168.1.0/24
3.5- Do you want to enable remote syslog (port 514 udp)? (y/n) [y]: 按Enter鍵
- Remote syslog enabled.
3.6- Setting the configuration to analyze the following logs:
-- /var/log/messages
-- /var/log/auth.log
-- /var/log/syslog
-- /var/log/mail.info
-- /var/log/dpkg.log
-- /var/log/apache2/error.log (apache log)
-- /var/log/apache2/access.log (apache log)
- If you want to monitor any other file, just change
the ossec.conf and add a new localfile entry.
Any questions about the configuration can be answered
by visiting us online at http://www.ossec.net .
--- Press ENTER to continue --- 按Enter鍵
開始編譯Ossec過程,請稍後...
編譯完成後會出現下列訊息:
- System is Debian (Ubuntu or derivative).
- Init script modified to start OSSEC HIDS during boot.
- Configuration finished properly.
- To start OSSEC HIDS:
/var/ossec/bin/ossec-control start
- To stop OSSEC HIDS:
/var/ossec/bin/ossec-control stop
- The configuration can be viewed or modified at /var/ossec/etc/ossec.conf
Thanks for using the OSSEC HIDS.
If you have any question, suggestion or if you find any bug,
contact us at contact@ossec.net or using our public maillist at
ossec-list@ossec.net
( http://www.ossec.net/main/support/ ).
More information can be found at http://www.ossec.net
--- Press ENTER to finish (maybe more information below). --- 按Enter鍵
- In order to connect agent and server, you need to add each agent to the server.
Run the 'manage_agents' to add or remove them:
/var/ossec/bin/manage_agents
More information at:
http://www.ossec.net/en/manual.html#ma
B.編輯ossec.conf檔,讓Ossec Server隨時將監控及反制入侵者之相關資料寄到所指定電子信箱:
Code:
nano -w /var/ossec/etc/ossec.conf
<ossec_config>
<global>
<email_notification>yes</email_notification>
<email_to>jackooo@gmail.com</email_to>
<smtp_server>localhost</smtp_server>
<email_from>ossecm@dyndns.org</email_from>
</global>
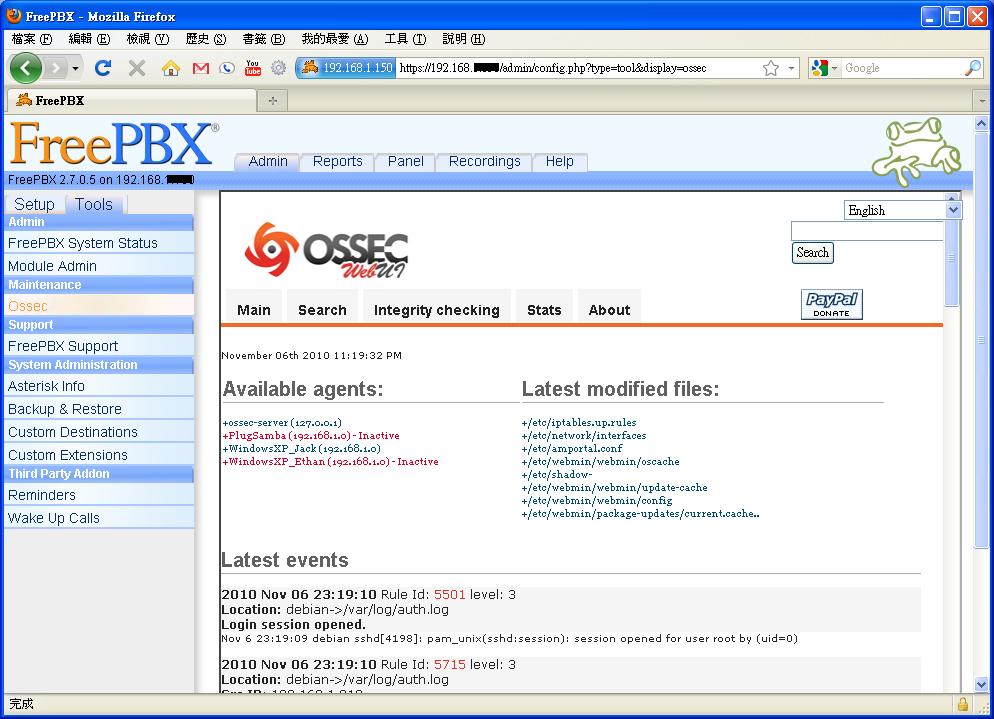
C.在FreePBX安裝Ossec Server Web介面:
1.為FreePBX安裝Ossec Server Web介面之前,先將asterisk這參數填入/etc/group 之ossec這一行末:
Code:
sed -i '/ossec:/s|$|asterisk|' /etc/group
2.接著將主機重新啟動,套用新設定:
Code:
reboot
3.主機重新開機後繼續安裝OSSEC module - ossec-1.0.2.tgz for FreePBX:
從http://www.fonicaprojects.com/wiki/index.php/FreePBX_Module:_OSSEC 網頁下載ossec-1.0.2.tgz檔到Windows桌面
打開FreePBX-> Tools-> Module Admin-> Upload Module-> 瀏覽-> 桌面-> ossec-1.0.2.tgz
點按Upload 後再到Module Administration-> Maintenance-> OSSEC-> Install
完成安裝後,在左頁Tools-> 點按OSSEC 可看到Ossec Server Web介面如下圖示:
D.編輯IPTables,讓區網內其它Windows, Linux等主機也可連入Ossec Server以利納入監視:
Code:
nano -w /etc/iptables.up.rules
# Allow connections from Ossec Agents to our Ossec Server
-A INPUT -p udp -m udp -s 192.168.1.0/24 --dport 1514 -j ACCEPT
E.檢查logger.conf檔,要將message, full及syslog.local0前之註解取消:
Code:
nano -w /etc/asterisk/logger.conf
messages => notice,warning,error
full => notice,warning,error,debug,verbose
syslog.local0 => notice,warning,error
改好之後記得要 reload:
asterisk -rx "logger reload"
F.有用之語法:
Code:
/var/ossec/bin/ossec-control stop
/var/ossec/bin/ossec-control start
/var/ossec/bin/ossec-control restart
/var/ossec/bin/manage_agents
ps -ef | grep ossec
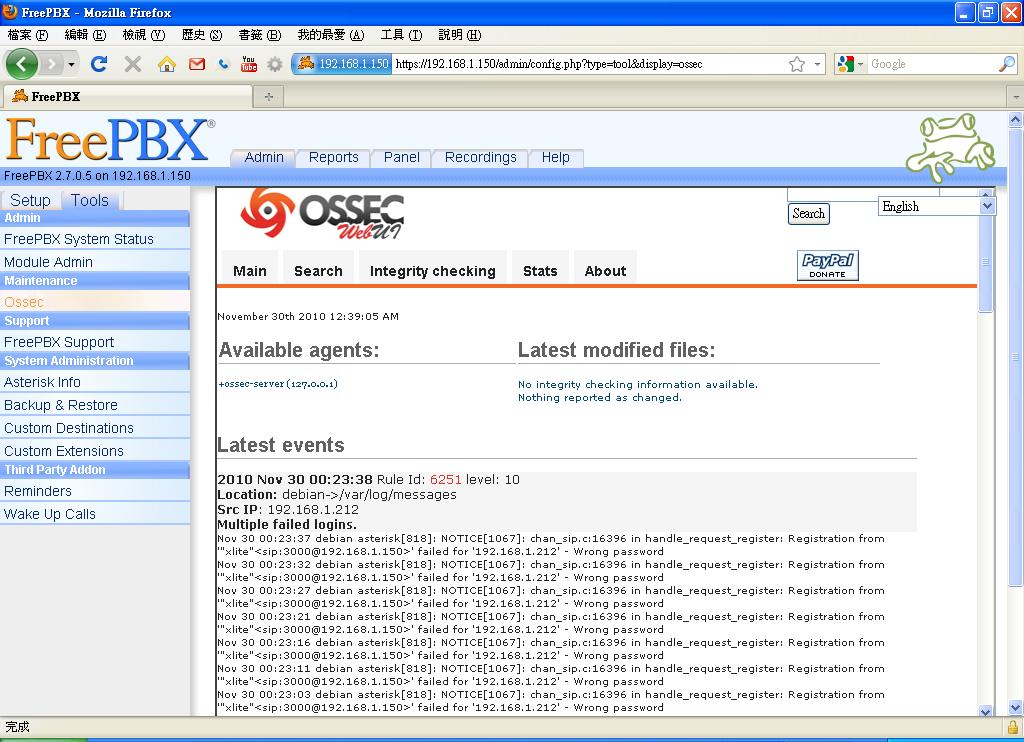
G.手動測試Asterisk遭來源IP-192.168.1.21入侵後Ossec的反應情形:
1.使用錯誤密碼連續向Asterisk 註冊九次後Ossec啟動反制封鎖機制並寄出遭入侵訊息的email 內容:
Received From: debian->/var/log/messages
Rule: 6251 fired (level 10) -> "Multiple failed logins."
Portion of the log(s):
Nov 29 18:13:10 debian asterisk[818]: NOTICE[1067]: chan_sip.c:16396 in handle_request_register: Registration from '"xlite"<sip:1000@192.168.1.55>' failed for '192.168.1.21' - Wrong password
Nov 29 18:13:00 debian asterisk[818]: NOTICE[1067]: chan_sip.c:16396 in handle_request_register: Registration from '"xlite"<sip:1000@192.168.1.55>' failed for '192.168.1.21' - Wrong password
Nov 29 18:12:51 debian asterisk[818]: NOTICE[1067]: chan_sip.c:16396 in handle_request_register: Registration from '"xlite"<sip:1000@192.168.1.55>' failed for '192.168.1.21' - Wrong password
Nov 29 18:12:43 debian asterisk[818]: NOTICE[1067]: chan_sip.c:16396 in handle_request_register: Registration from '"xlite"<sip:1000@192.168.1.55>' failed for '192.168.1.21' - Wrong password
Nov 29 18:12:34 debian asterisk[818]: NOTICE[1067]: chan_sip.c:16396 in handle_request_register: Registration from '"xlite"<sip:1000@192.168.1.55>' failed for '192.168.1.21' - Wrong password
Nov 29 18:12:26 debian asterisk[818]: NOTICE[1067]: chan_sip.c:16396 in handle_request_register: Registration from '"xlite"<sip:1000@192.168.1.55>' failed for '192.168.1.21' - Wrong password
Nov 29 18:12:19 debian asterisk[818]: NOTICE[1067]: chan_sip.c:16396 in handle_request_register: Registration from '"xlite"<sip:1000@192.168.1.55>' failed for '192.168.1.21' - Wrong password
2.使用錯誤之分機號及密碼連續向Asterisk 註冊七次後Ossec啟動反制封鎖機制並寄出遭入侵訊息的email 內容:
Received From: debian->/var/log/messages
Rule: 6252 fired (level 10) -> "Extension enumeration."
Portion of the log(s):
Nov 29 14:57:09 debian asterisk[818]: NOTICE[1067]: chan_sip.c:16396 in handle_request_register: Registration from '"xlite"<sip:700@192.168.1.55>' failed for '192.168.1.21' - No matching peer found
Nov 29 14:57:02 debian asterisk[818]: NOTICE[1067]: chan_sip.c:16396 in handle_request_register: Registration from '"xlite"<sip:700@192.168.1.55>' failed for '192.168.1.21' - No matching peer found
Nov 29 14:56:56 debian asterisk[818]: NOTICE[1067]: chan_sip.c:16396 in handle_request_register: Registration from '"xlite"<sip:700@192.168.1.55>' failed for '192.168.1.21' - No matching peer found
Nov 29 14:56:50 debian asterisk[818]: NOTICE[1067]: chan_sip.c:16396 in handle_request_register: Registration from '"xlite"<sip:700@192.168.1.55>' failed for '192.168.1.21' - No matching peer found
Nov 29 14:56:44 debian asterisk[818]: NOTICE[1067]: chan_sip.c:16396 in handle_request_register: Registration from '"xlite"<sip:700@192.168.1.55>' failed for '192.168.1.21' - No matching peer found
Nov 29 14:56:37 debian asterisk[818]: NOTICE[1067]: chan_sip.c:16396 in handle_request_register: Registration from '"xlite"<sip:700@192.168.1.55>' failed for '192.168.1.21' - No matching peer found
Nov 29 14:56:31 debian asterisk[818]: NOTICE[1067]: chan_sip.c:16396 in handle_request_register: Registration from '"xlite"<sip:700@192.168.1.55>' failed for '192.168.1.21' - No matching peer found
3.在FreePBX頁面OSSEC之顯示:
參考資料來源:
http://www.ossec.net/main/manual/man...ation/#install
http://www.fonicaprojects.com/wiki/i..._Module:_OSSEC
http://www.netadmin.com.tw/article_c...?sn=0810030005
http://www.fonicaprojects.com/wiki/i...caPABX-Install
- 標籤 (Edit tags)
- 什麼連接到這裡
文件 2
| 文件 | 大小 | 日期 | 附件上傳者 | |||
|---|---|---|---|---|---|---|
 | fpbx-ossec-2.JPG fpbx-ossec-2 | 170.55 KB | 12:00, 30 Nov 2010 | jack | 動作 | |
| fpbx-ossec-3.JPG fpbx-ossec-3 | 157 KB | 12:00, 30 Nov 2010 | jack | 動作 | |
| Images 2 | ||
|---|---|---|
 fpbx-ossec-2fpbx-ossec-2.JPG |  fpbx-ossec-3fpbx-ossec-3.JPG | |