OSSLab::開放軟體實驗室(Open Source Software Lab) > VoIP > IP PBX > 軟體式 IP PBX > Asterisk - 免費 IP PBX 網路電話交換平台 > Tips > 如何安裝 codec g.729 & g.723
內容表格
- 1. 延伸閱讀
此篇適用 Elastix、Trixbox及 PBXinaFlash 等用戶,以手動方式安裝語音編碼,如需要自動安裝請參考 Codec 自動安裝工具。
下載適合自己機器及軟體版本的模組檔,基本上略分為 pentium/pentium2/pentium3/x86_64,Asterisk 1.2/1.4/1.6。
前往 http://asterisk.hosting.lv/
Note: 在 Linux 要檢查 CPU 資訊,可以執行 cat /proc/cpuinfo。
安裝 codec 只需要將模組檔複製到 Asterisk 主機上,目錄為 /usr/lib/asterisk/modules。
#cp codec_g723-ast14-gcc4-glibc-pentium3.so /usr/lib/asterisk/modules
#cp codec_g729-ast14-gcc4-glibc-pentium3.so /usr/lib/asterisk/modules
#chmod 0755 /usr/lib/asterisk/modules/codec_g723-ast14-gcc4-glibc-pentium3.so
#chmod 0755 /usr/lib/asterisk/modules/codec_g729-ast14-gcc4-glibc-pentium3.so
然後,重新啟動 asterisk 套用新模組檔
#asterisk -rx "stop now"
#amportal stop
#amportal start
Note: 如果不想停止服務,可以在 CLI 載入模組檔,請執行:
#asterisk -rx "load codec_g723-ast14-gcc4-glibc-pentium3.so"
#asterisk -rx "load codec_g729-ast14-gcc4-glibc-pentium3.so"
到這裡,如果沒有發生任何錯誤,codec 就已經安裝完成,但 Asterisk 預設並未啟用這兩個額外裝的 codec,所以繼續下一步將它們啟用。
Elastix UI -> PBX -> Tools -> File Editor 搜尋 sip_general_custom.conf,加上這幾行。
allow=g729
allow=g723
存檔離開,選擇 Asterisk-Cli,輸入 sip reload 按執行,套用新設定。
最後,檢查系統是否已支援 codec g.729 & g.723:
Elastix UI -> PBX -> Toosl -> Asterisk-Cli,執行 core show translation recalc 10。
列表中,不能全出現 - 就可以了。
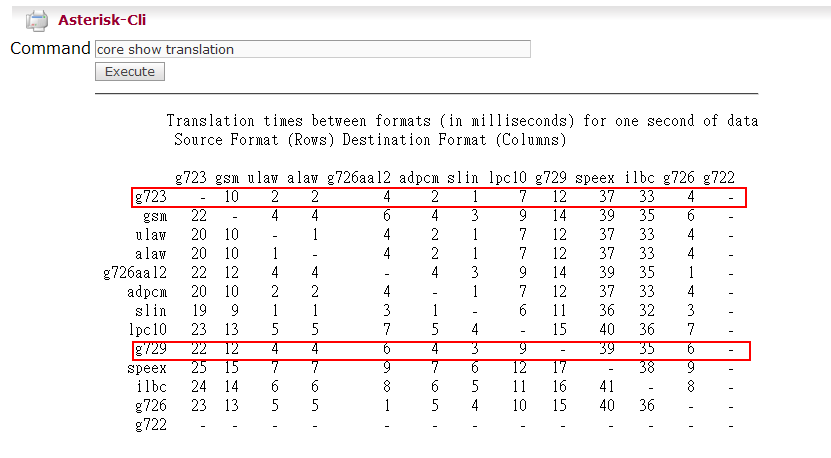
Notes: 如果有多個模組檔都可以相容目前的機器,選擇其中一個顯示數字最小的模組來使用。
- Was this page helpful?
- 標籤 (Edit tags)
- 什麼連接到這裡
文件 1
| 文件 | 大小 | 日期 | 附件上傳者 | |||
|---|---|---|---|---|---|---|
| ast-check-codec.png Check codec | 15.99 KB | 13:05, 8 Mar 2009 | alang | 動作 | |
| Images 1 | ||
|---|---|---|
 Check codecast-check-codec.png | ||
Powered by MindTouch Core
#asterisk -rx "core restart now" 就可以讀到了