Asterisk & FreePBX
Asterisk 是第一套以開放原始碼軟體實作的 用戶交換機 系統。Asterisk 由 Digium 的創辦人馬克·史賓瑟於1999年他還在奧本大學念書時所開發。與其他的用戶交換機系統相同,Asterisk 同樣支援電話撥打另一隻分機,和撥打到公共交換電話網與IP電話系統。 FreePBX is a web-based open-source graphical user interface (GUI) that manages Asterisk, a voice over IP and telephony server.
- Installation
- Learning
- Q & A
- A2B 與 FreePBX 的連接
- A2Billing
- Voice Mail Transcription
- Soft Phone
- OpenSIPS
- FreePBX
- SIP Response Codes
Installation
Install Asterisk and FreePBX
Install FreePBX 15 with Asterisk 16 on Debian 10
Install Asterisk 16
Step 1: Update system
sudo apt update && sudo apt upgrade
sudo reboot
Step 2: Install Asterisk 16 LTS dependencies
sudo apt install git curl wget libnewt-dev libssl-dev libncurses5-dev subversion libsqlite3-dev build-essential libjansson-dev libxml2-dev uuid-devStep 3: Download Asterisk 16 LTS tarball
cd /usr/src/
sudo curl -O http://downloads.asterisk.org/pub/telephony/asterisk/asterisk-16-current.tar.gz

sudo tar xvf asterisk-16-current.tar.gz
cd asterisk-16*/

# download the mp3 decoder library into the source tree
sudo contrib/scripts/get_mp3_source.sh

# Ensure all dependencies are resolved
sudo contrib/scripts/install_prereq install
Step 4: Build and Install Asterisk 16
sudo ./configure
sudo make menuselect
- Add-ons: chan_ooh323, format_mp3
- Core Sound Packages: CORE-SOUNDS-EN-*
- Music On Hold File Packages: MOH-OPSOUND-*
- Extra Sound Packages: EXTRA-SOUNDS-EN-*
- Applications: app_macro
sudo make
sudo make install
sudo make progdocs
sudo make samples
sudo make config
sudo ldconfig
Create Asterisk User
sudo groupadd asterisk
sudo useradd -r -d /var/lib/asterisk -g asterisk asterisk
sudo usermod -aG audio,dialout asterisk
sudo chown -R asterisk.asterisk /etc/asterisk
sudo chown -R asterisk.asterisk /var/{lib,log,spool}/asterisk
sudo chown -R asterisk.asterisk /usr/lib/asterisk
Set Asterisk default user to asterisk
$ sudo vim /etc/default/asterisk
AST_USER="asterisk"
AST_GROUP="asterisk"

$ sudo vim /etc/asterisk/asterisk.conf
runuser = asterisk ; The user to run as.
rungroup = asterisk ; The group to run as.
Restart asterisk service
sudo systemctl restart asterisk

# Enable asterisk service to start on system boot
sudo systemctl enable asterisk

# Test to see if you can connect to Asterisk CLI
sudo asterisk -rvv
Install FreePBX 15
Step 1: Install MariaDB Database server
sudo apt update
sudo apt install mariadb-server mariadb-client

# Initial DB setup and set root's password for DB
sudo /usr/bin/mysql_secure_installation
Step 2: Installing Node.js 10 LTS
sudo apt install curl dirmngr apt-transport-https lsb-release ca-certificates
curl -sL https://deb.nodesource.com/setup_10.x | sudo bash
sudo apt update
sudo apt install gcc g++ make
sudo apt install nodejs
Step 3: Install and configure Apache Web Server
sudo apt install apache2

# change Apache user to asterisk and turn on AllowOverride option
sudo cp /etc/apache2/apache2.conf /etc/apache2/apache2.conf_orig
sudo sed -i 's/^\(User\|Group\).*/\1 asterisk/' /etc/apache2/apache2.conf
sudo sed -i 's/AllowOverride None/AllowOverride All/' /etc/apache2/apache2.conf

# Remove default index.html page
sudo rm -f /var/www/html/index.html
Step 4: Install PHP and required extensions
sudo apt install wget php php-pear php-cgi php-common php-curl php-mbstring php-gd php-mysql \
php-gettext php-bcmath php-zip php-xml php-imap php-json php-snmp php-fpm libapache2-mod-php
Change php maximum file upload size
sudo sed -i 's/\(^upload_max_filesize = \).*/\120M/' /etc/php/7.3/apache2/php.ini
sudo sed -i 's/\(^upload_max_filesize = \).*/\120M/' /etc/php/7.3/cli/php.ini
Step 5: Install FreePBX 15
sudo apt install wget
cd /usr/src
wget http://mirror.freepbx.org/modules/packages/freepbx/freepbx-15.0-latest.tgz

tar xfz freepbx-15.0-latest.tgz
rm -f freepbx-15.0-latest.tgz

cd freepbx
sudo ./start_asterisk start
sudo ./install -n --dbuser root --dbpass "yourpassword"

# Enable Apache Rewrite engine
sudo a2enmod rewrite
sudo systemctl restart apache2
Step 6: Access FreePBX 15 Web Interface
Create the first admin account.
Q & A
Q: Online modules are not available.
Error:
Warning: Error retrieving updates from online repository(s) (https://mirror.freepbx.org 35). Online modules are not available.
A: Change the DNS to 8.8.8.8
vi /etc/resolv.conf

nameserver 8.8.8.8
#nameserver 67.207.67.3
#nameserver 67.207.67.2
Reference
- Install Asterisk 16 with FreePBX 15 on Ubuntu 20.04/18.04/16.04 & Debian 9
- Install Asterisk 16 LTS on Ubuntu 20.04/18.04/16.04 & Debian 10/9
- How To Install FreePBX 15 on Ubuntu 20.04/18.04/16.04 & Debian 10/9
- Installing FreePBX 15 on Debian 9.6
Install FreePBX 15 with Docker
Reference
Incredible PBX
Post-Installation
Incredible PBX 2027 with Debian 11
Reset the hostname and password:
# Set the hostname
hostnamectl set-hostname <your-FQDN-name>

# Set the password
passwd              # for Root
admin-pw-change     # for FreePBX
apache-pw-change    # for Reminders and AsteriDex
Set Gmail as an SMTP Smarthost:
Create an App password for your Gmail account: https://support.google.com/accounts/answer/185833?hl=en
/root/enable-gmail-smarthost-for-sendmailStop Webmin
systemctl stop webmin
systemctl disable webmin
Learning
Official URLs
Community
- Asterisk: https://community.asterisk.org/
- FreePBX: https://community.freepbx.org/
Github
- Asterisk: https://github.com/asterisk
- FreePBX: https://github.com/freepbx
Speech Recognition (Speech to Text)
Vosk-API
- Vosk speech recognition modules for Asterisk
- https://alphacephei.com/vosk/integrations
- Offline Speech to Text for Desktop Linux
Kamailio
Secure SIP Server
SIP Monitoring
Auto Provisioning
- OSS End Point Manager - PBX GUI - Documentation (freepbx.org)
- https://www.voip-info.org/forum/threads/oss-epm-for-freepbx-16-ipbx-2027.26880/
WebRTC
Billing
HA with DRBD
Q & A
CDR Reports 沒有任何紀錄
檢查 MySQL 資料表
# MySQL Credentials
cat /etc/freepbx.conf

# Check the mysql
mysql -u freepbxuser -p asteriskcdrdb -e 'SELECT * FROM cdr ORDER BY calldate DESC LIMIT 4'
檢查 asterisk module
asterisk -rx "module show like odbc"

Module                         Description                              Use Count  Status      Support Level
cdr_adaptive_odbc.so           Adaptive ODBC CDR backend                0          Running              core
cdr_odbc.so                    ODBC CDR Backend                         0          Running          extended
cel_odbc.so                    ODBC CEL backend                         0          Running              core
func_odbc.so                   ODBC lookups                             0          Running              core
res_config_odbc.so             Realtime ODBC configuration              0          Running              core
res_odbc.so                    ODBC resource                            6          Running              core
res_odbc_transaction.so        ODBC transaction resource                1          Running              core
重啟服務出現以下錯誤
fwconsole stop
fwconsole start
[2022-06-03 10:38:42] WARNING[32144] res_odbc.c: res_odbc: Error SQLConnect=-1 errno=0 [unixODBC][Driver Manager]Can't open lib '/usr/lib/x86_64-linux-gnu/odbc/libmaodbc.so' : file not f
Solution:
#> locate libmaodbc.so
/usr/lib/i386-linux-gnu/odbc/libmaodbc.so

#> cp /etc/odbcinst.ini /etc/odbcinst.ini.orig
#> vi /etc/odbcinst.ini

# Change this line
Driver = /usr/lib/x86_64-linux-gnu/odbc/libmaodbc.so
重啟服務確認錯誤不再發生
fwconsole stop
fwconsole start
Can't send 10 type frames with SIP write
Frame type '10' is comfort noise (aka CNG) which Asterisk does not support.
However as of 13.18.0 this message will be silenced so you won’t see it anymore.
You can ignore it or disable CNG on all of your endpoints and ask the telecom providers as well to disable the CNG on your trunks.
FXO 不會正確地傳送 Answer 至 IP 端
當透過 Gateway 撥打外線時 (IP to PSTN),不管 PSTN 端是否接起電話,Gateway 總是傳送 Answer 至 IP 端。這個對於一般電話操作不會有影響,不過,若是要對通話進行計費時,就會造成很大問題。
原因及解法如下:
Polarity Reversal (極性反轉):電信商提供用戶交換機外線通話開始及結束之確認訊號,以利用戶電話 計費系統進行話務計費 (適用旅館業者)
- Improper FXO port configuration: The FXO port on the gateway might not be configured correctly, leading to the gateway sending an answer signal prematurely.
- PSTN line issues: There could be issues with the PSTN line, such as noise or electrical interference, that are causing the gateway to misinterpret the call status.
- Polarity Reversal Detection not functioning correctly: The Polarity Reversal Detection feature on the gateway might not be working as expected, which could be contributing to the issue.
- Verify FXO port configuration: Check the FXO port configuration on the gateway to ensure it is set up correctly. Consult the gateway's documentation or contact the manufacturer for guidance.
- Check PSTN line quality: Verify that the PSTN line is clean and free of noise or electrical interference. You can use a line tester or consult with the PSTN provider to troubleshoot line issues.
- Verify Polarity Reversal Detection settings: Ensure that the Polarity Reversal Detection feature is enabled and configured correctly on the gateway. Consult the gateway's documentation or contact the manufacturer for guidance.
- Monitor gateway logs: Check the gateway logs to see if there are any errors or anomalies related to the Polarity Reversal Detection feature.
- Test with a different PSTN line: If possible, test the VoIP gateway with a different PSTN line to isolate the issue.
A2B 與 FreePBX 的連接
A2B 作為 Outbound Trunk 時
Call > FreePBX > A2B > SIP Carrier
在 FreePBX 上的設定範例:
以帳號密碼驗證方式
username=51521171
fromuser=51521171
type=friend
secret=1234567
host=incoming.future-nine.com
insecure=port,invite
nat=yes
qualify=yes
context=from-trunk
allow=ulaw,g729,g726
trustrpid=yes
sendrpid=yes
canreinvite=no
FreePBX 作為 Outbound Trunk 時
Call > A2B > FreePBX > SIP Carrier
在 FreePBX 上)
- 新增 SIP extension: 9001
在 A2B PBX)
1. 新增 SIP Trunk: freepbx
[freepbx]
username=9001
type=peer
secret=<ext-secret>
insecure=very
host=<freepbx-ip-addr>
fromuser=9001
qualify=yes
2. 新增 SIP Register String (for incoming call only)
9001:<ext-secret>@<freepbx-ip-addr>/from_freepbxNOTE: 最後面為甚麼不是 SIP number 而是改用字串(
/from_freepbx)呢?這是因為若以 SIP number 199 來作識別,可能會與本地的其他分機的編碼規則造成衝突,所以改用字串可以避免爾後遇到路由的問題。
3. 新增 Outbound Route
A2Billing
URLs
Alternative to A2Billing
- MagnusBilling
- ASTPP (based on FreeSWITCH)
Voice Mail Transcription
IBM Watson STT
Creating IBM Watson Credentials
- Login to IBM Cloud using your new credentials.
- Once logged in, choose IBM Cloud from the Title Bar to display your Dashboard.
- Choose Create Resource.
- Click Speech to Text from the AI Section.
- Name your STT service, choose the desired region, and choose Default resource group.
- Select a Pricing Plan:
- LITE provides 500 minutes/month free. Plan is deleted after 30 days of inactivity.
- STANDARD is 2¢/minute with no free minutes.
- When Speech to Text dialog opens, copy your API Key and URL.
- Logout by clicking on image icon in upper right corner of dialog window.
Installing STT Engine
1. Unpack the file
wget http://incrediblepbx.com/sendmailibm-13.tar.gz
tar zxvf sendmailibm-13.tar.gz
cp sendmailmp3.ibm /usr/local/sbin/sendmailmp3
chmod 0755 /usr/local/sbin/sendmailmp3
2. Edit sendmailmp3.ibm and insert your IBM STT API_KEY and URL. Save file.
3. Edit bluemix-test and insert your IBM STT API_KEY and URL. Save the file.
4. Copy the updated sendmailmp3.ibm file to sendmailmp3:
cp sendmailmp3.ibm /usr/local/sbin/sendmailmp3
chmod 0755 /usr/local/sbin/sendmailmp3
5. Test your Bluemix STT setup: bluemix-test
Result should be: we are now transferring you out of the company directory…
FreePBX Setup
Settings > Voicemail Admin > Settings > Email Config > Mail Command: /usr/local/sbin/sendmailmp3
Set up voicemail for an extension and include your email address.
Tutorials
- Free IBM Voicemail Transcription with Incredible PBX 2020
- IBM’s Speech Recognition Engine Comes to Asterisk
- Free Asterisk Voicemail Transcription with IBM Watson STT
- Creating IBM Watson Credentials
- Release notes for Speech to Text for IBM Cloud
- Getting started with Speech to Text
- Github: lgaetz/sendmail-bluemix
- Github: jtsage/sendmail.asterisk
Google STT
Tutorials
Soft Phone
Open Source/Freeware
- Zoiper - Branding for your business, Freeware, Support mobile and desktop (Linux/Windows/macOS)
- Linphone - Open Source, Support mobile and desktop (Linux/Windows/macOS)
- MicroSIP - Open Source, based on PJSIP for Windows OS
- PhonerLite - Freeware, For Windows OS
OpenSIPS
Installation on Debian 10
- OpenSIPS v3 with GUI on Debian v10 MariaDB Apache install guide
- Quick Start to OpenSIPS Training 3.2
OpenSIPS 3.3
apt install gnupg2
apt-key adv --keyserver keyserver.ubuntu.com --recv-keys 049AD65B

# For Debian 10
echo "deb https://apt.opensips.org buster 3.3-releases" >/etc/apt/sources.list.d/opensips.list
echo "deb https://apt.opensips.org buster cli-nightly" >/etc/apt/sources.list.d/opensips-cli.list
# For Ubuntu 20
echo "deb https://apt.opensips.org focal 3.3-releases" >/etc/apt/sources.list.d/opensips.list
echo "deb https://apt.opensips.org focal cli-nightly" >/etc/apt/sources.list.d/opensips-cli.list

apt update
apt install opensips
apt install opensips-cli

# Install all other modules
apt install opensips-*

# Start opensips and check the status
systemctl start opensips
systemctl status opensips
OpenSIPS Database Support (MySQL)
# Install MySQL Server (MariaDB on Debian 10)
apt install mariadb-server

# Create the database opensips using the OpenSIPS command line interface
opensips-cli -x database create opensips

# Verify if the tables were created
mysql opensips -e "show tables"

# Set the root's password for MariaDB and complete a few secure steps.
MariaDB> alter user 'root'@'localhost' identified by 'newpassword';
MariaDB> flush privileges;
MariaDB> exit
OpenSIPS Control Panel 9.3.3
# Install Apache, PHP and other dependencies
apt-get install apache2 libapache2-mod-php php-curl php php-mysql php-gd php-pear php-cli php-apcu git

# Download the OCP 9.3.3
git clone -b 9.3.3 https://github.com/OpenSIPS/opensips-cp.git /var/www/opensips-cp
Configure Apache
# Remove the default configuration
rm /etc/apache2/sites-enabled/000-default.conf
Edit: /etc/apache2/sites-enabled/opensips.conf
<VirtualHost *:80>
        <Directory /var/www/opensips-cp/web>
                Options Indexes FollowSymLinks MultiViews
                AllowOverride None
                Require all granted
        </Directory>

        <Directory /var/www/opensips-cp>
                Options Indexes FollowSymLinks MultiViews
                AllowOverride None
                Require all denied
        </Directory>

        Alias /cp /var/www/opensips-cp/web

        <DirectoryMatch "/var/www/opensips-cp/web/tools/.*/.*/(template|custom_actions|lib)/">
                Require all denied
        </DirectoryMatch>

        ErrorLog ${APACHE_LOG_DIR}/error.log
        CustomLog ${APACHE_LOG_DIR}/access.log combined

</VirtualHost>
Set the permissions of directories
chown -R www-data:www-data /var/www/opensips-cp/Creating the OCP tables
# This will create the OCP specific tables into the opensips database and add a first access user,
# the admin user with the opensips password.
mysql -uroot -p opensips < /var/www/opensips-cp/config/db_schema.mysql
set Cron jobs
cp /var/www/opensips-cp/config/tools/system/smonitor/opensips_stats_cron /etc/cron.d
sed -i 's/\/var\/www\/html\/opensips-cp/\/var\/www\/opensips-cp/g' /etc/cron.d/opensips_stats_cron
Restart Apache
systemctl restart apache2Visit the OCP Web site: http://server-ip-address/cp , admin / opensips
RTPProxy
apt install build-essential
apt install libucl-dev
cd /usr/src
git clone -b master https://github.com/sippy/rtpproxy.git
git -C rtpproxy submodule update --init --recursive
cd rtpproxy
./configure
make clean all
make install
Configure the systemd
Edit: /etc/systemd/system/rtpproxy.service
[Unit]
Description=RTPProxy media server
After=network.target
Requires=network.target

[Service]
Type=simple
PIDFile=/var/run/rtpproxy/rtpproxy.pid
Environment='OPTIONS= -l 172.16.0.67 -A 154.19.187.227 -m 10000 -M 20000 -d INFO:LOG_LOCAL5'

Restart=always
RestartSec=5

ExecStartPre=-/bin/mkdir /var/run/rtpproxy
ExecStartPre=-/bin/chown opensips:opensips /var/run/rtpproxy

ExecStart=/usr/local/bin/rtpproxy -p /var/run/rtpproxy/rtpproxy.pid -s unix:/var/run/rtpproxy/rtpproxy.sock \
 -u opensips:opensips $OPTIONS
ExecStop=/usr/bin/pkill -F /var/run/rtpproxy/rtpproxy.pid

ExecStopPost=-/bin/rm -R /var/run/rtpproxy

StandardOutput=syslog
StandardError=syslog
SyslogIdentifier=rtpproxy
SyslogFacility=local5

TimeoutStartSec=10
TimeoutStopSec=10

[Install]
WantedBy=multi-user.target
Start the service
systemctl daemon-reload
systemctl start rtpproxy
systemctl enable rtpproxy
Configuration
OpenSIPS
Generate config file
# Install the package required
apt install m4

# -> Residential Script
# --> Configure Residential Script
# ---> Select all options except for TLS, VM_DIVERSION, PRESENCE
/usr/sbin/osipsconfig

mv /etc/opensips/opensips.cfg /etc/opensips/opensips.cfg.orig
mv /etc/opensips/opensips_residential_2023-3-19_6:6:6.cfg /etc/opensips/opensips.cfg
chmod 0644 /etc/opensips/opensips.cfg

# Restart OpenSIPS
systemctl restart opensips
opensips.cfg for server behind the firewall
/* For AWS and OpenStack Environment */
/* WAN IP: 123.123.123.123 */
/* LAN IP: 172.16.0.67
advertised_address="123.123.123.123"
alias="123.123.123.123"

socket=udp:172.16.0.67:5060
socket=tcp:172.16.0.67:5060
opensips.cfg for RTPProxy
### RTPProxy module ###
loadmodule "rtpproxy.so"
## Fixed for ERROR:rtpproxy:send_rtpp_command: proxy <udp:localhost:7890> does not respond, disable it
#modparam("rtpproxy", "rtpproxy_sock", "udp:localhost:7890")
modparam("rtpproxy", "rtpproxy_sock", "unix:/var/run/rtpproxy/rtpproxy.sock")
opensips.cfg for dispatcher
### Dispatcher modules ###
loadmodule "dispatcher.so"
modparam("dispatcher", "db_url", "mysql://opensips:opensipsrw@localhost/opensips")
modparam("dispatcher", "dst_avp", "$avp(271)")
modparam("dispatcher", "attrs_avp", "$avp(272)")
modparam("dispatcher", "grp_avp", "$avp(273)")
modparam("dispatcher", "cnt_avp", "$avp(274)")
modparam("dispatcher", "hash_pvar", "$avp(273)")
modparam("dispatcher", "ds_ping_method", "OPTIONS")
modparam("dispatcher", "ds_ping_from", "sip:sipcheck@outbound_IP:5060")
modparam("dispatcher", "ds_ping_interval", 10)
modparam("dispatcher", "ds_probing_threshhold", 3)
modparam("dispatcher", "ds_probing_mode", 1)
modparam("dispatcher", "options_reply_codes", "501,403,404,400,200")
OpenSIPS Control Panel (OCP)
OCP 管理模組開啟與關閉
編輯: config/modules.inc.php
資料庫連線資訊
編輯: config/db.inc.php
Log file
Edit: /etc/rsyslog.d/opensips.conf
local0.* -/var/log/opensips.logRestart rsyslog
touch /var/log/opensips.log
systemctl restart rsyslog
OpenSIPS CLI
# opensips-cli -x mi version
{
    "Server": "OpenSIPS (3.1.14 (x86_64/linux))"
}
FAQ
OCP 的 dispatcher 頁面出現空白
Solution: 檢查 dispatcher 與 mi_http 模組是否載入成功。驗證方式可以用 OCP 的 MI Commands 執行 ds_list,如果有內容輸出表示模組載入成功。
Links
- https://opensips.org/
- https://www.rtpproxy.org/
- Quick Start to OpenSIPS Training 3.2
- opensips 簡介 1/2
Dispatcher
CGRateS
- Installation
- CGRateS Usage
- https://fossies.org/linux/opensips/modules/cgrates/README
- https://nickvsnetworking.com/category/voip/cgrates/
FreePBX
fwconsole
Tutorials
Help
fwconsole help

# lists all commands
php /usr/sbin/fwconsole list
Service Start/Stop
# Start Asterisk and run other needed FreePBX commands
fwconsole start

# Stop Asterisk and run other needed FreePBX commands
fwconsole stop
Module Admin
# Check Online Repository
fwconsole ma listonline

# Install a module
fwconsole ma download ivr
fwconsole ma install ivr

# Installing specific module versions with multiple modules
fwconsole ma install foomodule:15.1.3 barmodule:15.0.9

# Upgrade all modules
fwconsole ma listonline | grep "upgrade"
fwconsole ma upgradeall

# Apply the settings changed
fwconsole reload
Database
連線資料庫 asterisk (自動從 /etc/freepbx.conf 取得連線資訊)
fwconsole mPost-Installation
Set root's password for MySQL
mysql_secure_installationLog File Rotation
If this is not done the log files will keep growing indefinitely.
Edit /etc/logrotate.d/asterisk
/var/spool/mail/asterisk
/var/log/asterisk/*log
/var/log/asterisk/full
/var/log/asterisk/dtmf
/var/log/asterisk/freepbx_dbug
/var/log/asterisk/fail2ban {
 weekly
 missingok
 rotate 4
 #compress
 notifempty
 sharedscripts
 create 0640 asterisk asterisk
 postrotate
 /usr/sbin/asterisk -rx 'logger reload' > /dev/null 2> /dev/null || true
 endscript
 su root root
}
TFTP
If you plan to use hardware SIP phones you will probably want to set up TFTP.
yum -y install tftp-server
nano /etc/xinetd.d/tftp
change server_args = -s /var/lib/tftpboot
to server_args = -s /tftpboot
change disable=yes
to disable=nomkdir /tftpboot
chmod 777 /tftpboot
systemctl restart xinetd
firewall-cmd --permanent --zone=public --add-port=69/udp
firewall-cmd --reloadMPG123
This is used in combination with sox to convert uploaded mp3 files to Asterisk compatible wav files.
cd /usr/src
wget http://ufpr.dl.sourceforge.net/project/mpg123/mpg123/1.22.4/mpg123-1.22.4.tar.bz2
tar -xjvf mpg123*
cd mpg123*/
./configure --prefix=/usr --libdir=/usr/lib64 && make && make install && ldconfig
Digum addons
To register digium® licenses.
cd /usr/src
wget http://downloads.digium.com/pub/register/linux/register
chmod +x register
./register
To install the individual addons refer to the README files and ignore the register instructions.
- http://downloads.digium.com/pub/telephony/codec_g729/README
- http://downloads.digium.com/pub/telephony/res_digium_phone/README
- http://downloads.digium.com/pub/telephony/fax/README
- http://downloads.digium.com/pub/telephony/hpec/README
Password protect http access
A simple way to block scanners looking for exploits on apache web servers.
mkdir -p /usr/local/apache/passwd
htpasswd -c /usr/local/apache/passwd/wwwpasswd someusername
htpasswd -c /usr/local/apache/passwd/wwwpasswd someotherusername
nano /var/www/html/.htaccess
# .htaccess files require AllowOverride On in /etc/httpd/conf/httpd.conf
AuthType Basic
AuthName "Restricted Access"
AuthUserFile /usr/local/apache/passwd/wwwpasswd
Require valid-userAlternatively, the above .htaccess config can be added to /etc/httpd/conf/httpd.conf or as a separate file in /etc/httpd/conf.d/ as follows.
<Directory /var/www/html>
AuthType Basic
AuthName "Restricted Area"
AuthUserFile /usr/local/apache/passwd/wwwpasswd
Require valid-user
</Directory>
Whitelist protect http access
If http access is only required from certain IP addresses.
NOTE: Apache 2.4 以後才支援這功能
Edit /etc/httpd/conf.d/whitelist.conf
<Location />
 <RequireAny>
 ## Uncomment the following line to disable the whitelist
 #Require all granted
 Require ip x.x.x.x
 Require ip x.x.x.x x.x.x.x x.x.x.x
 Require ip x.x
 Require ip x.x.x.0/255.255.255.0
 Require host somedomain.com
 #
 ## See http://httpd.apache.org/docs/2.4/mod/mod_authz_host.html for more examples
 #
 </RequireAny>
</Location>
舊版 Apache 設定
NOTE:確定網站目錄有 AllowOverride All 設定
.htaccess:
order deny,allow
deny from all
# Alang's IPs
allow from 123.123.123.1
allow from 111.222.222.2
allow from 192.168.99.
G.729 Codec
OSS Endpoint Manager
Links
- Github: https://github.com/billsimon/endpointman
- Doc: https://wiki.freepbx.org/display/FPG/OSS+End+Point+Manager
- EPM-Supported Devices
- Introducing OSS Endpoint Manager for FreePBX 16 & Incredible PBX 2027 – Nerd Vittles
Installation
Incredible PBX 2027
cd /var/www/html/admin/modules
wget http://incrediblepbx.com/ossepm16.tgz
tar zxvf ossepm16.tgz
rm -f ossepm16.tgz
rm -f /tmp/*
fwconsole ma install endpointman
fwconsole reload
Configuration
Package Server
FreePBX GUI > Settings > OSS Endpoint Manager > Settings
- Package Server:
http://provision.lol/
FreePBX GUI > Settings > OSS Endpoint Manager > Package Manager
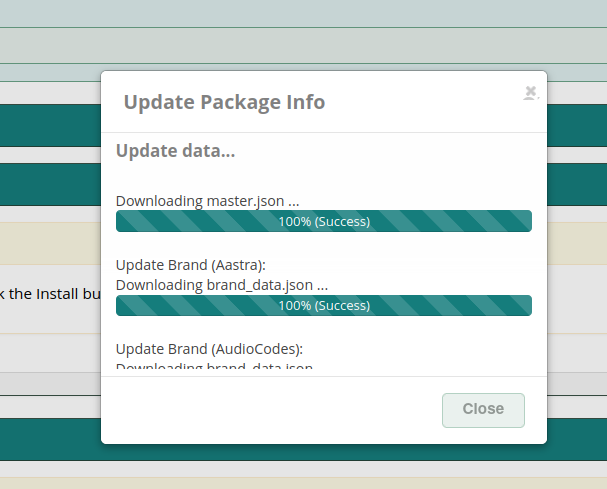
- Click the Check for Update
如果沒出現更新視窗,檢查網路狀態或稍後再試。
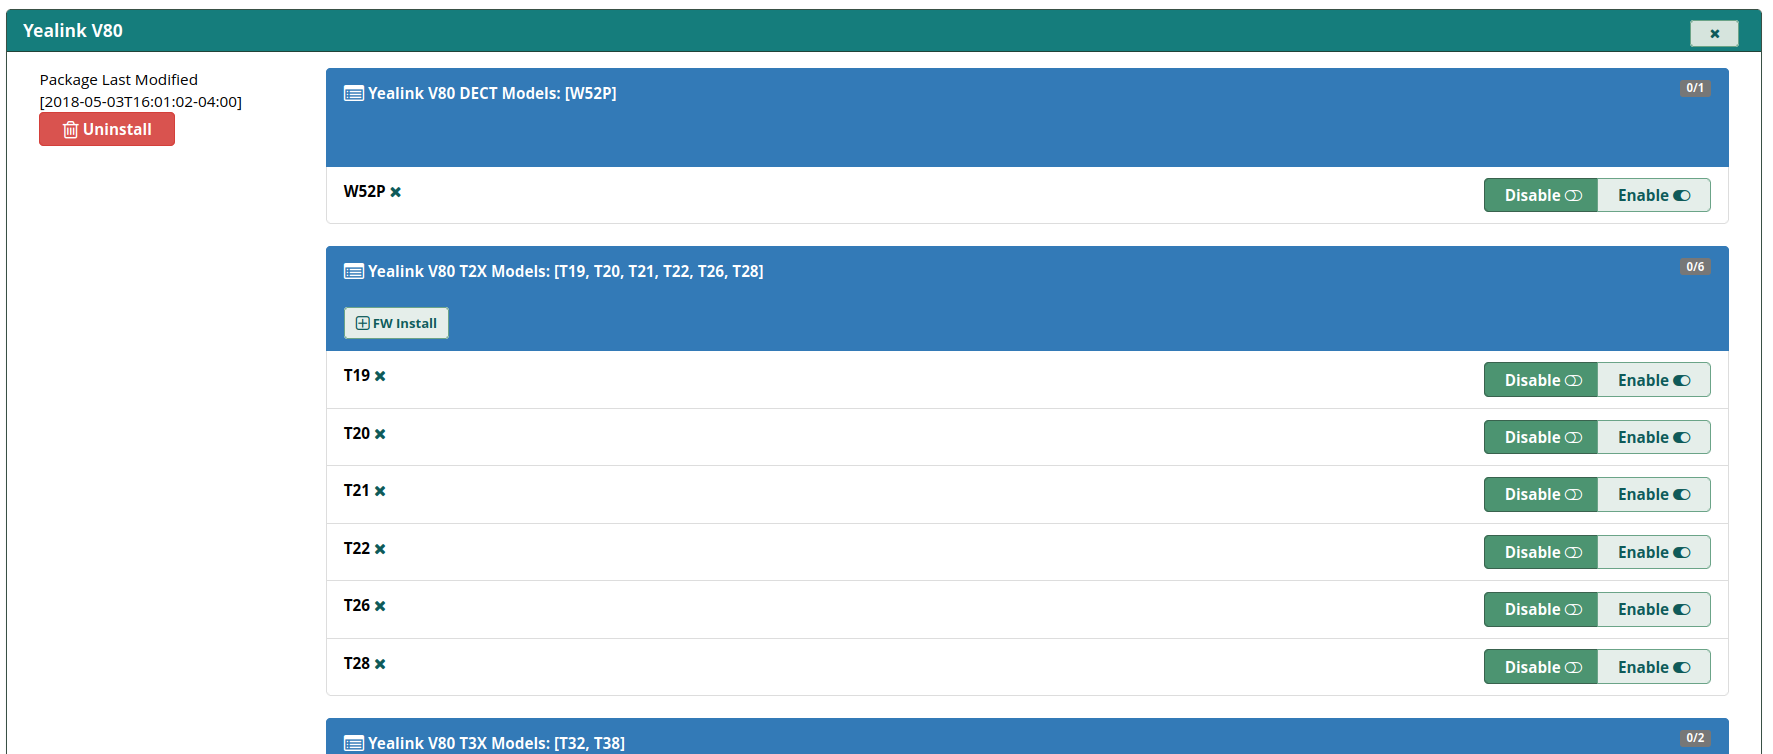
Additional brands (Grandstream & Yeallink V80)
- Download: SourceForge
FreePBX GUI > Settings > OSS Endpoint Manager > Settings > Package Import/Export
- Brand Package:
grandstream.tgzyealinkv80.tgz
IP & NTP & Type
FreePBX GUI > Settings > OSS Endpoint Manager > Settings
- IP address of phone server: <server-ip-addr>
- Internal IP address of phone server: <server-ip-addr>
- Configuration Type: Web (HTTP)
- Time Zone: Asia/Taipei
- Time Server:
tw.pool.ntp.org
如果以後有修改 Settings 的內容,或者 Template Editor,完成變更後,還要到 Extension Mapping,選擇 Selected Phone Options 或者 Global Phone Options,按下 Rebuild,這樣才會套用更新到所有裝置的佈署檔。
Extension Provisioning
Add Device: Linksys PAP2T
FreePBX GUI > Settings > OSS Endpoint Manager > Package Manager
- Cisco/Linksys - PAP2T : Enable
Create Template: my-pap2t
注意:預設的部署檔會將 PAP2T 的管理網頁界面關閉,新增一個部署設定檔 my-pap2t。
技巧:如果 template 內容如果有修改過,必須到 Extension Mapping 選擇分機後,重新執行一次 Save,這樣新的設定才會被套用。
FreePBX GUI > Settings > OSS Endpoint Manager > Template Manager
- Template Name: my-pap2t
- Product Select: Linksys/Cisco
- Clone Template From: PAP2T
Edit the template: my-pap2t
- Profile Resync: 3600 (對應設備參數
Resync_Periodic,秒數不要調太低,避免設備太忙碌更新) - Enable Webserver: Yes
- Enable Webserver Admin: Yes
- Administrator Password: <set-your-password>
- User Password: <set-your-password>
注意:編輯 template 時,不要使用 Edit Global Setting Overrides,這個可能會弄壞 template。如果不小心 弄壞 template,只要將 template 移除後重建即可。
技巧:template 或者原始設定檔 (spa$mac.xml) 有修改過參數,要如何在設備部署前做驗證?以 HTTP 為例,瀏覽這段網址 http://freepbx-ip-addr/provisioning/p.php/spaxxxxxxx.xml,xxxxxxx 是設備的 MAC address (必須是小寫),可以下載部署設定檔。
Extension Mapping
FreePBX GUI > Settings > OSS Endpoint Manager > Extension Mapping
- MAC Address: <pap2t-mac-addr>
- IPEI: <blank>
- Brand: Cisco/Linksys
- Model: PAP2T
- Line: 1
- Extension Number: <select-your-extension>
- Template: my-pap2t
PAP2T 設置
登入 PAP2T 管理界面 (advanced view) > Provisioning
- Provision Enable: yes
- Profile Rule:
http://<freepbx-ip-addr>/provisioning/p.php/spa$MA.xml
須重啟電源才會重新部署新設定。
Provisioning Template Files
SPA-3102/PAP2T
File: spa$mac.xml
將檔案複製到目錄 /var/www/html/admin/modules/_ep_phone_modules/endpoint/cisco/linksysata/
修正內容:
- 移除日光節約的時間設定
- 移除 LAN 關閉 DHCP(SPA3102 必須啟用)
- 移除部署主機位址的設定(目前只能支援 tftp 方式)
SIP Response Codes
180 v.s. 183
- The 180 Ringing response code indicates that the called party's device is being alerted or ringing.
- It is typically sent by the called party's User Agent (UA) to indicate that the call is being presented to the user.
- The 180 response code is often sent in response to an INVITE request, indicating that the called party's phone is ringing.
- The calling party may receive multiple 180 responses if the call is forwarded to multiple destinations.
- The 183 Session Progress response code indicates that the call is in progress, but the called party has not yet answered.
- It is typically sent by the called party's UA to indicate that the call is being connected or processed, but the called party has not yet accepted the call.
- The 183 response code is often used to indicate that the call is being connected to a voicemail system, an IVR, or a queue.
- Unlike 180, the 183 response code does not necessarily imply that the called party's phone is ringing.
- Ringing vs. Call Progress: 180 specifically indicates that the called party's phone is ringing, while 183 indicates that the call is in progress, but the called party has not yet answered.
- Device Alerting: 180 implies that the called party's device is being alerted, whereas 183 does not necessarily imply device alerting.
- Call State: 180 indicates that the call is in the "ringing" state, while 183 indicates that the call is in the "session progress" state.