Git
git 是一個分散式版本控制軟體,最初由林納斯·托瓦茲創作,於2005年以GPL釋出。最初目的是為更好地管理Linux核心開發而設計。應注意的是,這與GNU Interactive Tools不同。 git最初的開發動力來自於BitKeeper和Monotone。
- Learning Git
- Git Installation
- Git 常用指令
- FAQ
- Git 進階使用
- GitHub
- Branch
- Remote repository
- Merge
- 實例流程
- Pull request
- Code review
- Cheat Sheets
- Gitlab Server
- CI/CD
Learning Git
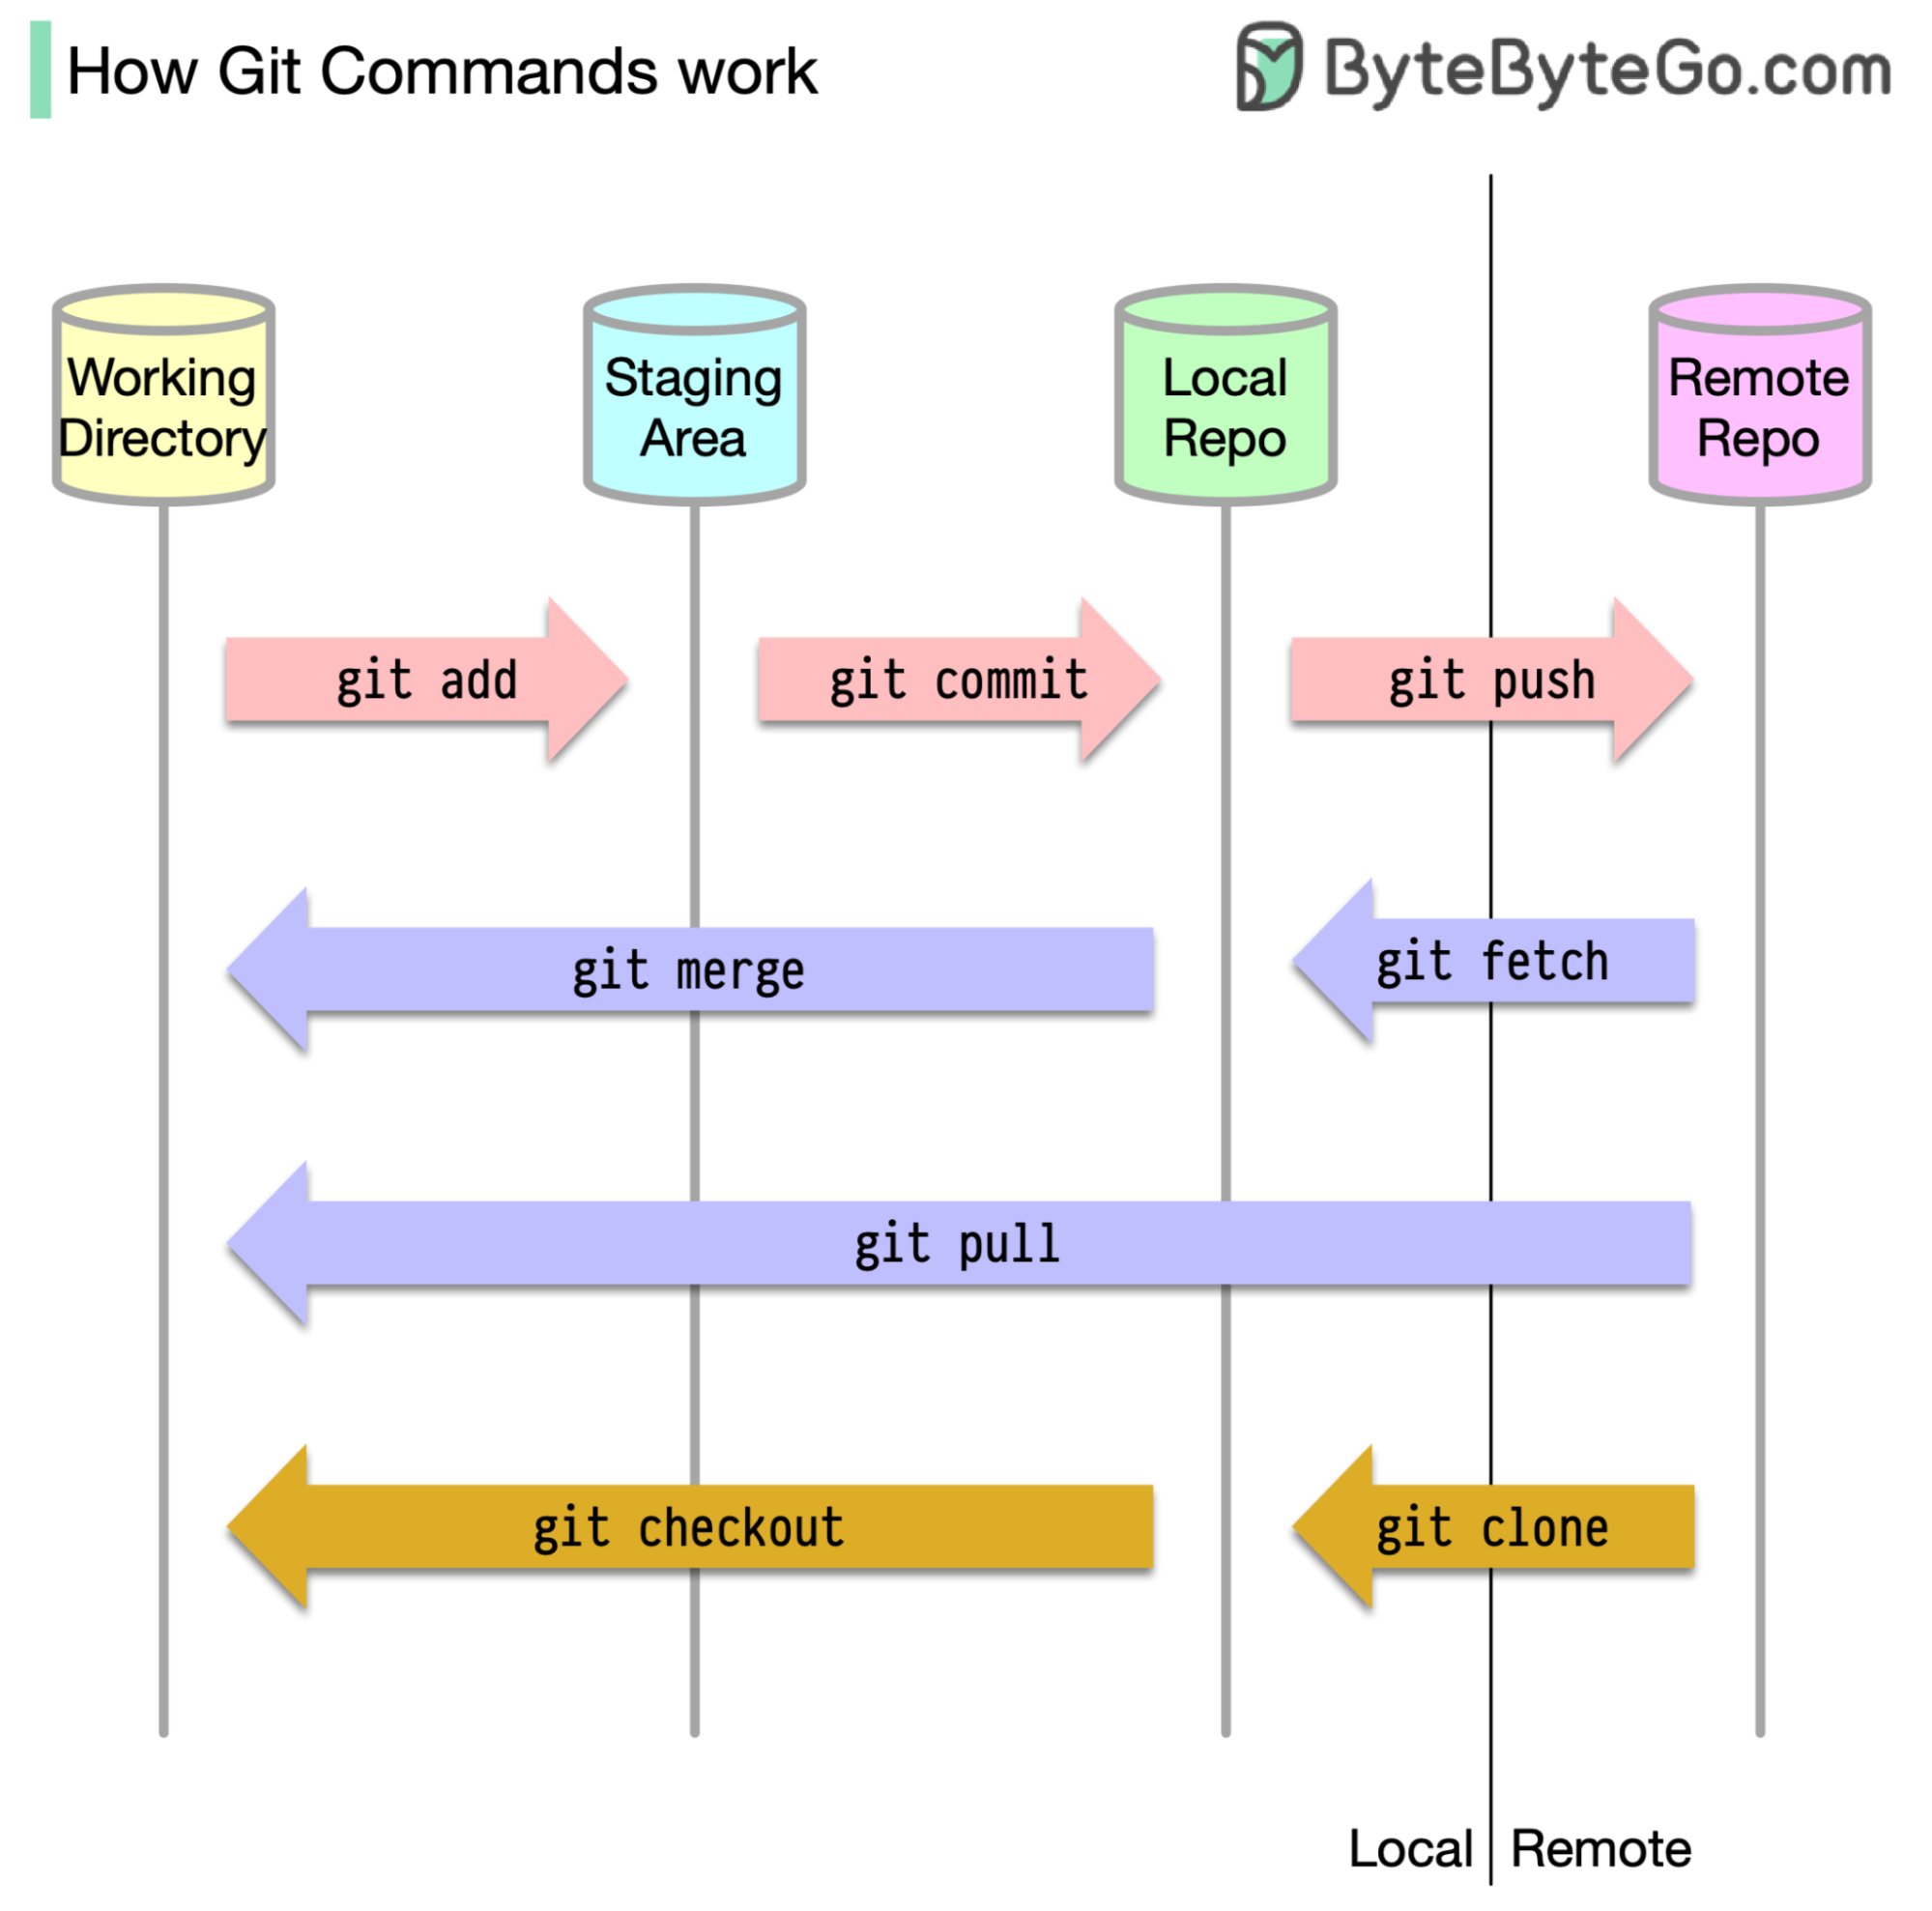
Git Commands Work
中文
- Git - Book
- Git 筆記 - Git初始設定 & Github入門
- Git 版本控制教學 - 單兵必懂指令 | My.APOLLO (myapollo.com.tw)
- 學習 Git 分支 (Branching)
- Learn Git Branching (中文)
英文
- Getting started with GIT on Linux
- git - the simple guide - no deep shit! (up1.github.io)
- 10 things to love about Git
- Getting started with Git - GitHub Docs
- Oh Shit, Git!?!
- How to undo (almost) anything with Git
- 10 Git tutorials to level up your open source skills in 2022
- Make your own Git subcommands
- My guide to using the Git push command safely
- 7 Lesser-Known Git Commands and Tricks
- How to create a pull request in GitHub
- My favorite Git tools | Opensource.com
- 50+ Useful Git Commands for Everyone
- [Video] Git Tutorial for Absolute Beginners
Bitbucket
Git Tools
- LazyGit - simple terminal UI for git commands
Git Server
- Gitea
- Gitlab
- Soft Serve - A tasty, self-hostable Git server for the command line.
Git Installation
Git Client
# CentOS/RedHat 5/6
# Install from source
# Get the required version of GIT from https://www.kernel.org/pub/software/scm/git/
yum install zlib-devel openssl-devel cpio expat-devel gettext-devel
wget https://mirrors.edge.kernel.org/pub/software/scm/git/git-2.0.5.tar.gz
tar xzf git-2.0.5.tar.gz
cd git-2.0.5
./configure --prefix=/opt/git-2.0.5
make
make install
Git 常用指令
Git 檔案狀態
狀態 2 與 3 的檔案已經由 Git 控管內容變更。
- Modified/Untracked: 檔案已修改,尚未執行
git add - Staged: 檔案已經
git add,尚未執行git commit - Commited: 檔案已經
git commit
全域設定檔
# Using git to edit the configuration
git config --global --edit

# List the global configurations
git config --global --list

# Using vi/cat to edit the configuration
vi ~/.gitconfig

# Set the author's email address and name
git config --global user.email "alang.hsu@gmail.com"
git config --global user.name "Alang Hsu"

# Set default editor
git config --global core.editor "vi"

# Set default branch name
git config --global init.defaultBranch "main"
.gitconfig
[user]
	email = alang.hsu@gmail.com
	name = Alang Hsu
[core]
	editor = vi
[init]
	defaultBranch = main
建立新專案
mkdir test-git-push
cd test-git-push
git config --global user.name "<user-name>"
git config --global user.email "<your-email-addr>"
git init
echo "Test Git Push only" > README.md
git add .
git commit -m "Initial commit"
git branch -M main
git remote add origin https://<user-name>@github.com/a-lang/test-git-push.git
git remote -v
git push -u origin main
Git commit
簡單的 commit 訊息
git commit -m "Fixed a typo in somewhere"免 add 快速 commit (-a)
- 僅限 edited & deleted
- 僅適用單一 commit 訊息套用一次性的所有異動
- 通常用在簡短的異動時
git commit -a -m "<commit-message>"比較複雜的訊息
# 設定 Vim 作為編輯器
git config --global core.editor "vim"

# 不要加 -m 參數
git commit
Commit 訊息編寫原則
- 用一行空白行分隔標題與內容
- 標題:最多 50 字元,簡單描述更動的內容
- 標題開頭要大寫
- 標題不以句點結尾
- 以祈使句撰寫標題
- 內文:每行最多 72 字,可以多行,詳細描述更動的內容
- 用內文解釋 what 以及 why vs. how
修改(合併)最近一筆 Commit --amend
git commit --amend

# 免 add 的快速 commit
git commit -a --amend
--amend 會將目前的commit 與最近一次 commit 做合併。
僅適用在不重要的小部分更動後,卻不想產生單獨的 commit 紀錄;或者上次 commit 後發現遺漏某個檔案。
注意:已經 push 的 commit 不應該使用 --amend,因為這會造成其他協作者的混淆。
Commit count
git rev-list --count --all什麼是 HEAD
HEAD 用來表示目前 checked-out 的專案快照,就像網頁的書籤用途。
檢查目前 HEAD
cat .git/HEADGit diff
# 還沒執行 git add 前,比對目前檔案與最近一次 commit 版本的內容差異
git diff file

# 比對兩個檔案的內容差異
git diff --word-diff file1 file2

# 檢視兩個 Commit 版本的內容差
git log --graph --pretty=format:'%Cred%h%Creset -%C(yellow)%d%Creset %s %Cgreen(%cr) %C(bold blue)<%an>%Creset' --abbrev-commit --date=relative
git diff <old-commit-id> <new-commit-id>
Undo in Git
不同階段的檔案回復的方式
Local untracked changes (還沒有 add, 處於 untracked 狀態)
# For dry-run
git clean -dn

# Remove a specified untracked file
git clean -f <path>

# Remove all untracked files
git clean -f

# Remove all untracked files and directories
git clean -df
Local unstaged changes (還沒有 add , 處於 modified 狀態)
git restore -p : 批次回復,當更動內容分布在不同行時,可選擇批次回復git status
git restore <filename>
# For all files
git restore --staged .
# 如果出現錯誤:
# fatal: 無法解析 HEAD
git rm --cached -r .或者,還沒 staging 之前,可以用 checkout 來回復
checkout 會回復最近一次的 commited 或 staged 的內容
# For specified file
git checkout <file-name>

# For all files
git checkout .
# Alternatively
git checkout -- .
Local staged changes (已經 add 還沒有 commit)
git status
git restore --staged <filename>
git restore <filename>
Local committed changes (已經 commit 還沒有 push)
git status
git log
git reset --soft HEAD~
git log
NOTE: 上述指令是回復最新的 commit,如果是更早的 commit,可以執行
git reset <commit-id>,而 commit-id 可以從git log --oneline找到。不過,如果 commit 已經 push 到遠端庫,必須改用
git revert。
Public committed changes (已經 push)
git log --oneline
git revert <last-commit-id> --no-edit
git push
git log
NOTE: 在執行
git revert後,log 會多一條 Revert "XXXX" 的 commit 紀錄,原先的 commit 紀錄也會保留。
Git Prompt with bash
.bashrc:
# Kali-like Prompt with Git status

git_stats() {
  local STATUS=$(git status -s 2> /dev/null)
  local UNTRACKED=$(echo "$STATUS" | grep '^??' | wc -l)
  local STAGED=$(($(echo "$STATUS" | grep '^M ' | wc -l) + $(echo "$STATUS" | grep '^D ' | wc -l) + $(echo "$STATUS" | grep '^R ' | wc -l) + $(echo "$STATUS" | grep '^C ' | wc -l)+$(echo "$STATUS" | grep '^A ' | wc -l)))
  local DRC=$(($(echo "$STATUS" | grep '^ D' | wc -l) + $(echo "$STATUS" | grep '^ R' | wc -l) + $(echo "$STATUS" | grep '^ C' | wc -l)))
  local MODIFIED=$(echo "$STATUS" | grep '^ M' | wc -l)
  local STATS=''
  if [ $UNTRACKED != 0 ]; then
    STATS="\e[43m untr: $UNTRACKED "
  fi
  if [ $MODIFIED != 0 ]; then
    STATS="$STATS\e[43m mod: $MODIFIED "
  fi
  if [ $DRC != 0 ]; then
    STATS="$STATS\e[43m drc: $DRC "
  fi
  if [ $STAGED != 0 ]; then
    STATS="$STATS \e[42m staged: $STAGED "
  fi
  if [ ! -z "$STATS" ]; then
  echo -e "\e[30m $STATS\e[0m"
  fi
}

function origin_dist {
 local STATUS="$(git status 2> /dev/null)"
 local DIST_STRING=""
 local IS_AHEAD=$(echo -n "$STATUS" | grep "ahead")
 local IS_BEHIND=$(echo -n "$STATUS" | grep "behind")
 if [ ! -z "$IS_AHEAD" ]; then
  local DIST_VAL=$(echo "$IS_AHEAD" | sed 's/[^0-9]*//g')
  DIST_STRING="$DIST_VAL AHEAD"
 elif [ ! -z "$IS_BEHIND" ]; then
  local DIST_VAL=$(echo "$IS_BEHIND" | sed 's/[^0-9]*//g')
  DIST_STRING="BEHIND $DIST_VAL"
 fi
 if [ ! -z "$DIST_STRING" ]; then
  echo -en "\e[97;45m $DIST_STRING"
 fi
}

__PS1_GIT_BRANCH='`__git_ps1` '
__PS1_GIT_DIST='`origin_dist`'
__PS1_GIT_STATS='`git_stats` '

if $(__git_ps1 2>/dev/null);then
    PS1="\[\033[38;5;209m\]┌──[\[\033[38;5;141m\]\u\[\033[38;5;209m\]@\[\033[38;5;105m\]\h\[\033[38;5;231m\]:\w\[\033[38;5;209m\]]\[\033[33m\]${__PS1_GIT_BRANCH}${__PS1_GIT_DIST}${__PS1_GIT_STATS}\[\033[00m\]\n\[\033[38;5;209m\]└─\\[\033[38;5;209m\]\\$\[\033[37m\] "
else
    source /usr/share/git-core/contrib/completion/git-prompt.sh
    PS1="\[\033[38;5;209m\]┌──[\[\033[38;5;141m\]\u\[\033[38;5;209m\]@\[\033[38;5;105m\]\h\[\033[38;5;231m\]:\w\[\033[38;5;209m\]]\[\033[33m\]${__PS1_GIT_BRANCH}${__PS1_GIT_DIST}${__PS1_GIT_STATS}\[\033[00m\]\n\[\033[38;5;209m\]└─\\[\033[38;5;209m\]\\$\[\033[37m\] "
fi
Rename & Delete files
# Deleting
git rm my.sh

# Renaming
git mv old.sh new.sh
Git Alias
git config --global alias.st status
git config --global alias.c commit
git config --global alias.br branch
~/.gitconfig
[alias]
    st = status
    c = commit
    loo = log --oneline
    # 重新修改最後一筆 commit 的 comment
    onemore = commit -a --amend --no-edit
    # 刪除最後一筆 commit, 保留文件的修改
    undo = reset --soft HEAD^
    # 刪除最後一筆 commit, 不保留文件
    cancel = reset --hard HEAD^
Gitignore
不需要做版控的。
不需要版控的檔案或資料夾:
-
編譯後的檔案,例如
.o.so。 -
如果是 Node.js 專案,目錄
node_modules內的檔案都是從外部的軟體庫下載,與自己的程式碼無關。 -
與 Log 有關的檔案或資料夾,例如
.log。 -
系統環境變數檔,例如
.env。 -
.gitignore
# ignore all directories with the name test
test/

.env
log/
node_modules/
make/*.o
make/*.so

# ignores all .md files
.md

# does not ignore the README.md file
!README.md
Git log
- 輸入 commit-id 時只需要開頭的 4 - 8 碼字元就可以。
# 基本檢視 commit 資訊
git log
git log --oneline

# -p: patch, 詳細檢視 commit 的異動內容
git log -p
git log -p -2     # 最近兩次的 commit 異動內容

# 另一種可檢視 commit 的詳細內容
git show <commit-id>

# 檢視 commit 的狀態, 包含有異動的檔名與行數
git --stat

#
git log --graph --pretty=format:'%Cred%h%Creset -%C(yellow)%d%Creset %s %Cgreen(%cr) %C(bold blue)<%an>%Creset' --abbrev-commit --date=relative

* 957ae62 - (HEAD -> master, origin/master, origin/HEAD) Fixed the bug if the file config doesn't exist (4 年 7 個月前) <A-Lang>
* 2b64ce6 - Just fixed some no-wrap (4 年 8 個月前) <A-Lang>
* 1eab2be - Added the title in the window (4 年 8 個月前) <A-Lang>
* 5f139b3 - Added the function contents_edit (4 年 8 個月前) <A-Lang>
* 727a72b - Removed the directory sshto-1.0 (4 年 8 個月前) <A-Lang>
* 764c2a4 - fix download with changed user (4 年 9 個月前) <Ivan Marov>
* b8b718f - make pause if error occured in go_to_target (4 年 11 個月前) <Vaniac>
* cf20d21 - new screenshot and readme (5 年前) <Vaniac>
* 1bcbb6a - ref (5 年前) <Vaniac>
* 48df1bd - new screenshot and readme (5 年前) <Vaniac>
Git revert (Rollback)
使用 git revert 可以將專案 rollback 到某個 commit 之前的時間點,並且完成後會新增一筆 Revert 的 commit 紀錄,原先的 commit 紀錄也都會保持不變 (這與 git reset 不同)
Rollback 最後的 commit 之前的版本
# Rollback the latest commit
git revert HEAD
Rollback 指定 commit 之前的版本
注意:當 revert 的 commit 遇到有異動衝突時,必須手動排除衝突的內容,方法同 git merge 發生的衝突。如果要放棄目前的 revert,可以執行 git revert --abort
git revert <commit-id>Pull v.s Fecth
拉取遠端專案庫的更新內容
git pull = git fecth + git merge FETCH_HEAD
拉取遠端專案庫並強制同步至本地庫 (可確保本地庫與遠端庫內容保持一致)
git fetch origin
git reset --hard "origin/main"
Checkout
切換分支 (Branch) 或還原檔案 (尚未執行 git add 的 modified 與 untracked 狀態)
切換分支:
git checkout -b <branch-name> <start-point>: 新增分支並切換,如果分支不存在git checkout -B <branch-name> <start-point>: 新增分支並切換,如果分支存在,不會出現 failed ,而是重置起始點 (可用於自動部署)
其他切換:
- For commit:
git checkout <commit-hash> - For remote branch:
git checkout remote branch origin/feature-branch - For tag:
git checkout tag <tag-name>
還原檔案:
- 還原單一檔案:
git checkout /path/to/file - 還原所有檔案:
git checkout .
Git tag
# 建立並推送版本標籤
git tag -a v1.0.0 -m "Release version 1.0.0"
git push origin v1.0.0
FAQ
[GitHub] 無法 git push
錯誤訊息
remote: Support for password authentication was removed on August 13, 2021.
remote: Please see https://docs.github.com/en/get-started/getting-started-with-git/about-remote-repositories#cloning-with-https-urls for information on currently recommended modes of authentication.
fatal: 'https://github.com/a-lang/benchy.git/' 身份驗證失敗
解決方案:從 2021/8/13 起,GitHub 在 push 專案時不再接受密碼認證,替代方法可以使用一個較快速的 personal token。
先從 GitHub 網站新增一個 personal token
GitHub > Setting > Developer Settings > Personal Access Token > Tokens (classic)
這個 token 是用來取代密碼,git push 時出現密碼詢問,就輸入 token。
如果不想每次都輸入 token,可以將 token 記憶在系統裡
git config --global credential.helper cache更換 token 後,刪除舊的 token
git config --global --unset credential.helper
git config --system --unset credential.helper
git clone 錯誤訊息
(gnome-ssh-askpass:23713): Gtk-WARNING **: cannot open display
暫時解法:
unset SSH_ASKPASS永久解法: 編輯 ~/.bash_profile
# Fixed for the error with the git
export GIT_ASKPASS=
git log 不能正常顯示顏色
在 AIX 7.2 系統無法正確顯示顏色
^[[33mcommit 98d696dfa800b847640f1f9b9402f9a548c087b8^[[m^[[33m (^[[m^[[1;36mHEAD -> ^[[m^[[1;32mmaste
r^[[m^[[33m, ^[[m^[[1;31morigin/master^[[m^[[33m, ^[[m^[[1;31morigin/HEAD^[[m^[[33m)^[[m
Author: Alang <alanghsu@my.com>
Date: Thu Aug 7 15:21:46 2025 +0800
新增或編輯 ~/.gitconfig
[core]
    pager = less -R
Git 進階使用
使用 rev-parse
# Getting the top-level directory
git rev-parse --show-toplevel

# Find your way home
git rev-parse --show-cdup

## Current location
# 判斷是否在專案目錄 <git-repo>/.git 底下
git rev-parse --is-inside-git-dir
# 判斷是否在專案目錄 <git-repo> 底下 (不包含 .git 目錄下)
git rev-parse --is-inside-work-tree
合併發生衝突
Git credential cache
This command caches credentials for use by future Git programs. The stored credentials are kept in memory of the cache-daemon process (instead of being written to a file) and are forgotten after a configurable timeout.
git config credential.helper cache
git config credential.helper 'cache --timeout=3600'
Shallow Clone (淺複製)
何時使用 shallow clone:
- You don’t need the full commit history
- You want faster setup for CI/CD pipelines
- You’re working with large repositories
# Shallow clone
# Limit the clone to 100 commits before the current repository HEAD.
git clone --depth=100 <Repository_URL>

# Shallow Cloning Only a Single Branch
git clone --depth 100 <repository_URL> --single-branch --branch=<branch-name>

# Clone commits since a specific date
git clone --shallow-since="2024-01-01" <repository_URL>

# Skip large file downloads
git clone --filter=blob:none <Repository_URL>

# Unshallow a shallow clone
git fetch --unshallow
Common issues with shallow clones
- git merge-base
- git rebase
- git bisect
Fix: Run git fetch --unshallow or avoid shallow clone in those contexts.
Efficient Fetching Strategies for Shallow Clones
# Fetch with Limited Depth
git fetch origin --depth=5

# Fetch by Date
git fetch origin --shallow-since="2024-01-01"

# Fetch by Excluding Old Commits
git fetch origin --shallow-exclude=a1b2c3d

# Fetch Specific Branches/Tags
git fetch origin main --depth=10
git fetch origin refs/tags/v2.1.0 --depth=1
GitHub
Contribute to GitHub
Steps to contribute your changes / patches in open source repository.
- Fork the repository
- Create a new branch (
git checkout -b feature-branch) - Make your changes
- Commit (
git commit -m 'Add new feature') - Push to the branch (
git push origin feature-branch) - Open a Pull Request
Preparing your Fork
1. Hit 'fork' on Github, creating e.g. yourname/theproject
2. Clone your project:
git clone git@github.com:yourname/theproject3. Create a branch:
cd theproject
git checkout -b feature-branch
Making your Changes
1. Add changelog entry crediting yourself.
2. Write tests expecting the correct/fixed functionality; make sure they fail.
3. Hack, hack, hack.
4. Run tests again, making sure they pass.
5. Commit your changes:
git commit -m "Foo the bars"Creating Pull Requests
1. Push your commit to get it back up to your fork:
git push origin feature-branch2. Visit Github, click handy “Pull request” button that it will make upon noticing your new branch.
3. In the description field, write down issue number (if submitting code fixing an existing issue) or describe the issue + your fix (if submitting a wholly new bugfix).
4. Hit ‘submit’! And please be patient - the maintainers will get to you when they can.
GitHub CLI
GitHub Project
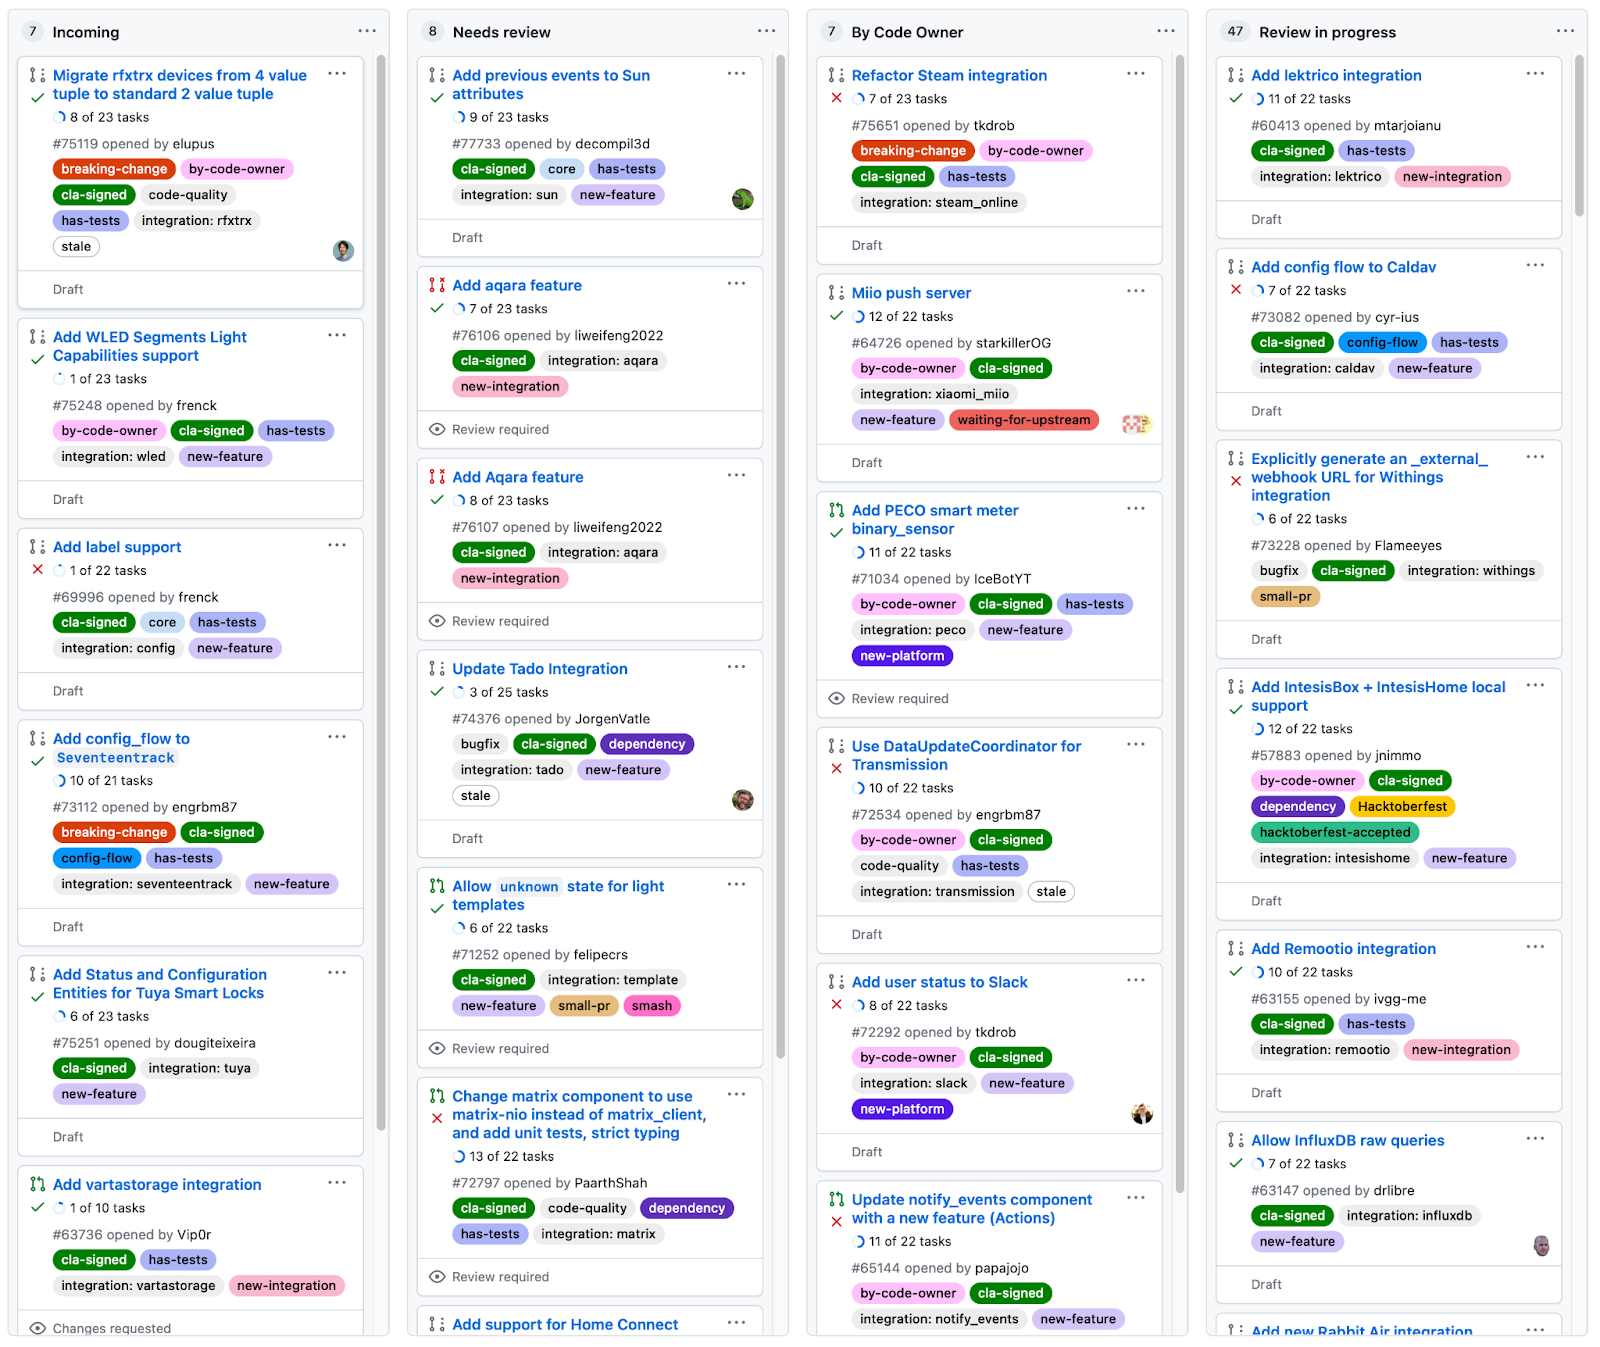
GitHub offers multiple tools to manage and plan your work. For example, GitHub Projects is a flexible tool for tracking and managing work on GitHub. You can use Projects to create an adaptable spreadsheet, task-board, and road map which integrates with your issues and pull requests. With GitHub projects, you can filter, sort, and group your issues and pull requests and customize to fit your team’s workflow. Projects can be created in a repository, and then issues can be added to them.
GitHub Issues
GitHub Issues is a part of GitHub Projects, and it provides a way to track tasks that you need to complete. An issue can be a bug, a feature request, or a housekeeping task (like upgrading a library to the latest version). Issues can have extensive text and descriptions attached to them, including screenshots and snippets of code. Issues can be discussed, commented on, assigned to people, and tagged.
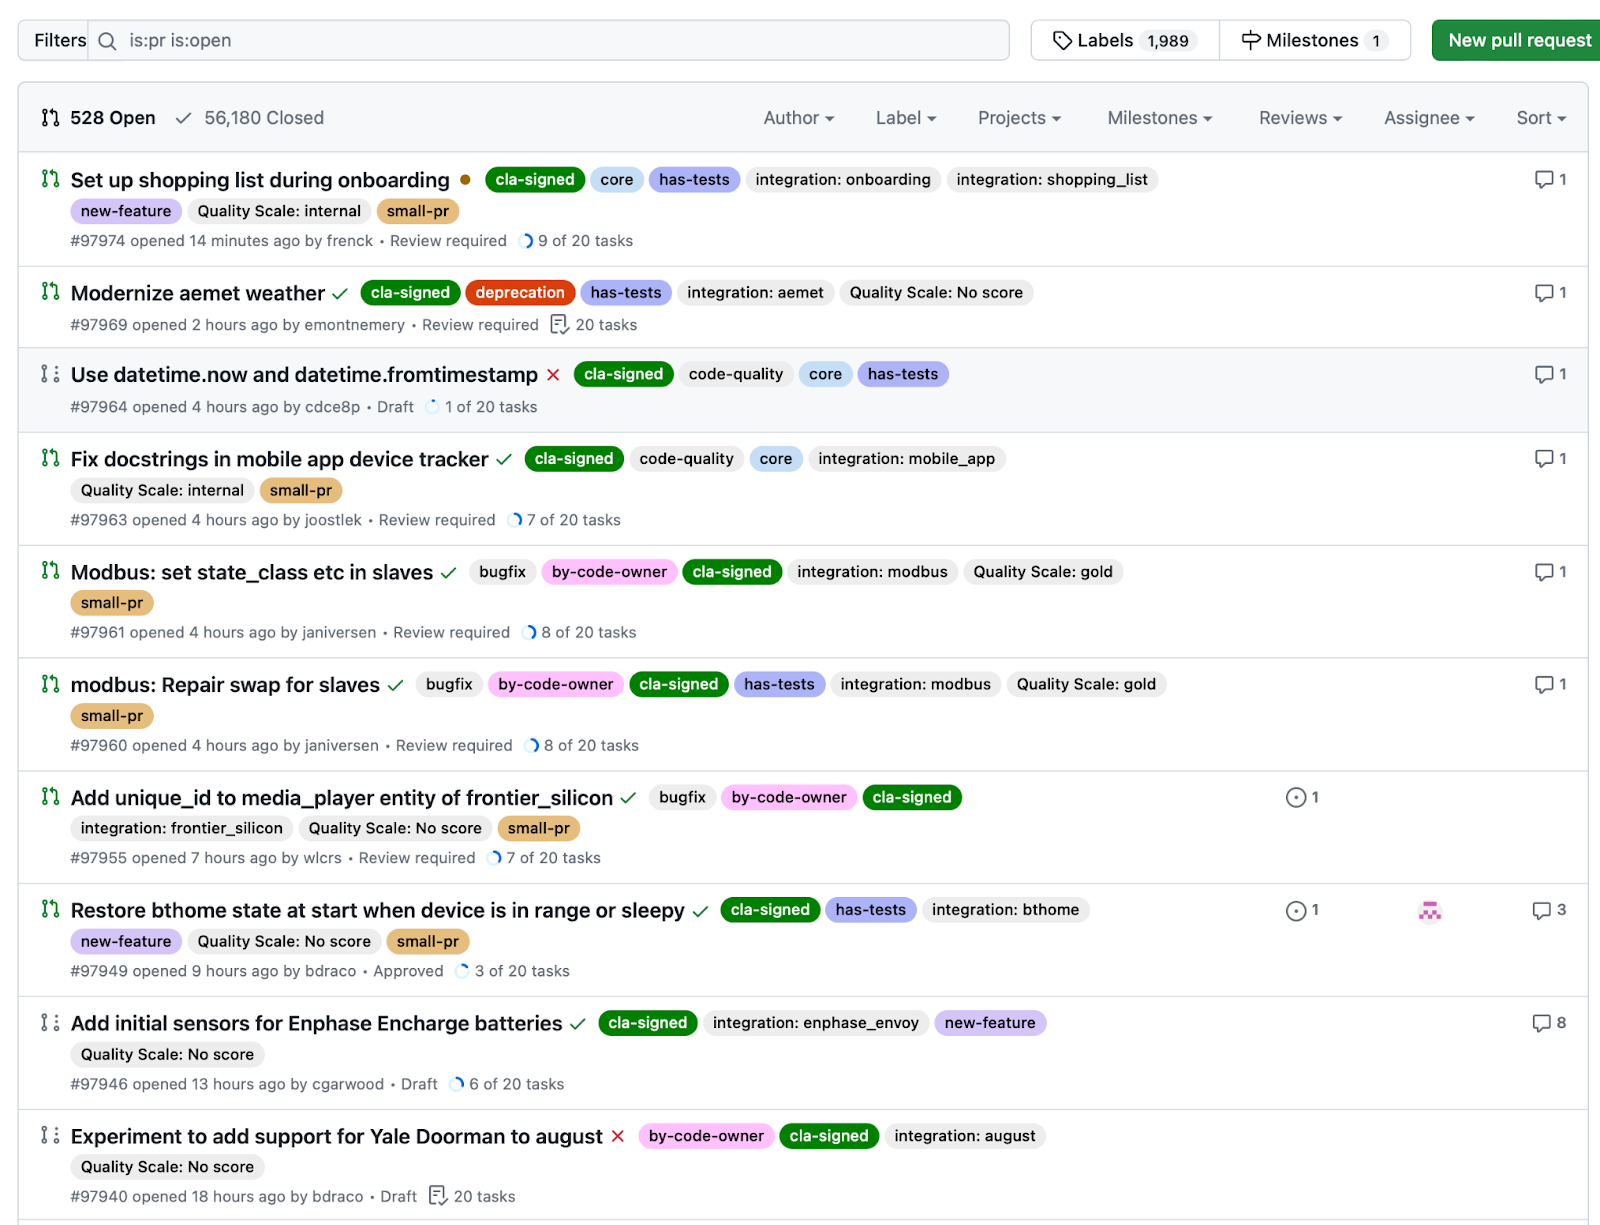
Tip: 當完成指定 issue 的修復後,可以在執行git commit時的訊息內容中,包含 #+Issue NO. 例如:
Fixed this bug #156
README Tips
Resources
- A Quick Guide to Using GitHub for Project Management
- This article provides a brief overview of project management tools on GitHub.
- GitHub for project management
- This lesson offers detailed descriptions of GitHub’s project management tools.
- Using GitHub as your Project Management Tool
- This video provides examples on GitHub project management tools.
- GitHub Issues: Project Planning for Developers
- This GitHub page shows the many project management tools available for developers.
Branch
Tips
- Branch : 指向特定 commit 的指標,代表專案中獨立的開發流程
- HEAD: 指向目前的分支
- main (master): 新專案建立時的預設分支,通常用於主版本
- branch-name 可使用斜線做分類識別,例如 test/feature1, dev/feature1
- 檢視目前 branch (HEAD) 的版本:
git branch或git log -1 - 不同 branch,專案目錄裡的檔案以及 commit 紀錄也都不同
Git branch
# List all the branches of local repo.
git branch

# List the branches of remote repo.
git branch -r

# List all branches of local and remote repos.
git branch -a

# Create new branch
git branch <branch-name>
git checkout <branch-name>

# Alternatively, using the following one-liner command
# <origin-name> 為空白時,預設為目前 HEAD 版本, 例如 origin/main
git checkout -b <branch-name> <origin-name>

# Remove a branch
# NOTE: 如果 branch 有內容異動, 移除時系統會有錯誤提示
git branch -d <branch-name>
建立分支
# Clone 專案
git clone http://your.company.com/yourname/my_proj.git
cd my_proj

# 建立一個來源是 origin/main 的分支版,名稱為 test/util-cmd,並且切換(checkout)至分支版
git checkout -b test/util-cmd origin/main
git branch -a

# Change your codes

# 更新至本地專案庫
git add .
git commit -m "Added a new branch test/util-cmd"

# 上傳至遠端專案庫
git push --set-upstream origin test/util-cmd
Remote repository
Git repository 除了本機以外,還可以是遠端 repository ,例如雲端 GitHub、Gitlab、Bitbucket,或者自架的 Git Server。
作為版本控制用途,Remote repository 不是必要的,除非想要多人協作開發共同的專案。
Git Repository Providers
Clone from remote repo.
# Specified version
git clone -b 8.3.0 https://github.com/OpenSIPS/opensips-cp.git /var/www/opensips-cp
Git remote
從遠端儲存庫下載專案或要推送本地專案至遠端儲存庫時,用來檢視、修改遠端儲存庫位址。
- branch (分支)有區分 local 與 remote,而 remote branch 預設為 origin 開頭。
git remote show資訊有時不是最新的,可以使用git remote update來更新。這指令也會更新遠端 branch 的 commit 紀錄,作用與git fetch相同。
# Show the configuration of the remote repository
git remote -v

origin	https://github.com/a-lang/sshto.git (fetch)
origin	https://github.com/a-lang/sshto.git (push)

# Get more information
git remote show origin

* 遠端 origin
  取得位址:https://github.com/a-lang/sshto.git
  推送位址:https://github.com/a-lang/sshto.git
  HEAD 分支:master
  遠端分支:
    master 已追蹤
  為 'git pull' 設定的本機分支:
    master 與遠端 master 合併
  為 'git push' 設定的本機引用:
    master 推送至 master (最新)

# Update the contents of remote branch
git remote update
變更 Remote Origin URL
# Way #1: 直接修改
git remote set-url origin <新的 URL>

# Way #2: 移除後重新加入
git remote remove origin
git remote add origin <新的 URL>
Remote branches
本地庫的遠端 branch (分支) 清單
# Way 1
git branch -r

# Way 2
git remote show origin
Push
將本地庫的更新推送到遠端庫
# 推送本地更新至遠端庫分支 refactor
git push origin refactor
git push -u origin refactor  # 第一次推送本地更新至遠端庫分支 refactor

# 刪除遠端庫分支 refactor
git push --delete origin refactor

# 強制推送更新至遠端庫分支
# 強制推送會覆蓋遠端分支原有的 commit 紀錄,這僅適用在 pull request 的分支。
git push -f
Pull
更新遠端庫的異動紀錄至本地端,並且與本地 branch 自動作合併。
cd my_proj
git pull
Pull vs. Fetch
- Pull: 同步遠端庫與本地庫,且自動合併本地 branch
- Fetch: 同步遠端庫與本地庫,需手動合併本地 branch
避免每次詢問密碼
輸入一次密碼,可以暫存系統 15 分鐘
git config --global credential.helper cacheSSH Key Authentication
# 建立 ssh-key
# 預設路徑: ~/.ssh/id_rsa (private key) , ~/.ssh/id_rsa.pub (public-key)
ssh-keygen -t rsa -b 4096 -C "alang@my-linux-desktop"
ssh-keygen -t ed25519 -C "alang@my-linux-desktop"

# Gitlab 網站匯入 public ssh-key
# 測試 ssh key authentication
# 如果輸出 Welcome to GitLab, @alang! 表示連線認證成功
ssh -T git@gitlab.shurafom.eu

# 下載專案
# NOTE: 位址必須是 git@XXX.xxx.xxx 開頭。
# 如果使用 https:// 則必須改用 Personal Token 認證方式
git clone git@gitlab.shurafom.eu:myproject/myprog.git
GitHub: For specified Repo
[YOUR-REPO] ➜ Settings ➜ Security ➜ Deploy keys ➜ Add deploy key
- Title : 自訂
- Key : SSH 公鑰
Linux 主機端
- 私鑰檔可以是預設檔名:
~/.ssh/id_rsa - 自訂的私鑰檔名,須執行
ssh-add ~/.ssh/id_yourcustomname加入到 ssh-agent
# Testing SSH connection
ssh -T git@github.com
~/.ssh/config
Host github-project1
    User git
    HostName github.com
    IdentityFile ~/.ssh/github.project1.key
Usage
git clone git@github-project1:orgname/some_repository.gitFetch
Git 本地庫與遠端庫並不會自動保持同步,而是用指令 git fetch 手動將遠端庫的所有 branches 異動 (commit) 紀錄更新至本地端。注意:這指令不會將遠端庫的異動合併至本地庫的 branches 資料(與 git pull 不同)
1. 如何知道遠端儲存庫有其他更新?
git remote show origin* remote origin
Fetch URL: https://github.com/redquinoa/health-checks.git
Push URL: https://github.com/redquinoa/health-checks.git
HEAD branch: master
Remote branch:
master tracked
Local branch configured for 'git pull':
master merges with remote master
Local ref configured for 'git push':
master pushes to master (local out of date)這行 master pushes to master (local out of date) 表示遠端庫有其他的更新。
2. 更新遠端庫 branches 異動紀錄至本地端
- 遠端 branch: origin/master
- 本地 branch: master
- 檢視遠端 branch log 時,出現 HEAD -> master 與 origin/master 不在同一行,表示本地庫與遠端庫版本不同步。
# 更新遠端 branches 異動紀錄至 local
git fetch

# 檢視遠端 branch 的 commit log 是否有更新
git branch -r         # List all remote branches
git log origin/master # Check the log for the remote branch origin/master

commit b62dc2eacfa820cd9a762adab9213305d1c8d344 (origin/master, origin/HEAD)
Author: Blue Kale <bluekale@example.com>
Date:   Mon Jan 6 14:32:45 2020 -0800
    Add initial files for the checks
commit 807cb5037ccac5512ba583e782c35f4e114f8599 (HEAD -> master)
Author: My name <me@example.com>
Date:   Mon Jan 6 14:09:41 2020 -800
    Add one more line to README.md
commit 3d9f86c50b8651d41adabdaebd04530f4694efb5
Author: Red Quinoa <55592533+redquinoa@users.noreply.github.com>
Date:   Sat Sep 21 14:04:15 2019 -0700
    Initial commit
3. 合併遠端 branch 最新異動至本地 branch(手動同步)
- git status : 快速檢視本地 branch 與遠端 branch 有無內容差異
# 檢查狀態
git status

On branch master
Your branch is behind 'origin/master' by 1 commit, and can be fast-forwarded.
  (use "git pull" to update your local branch)
nothing to commit, working tree clean

# 合併遠端 branch 至本地 branch
git merge origin/master

Updating 807cb50..b62dc2e
Fast-forward
 all_checks.py | 18 ++++++++++++++++++
 disk_usage.py | 24 ++++++++++++++++++++++++
 2 files changed, 42 insertions(+)
 create mode 100755 all_checks.py
 create mode 100644 disk_usage.py
複製遠端庫某個分支至本地庫分支
# 檢視遠端的分支清單
git remote show origin

# 建立本地分支
git checkout <remote-branch-name>

# 檢視本地分支
git branch
Merge
Git merge 區分兩種類型:
- Fast-forward merge: 兩分支的所有 commit 紀錄沒有分歧
- Three-way merge: 兩分支的 commit 紀錄有分歧,需要人工介入排除衝突的內容。
Git merge 基本流程
在一般的開發流程,建立新分支來開發新功能或修復 bug,在分支完成開發後,最後會將分支的內容合併到主分支 (main/master)。
git merge <branch-name>: 合併分支 <branch-name> 至目前分支git merge --abort: 放棄目前的合併
分支 fix_something 合併指令
git checkout main
git merge fix_something
合併後如果系統顯示 Merge conflict,必須依照訊息找出檔案(some.py)裡衝突的內容,進行手動修正。
手動修正以下標記的衝突內容:
- <<<< HEAD : 目前分支 (main) 的內容
- >>>> fix_something: 要合併的分支 (fix_something) 內容
- ====== : 分隔兩分支的衝突內容
- 技巧:參考標記的內容做適當的修改,最後移除所有的標記
<<<<<<< HEAD
print("Keep me!")
=======
print("No, keep me instead!")
>>>>>>> fix_something
完成後,依序再執行:
git add some.py
git status
# Check if the conflict has been fixed
git commit
檢視合併的紀錄
git log --graph --oneline如果合併檔案的衝突內容太複雜,且無法有效地修正,可以使用以下指令,放棄這次分支的合併,並且讓專案回到合併前的內容。
git merge --abortGit rebase
git rebase <branch-name> : Move the current branch on top of the <branch-name> branch
透過將已完成的工作從一個分支轉移到另一個分支來防止 three-way merges。這可保持線性歷史紀錄,且讓除錯更容易。
# 以互動方式 rebase
git rebase -i master
Interactive Rebasings 可讓開發人員修改個別提交,而不會因為多餘或不相關的變更而導致提交歷史雜亂無章。保持提交乾淨且相關,有助於建立更有條理且可維護的程式碼庫。通常用在 Pull Request 分支
實例流程
多人協作基本
人員A push 更新至遠端庫時發生錯誤:
 ! [rejected]        master -> master (fetch first)
error: failed to push some refs to 'https://github.com/redquinoa/health-checks.git'
hint: Updates were rejected because the remote contains work that you do
hint: not have locally. This is usually caused by another repository pushing
hint: to the same ref. You may want to first integrate the remote changes
hint: (e.g., 'git pull ...') before pushing again.
hint: See the 'Note about fast-forwards' in 'git push --help' for details.
原因是另一個協作人員B 對同一個遠端分支 (branch)的同個檔案,有上傳 (push) 過其他較新的異動 (commit)。
人員A 處理流程如下:
- 更新遠端分支至本地,並且與本地分支做合併:
git pull - 上述的自動合併,如果發生 Automatic merge failed,繼續下面步驟,手動排除衝突的內容。
- 檢視遠端分支最近做過哪些更動:
git log --graph --onleline --allgit log -p origin/master
- 手動修改衝突的檔案內容
- 檢視檔案包含 <<<< HEAD 與 >>>>>> something 標記的內容
- 完成後執行檢查與再上傳
git addgit statusgit commitgit push
更新遠端分支
Remote branch: refactor
git checkout -b refactor: 複製遠端分支至本地庫,並切換本地庫到這分支- 開始修改程式碼
git commit -a -m "Something": 步驟 2, 3 可執行多次git push -u origin refactor: 更新遠端庫,第一次上傳至遠端 branch 需要加上參數-u origin refactor之後再上傳可以忽略。
Pull request
拉取請求可讓您通知其他貢獻者有關 Git 分支的變更。 拉取請求時,您可以先討論並評估建議的變更,然後再將變更執行到主分支。
您最終可以透過建立拉取請求,將變更合併回主儲存庫 (或 repo)。 但是,需要注意的是,在對原始代碼進行任何變更之前,GitHub 會創建一個 fork(或專案的副本),即使變更無法推送到另一個 repo,也可以將變更提交到 fork 副本。
任何人都可以透過拉取請求中的內嵌註解提出變更建議,但在合併變更之前只有擁有者有審查和批准變更的權利。 若要建立拉取請求:
-
Make changes to the file.
-
Change the proposal and complete a description of the change.
-
Click the Proposed File Change button to create a commit in the forked repo to send the change to the owner.
-
Enter comments about the change. If more context is needed about the change, use the text box.
-
Click Pull Request.
您可以通過保留提交來合併拉取請求。 以下是您在合併拉取請求時可以使用的拉取請求合併選項清單。
- Merge commits. All commits from the feature branch are added to the base branch in a merge commit using the -- no–ff option.
- Squash and merge commits. Multiple commits of a pull request are squashed, or combined into a single commit, using the fast-forward option. It is recommended that when merging two branches, pull requests are squashed and merged to prevent the likelihood of conflicts due to redundancy.
- Merge message for a squash merge. GitHub generates a default commit message, which you can edit. This message may include the pull request title, pull request description, or information about the commits.
- Rebase and merge commits. All commits from the topic branch are added onto the base branch individually without a merge commit.
- Indirect merges. GitHub can merge a pull request automatically if the head branch is directly or indirectly merged into the base branch externally.
Practice
Basic processes
- Fork the project you're interested in to your repository (via web)
- Login to your GitHub repository
- Visit the project: https://github.com/google/it-cert-automation-practice
- Fork your own copy of this project via GitHub's website
- Clone the repository to local
git clone https://github.com/google/it-cert-automation-practicecd it-cert-automation-practice
- Setup a remote for the upstream repo.
git remote -vgit remote add upstream https://github.com/google/it-cert-automation-practicegit remote -v
- Configure Git
git config --global user.name "Yourname"git config --global user.email "your@email"
- Create new local branch for the fix
git branch improve-username-behaviorgit checkout improve-username-behavior
- Fix and test the code
- Commit the changes
git statusgit add .git commitgit push origin improve-username-behavior
- Create a pull request (PR) (via web)
- Login to your forked repository
- Go to Pull requests > Create a pull request
- Edit the title and the description for the pull request
- You can see information about the branch's current deployment status and past deployment activity on the Conversation tab of the upstream repo. .
Tip: 編寫 Commit 訊息時,可以包含要修復的問題編號(123)的參考連結,例如:
Updated validations.py python script.
Fixed the behavior of validate_user function in validations.py.
Fix for #123
Tip: 一旦 Pull Request 新增完成,後續的追蹤與討論需要回到上游的儲存庫的 Pull requests > Conversation 網站。
Code review
程式碼審閱 (Code Review) 也稱為同儕程式碼審閱 (peer code review),是指有目的、有條理地聚集其他程式設計師,以檢查彼此的程式碼是否有錯誤。與其他技術不同,程式碼審閱可以加速並簡化軟體開發流程。同儕審閱也可以節省時間和金錢,尤其是可以捕捉到那些可能會在測試、生產和最終使用者的筆記型電腦中偷偷出現的缺陷。
Code style guides
Code style tools
- Black is a PEP 8 compliant opinionated formatter with its own style
Five tips for pull request reviews
Some of the considerations you should have with pull request reviews are:
-
Be selective with reviewers: It's important to select a reasonable number of reviewers for a pull request. Adding too many reviewers can lead to inefficient use of resources, as too many people reviewing the same code may not be productive.
-
Timely reviews: Ideally, reviews should be completed within two hours of the pull request being submitted. Delays in reviews can lead to context switching and hinder overall productivity.
-
Constructive feedback: Feedback should be constructive and explain what needs to be changed and, more importantly, why those changes are suggested. Friendly and non-accusatory language fosters a positive and collaborative atmosphere.
-
Detailed pull request description: The pull request should include a detailed description that covers the changes made in the feature branch compared to the development branch, prerequisites, usage instructions, design changes with comparisons to mockups, and any additional notes that reviewers should be aware of. This information ensures that reviewers have a comprehensive understanding of the changes.
-
Interactive rebasings: Interactive Rebasings allow developers to modify individual commits without cluttering the commit history with redundant or unrelated changes. Keeping commits clean and relevant contributes to a more organized and maintainable codebase.
Cheat Sheets
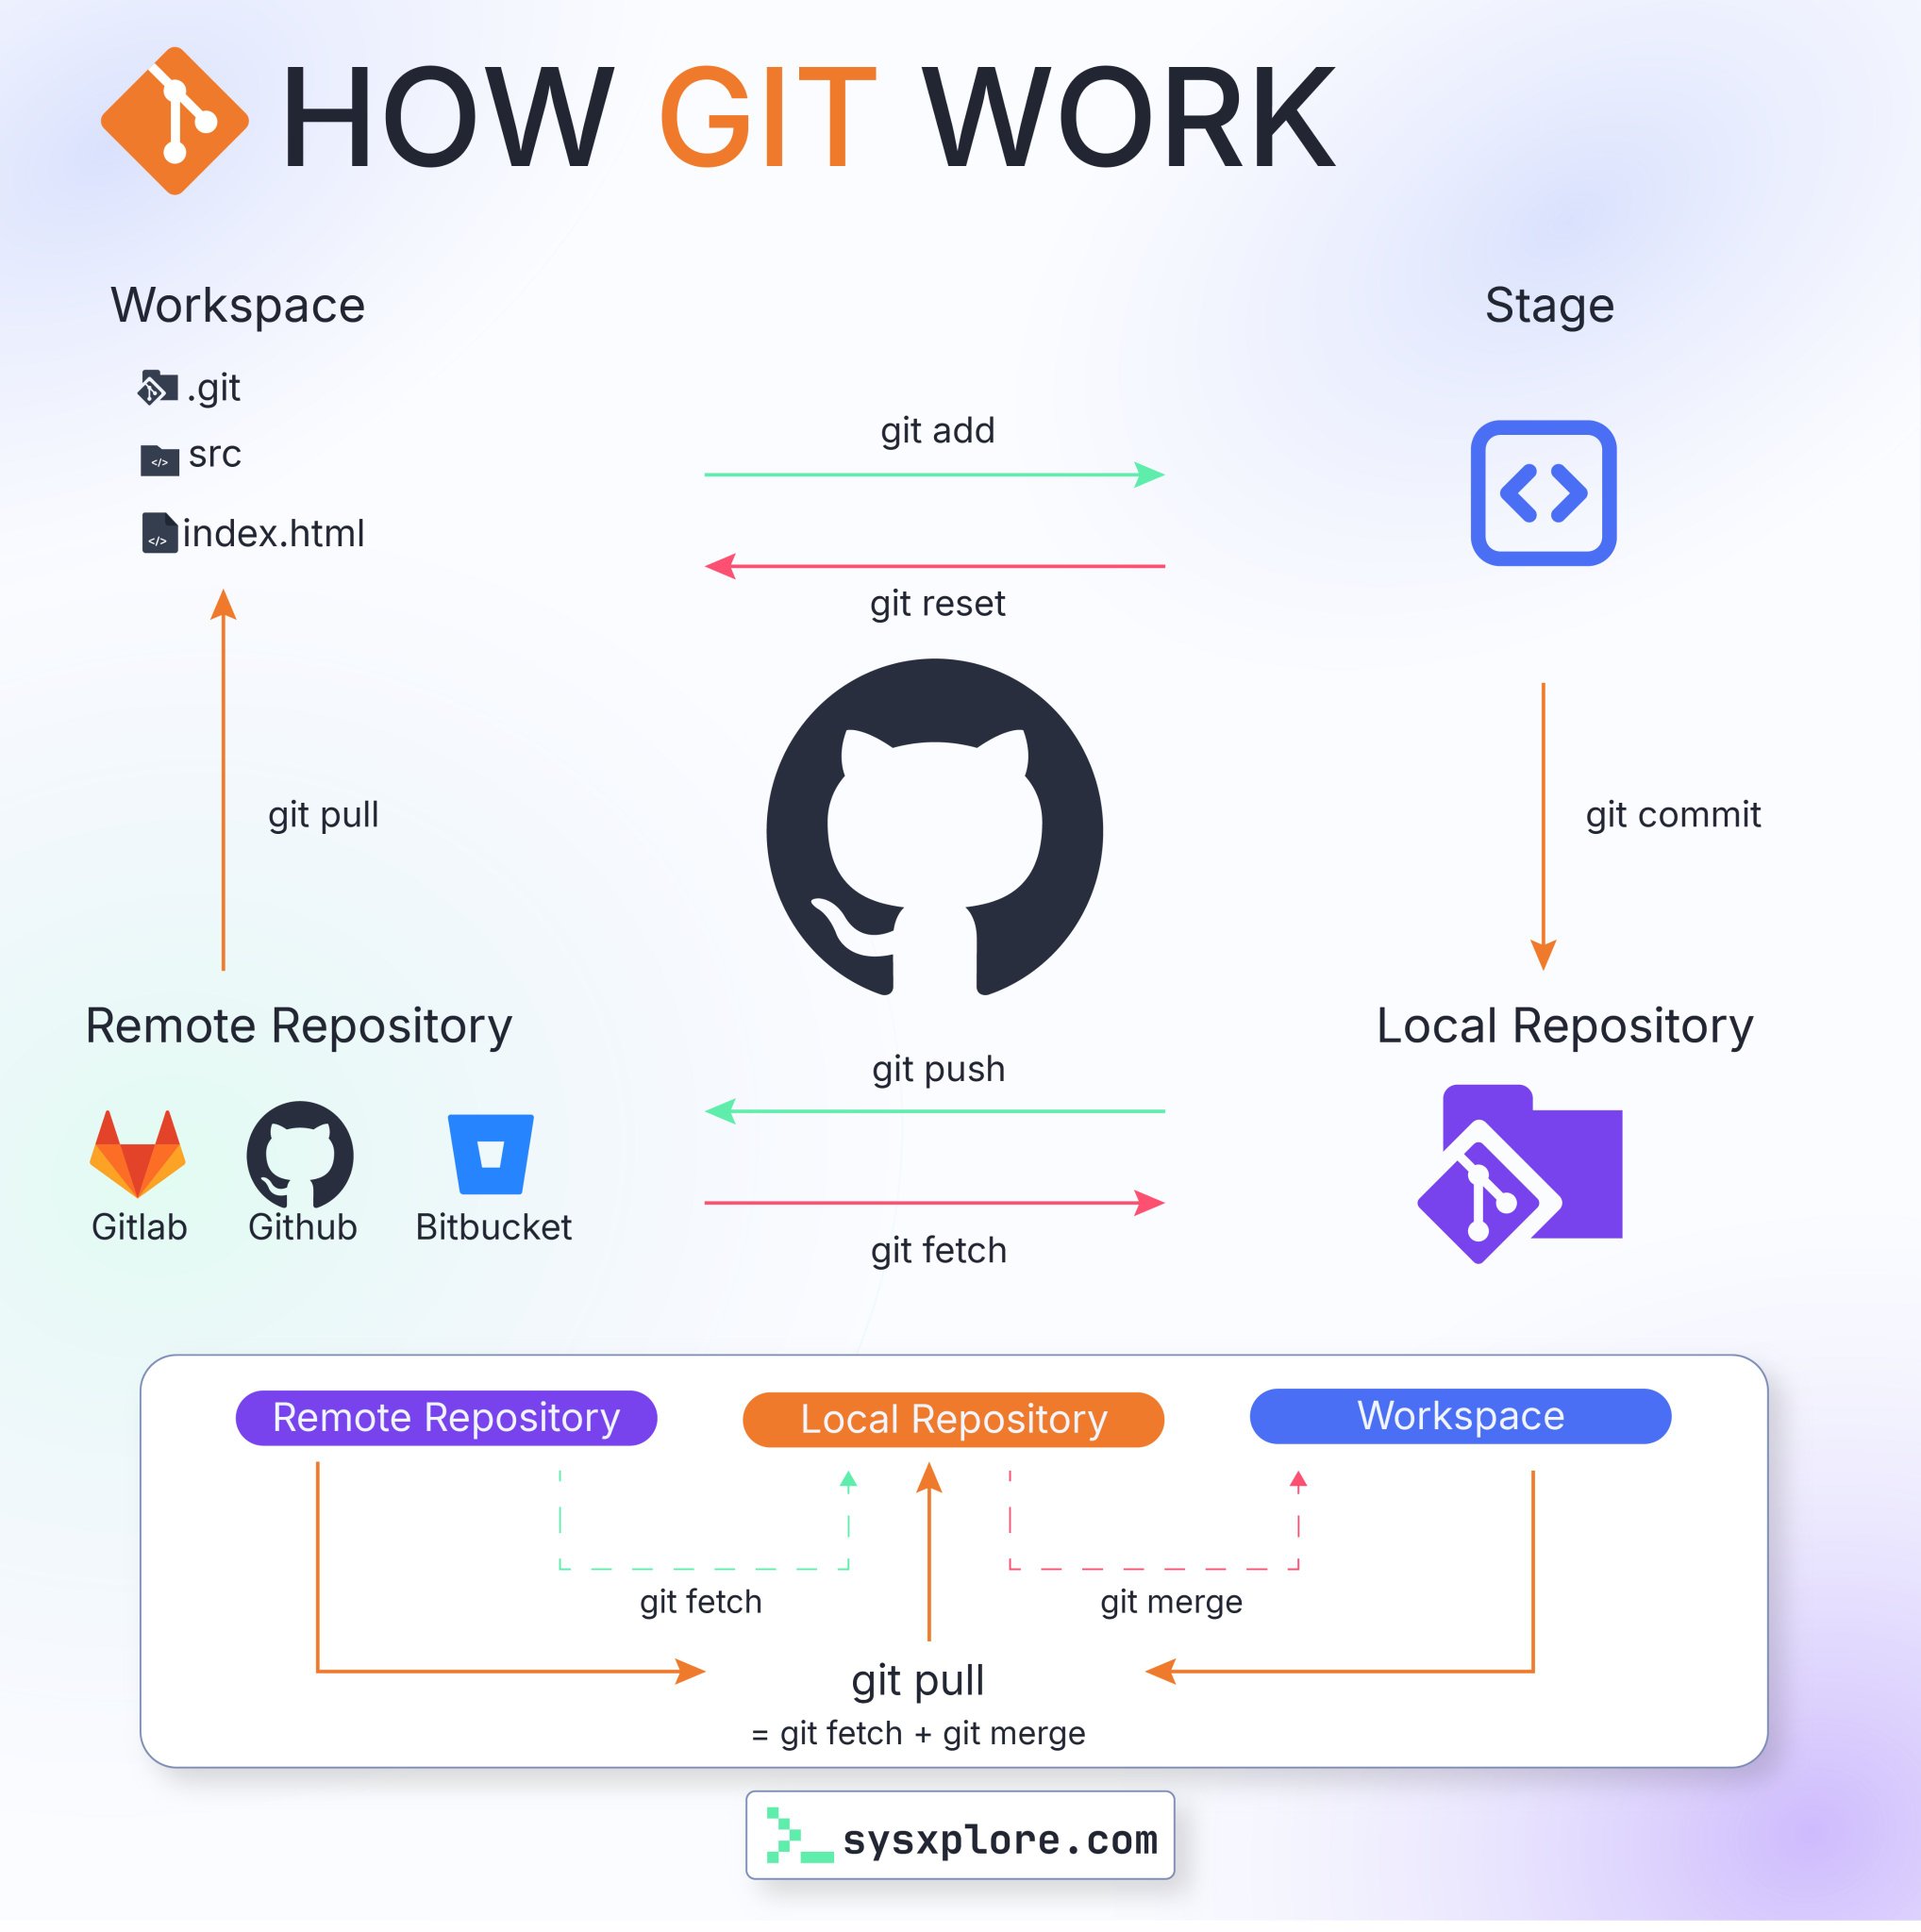
How Git Work
Git 檔案狀態:Modified/Untracked/Staged/Commited
- Modified/Untracked: 檔案已修改,尚未執行
git add - Staged: 檔案已經
git add,尚未執行git commit - Commited: 檔案已經
git commit
狀態 2 與 3 的檔案已經由 Git 控管內容變更。
Git Commands
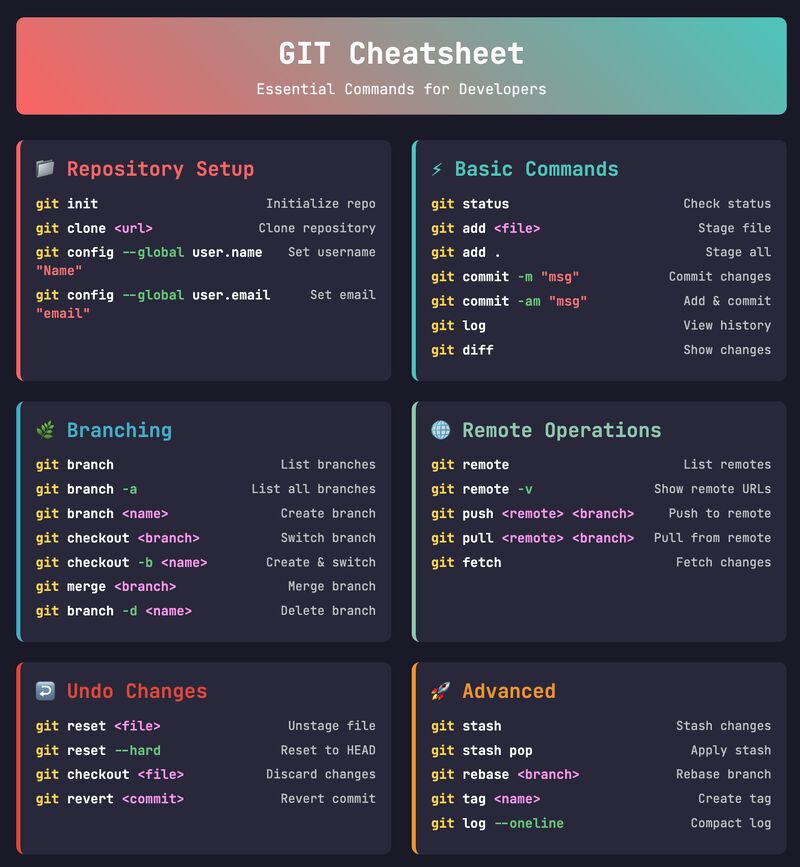
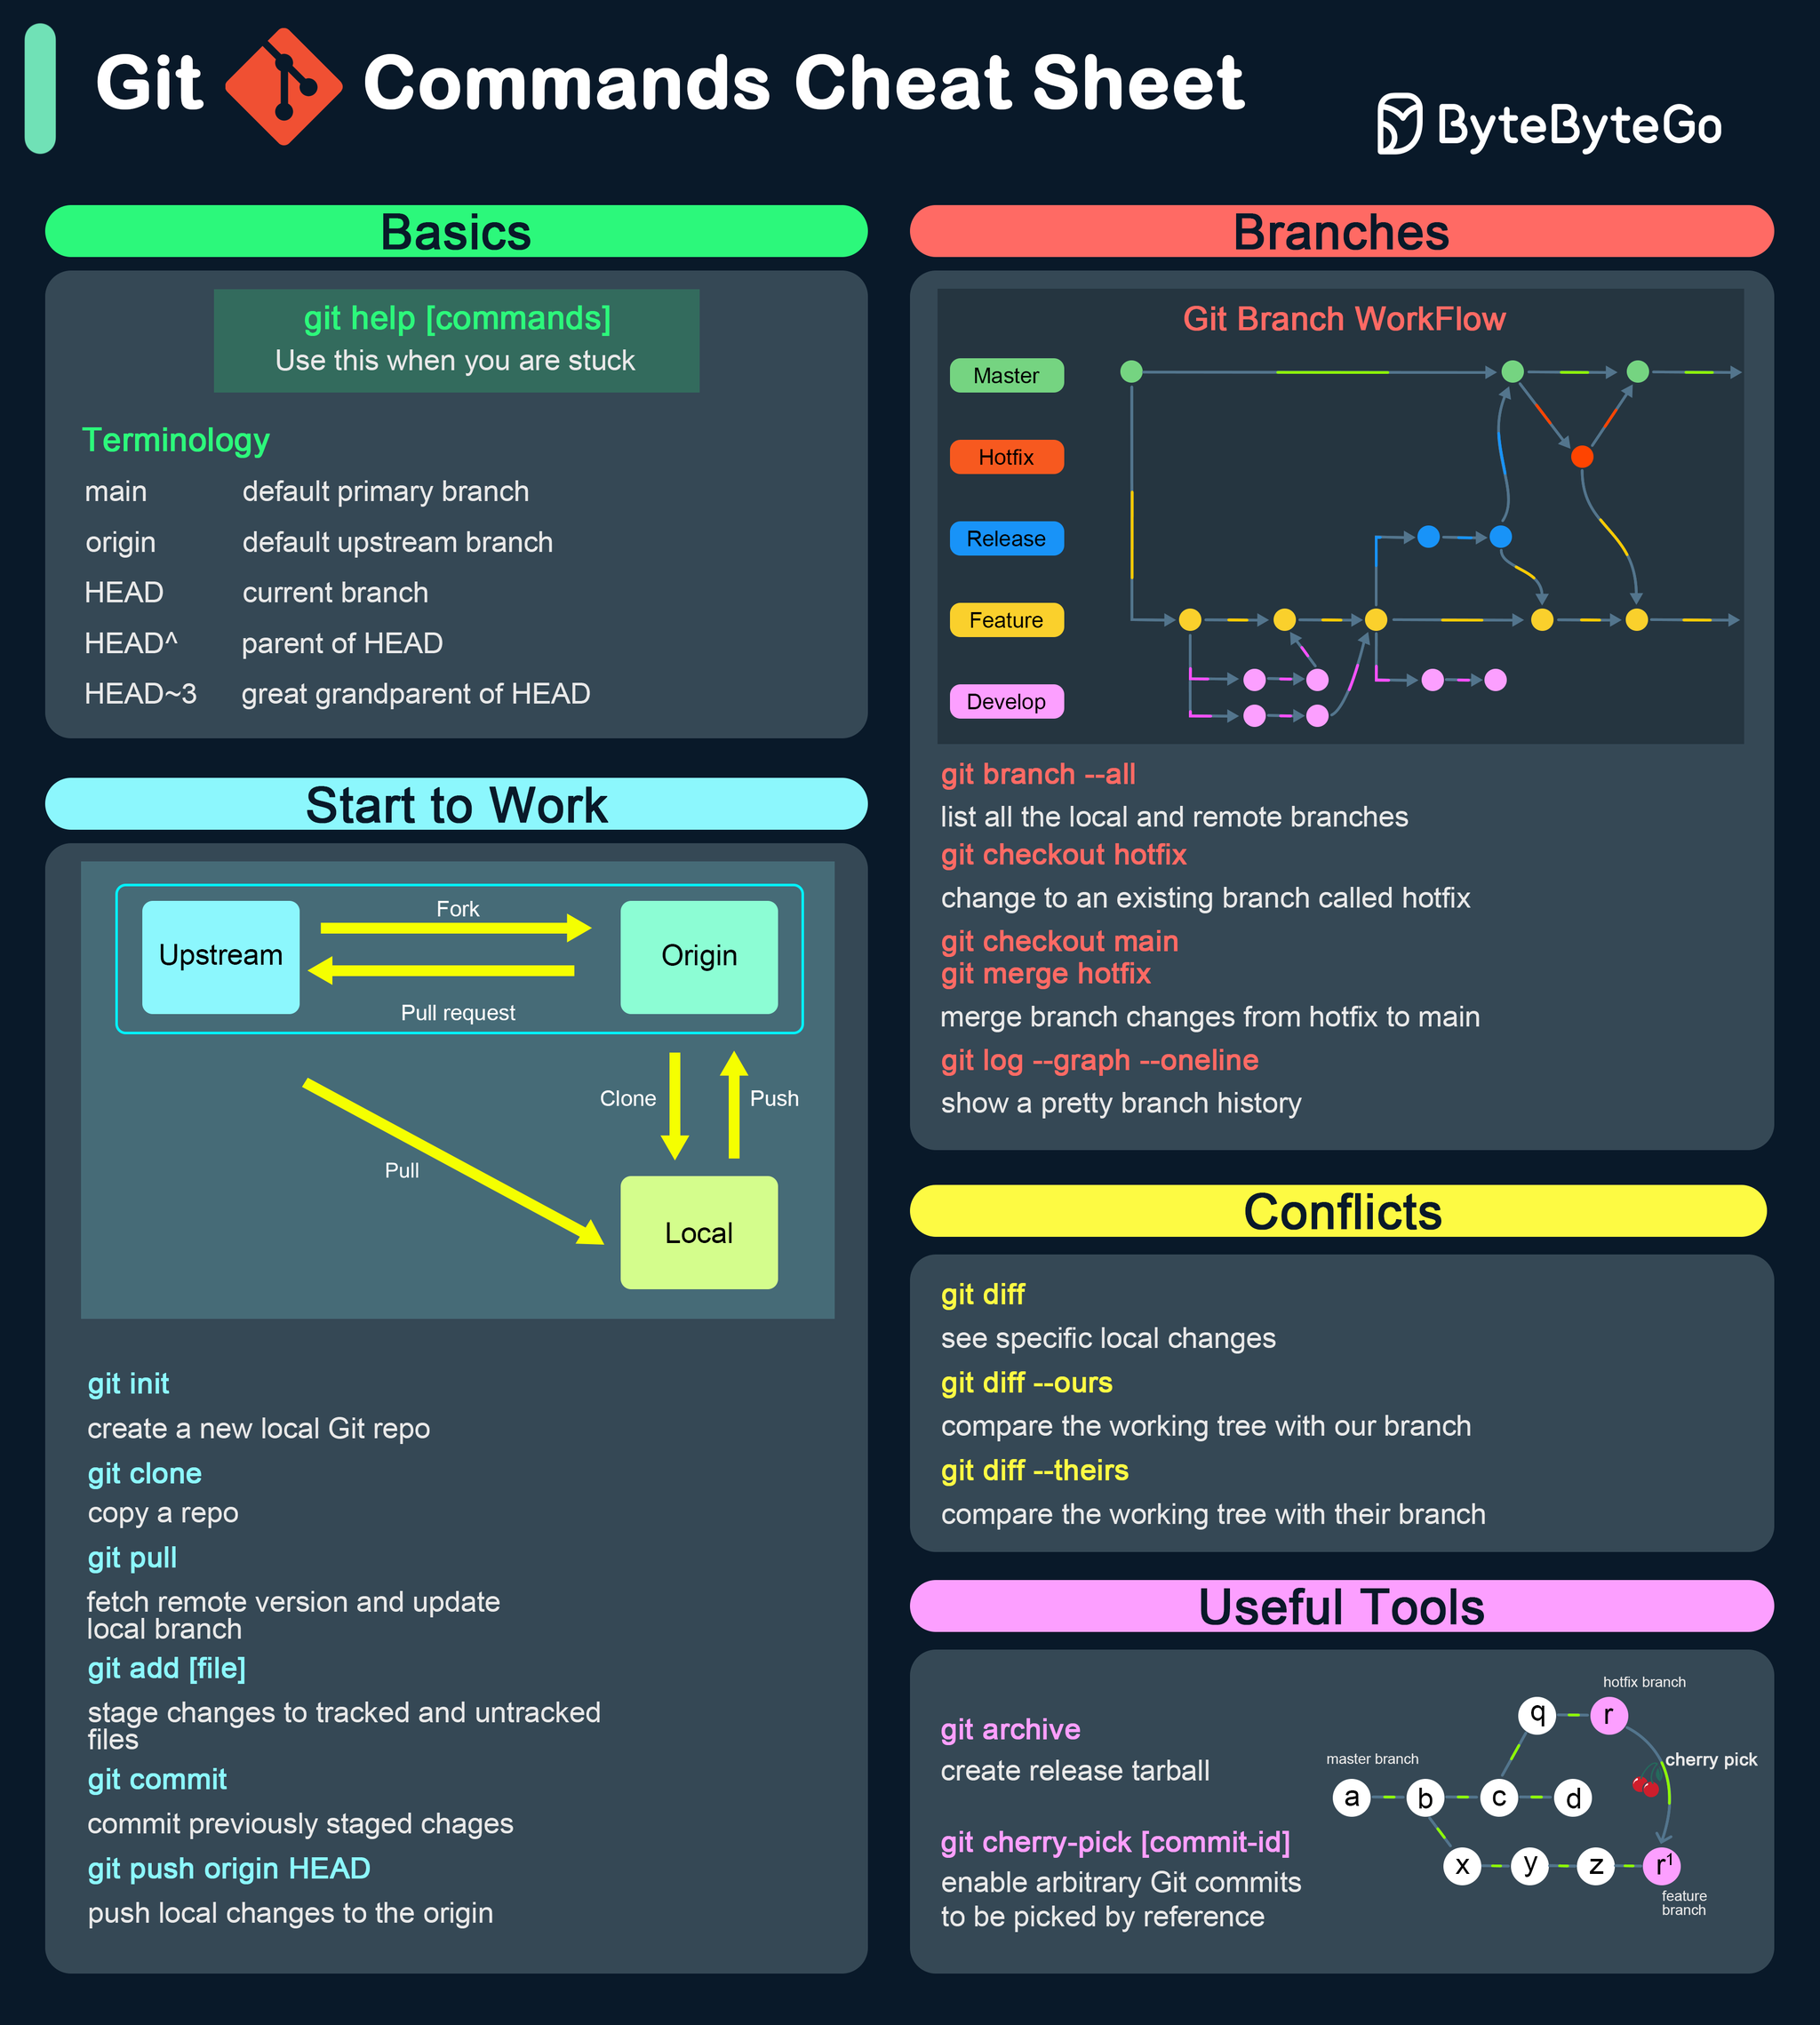
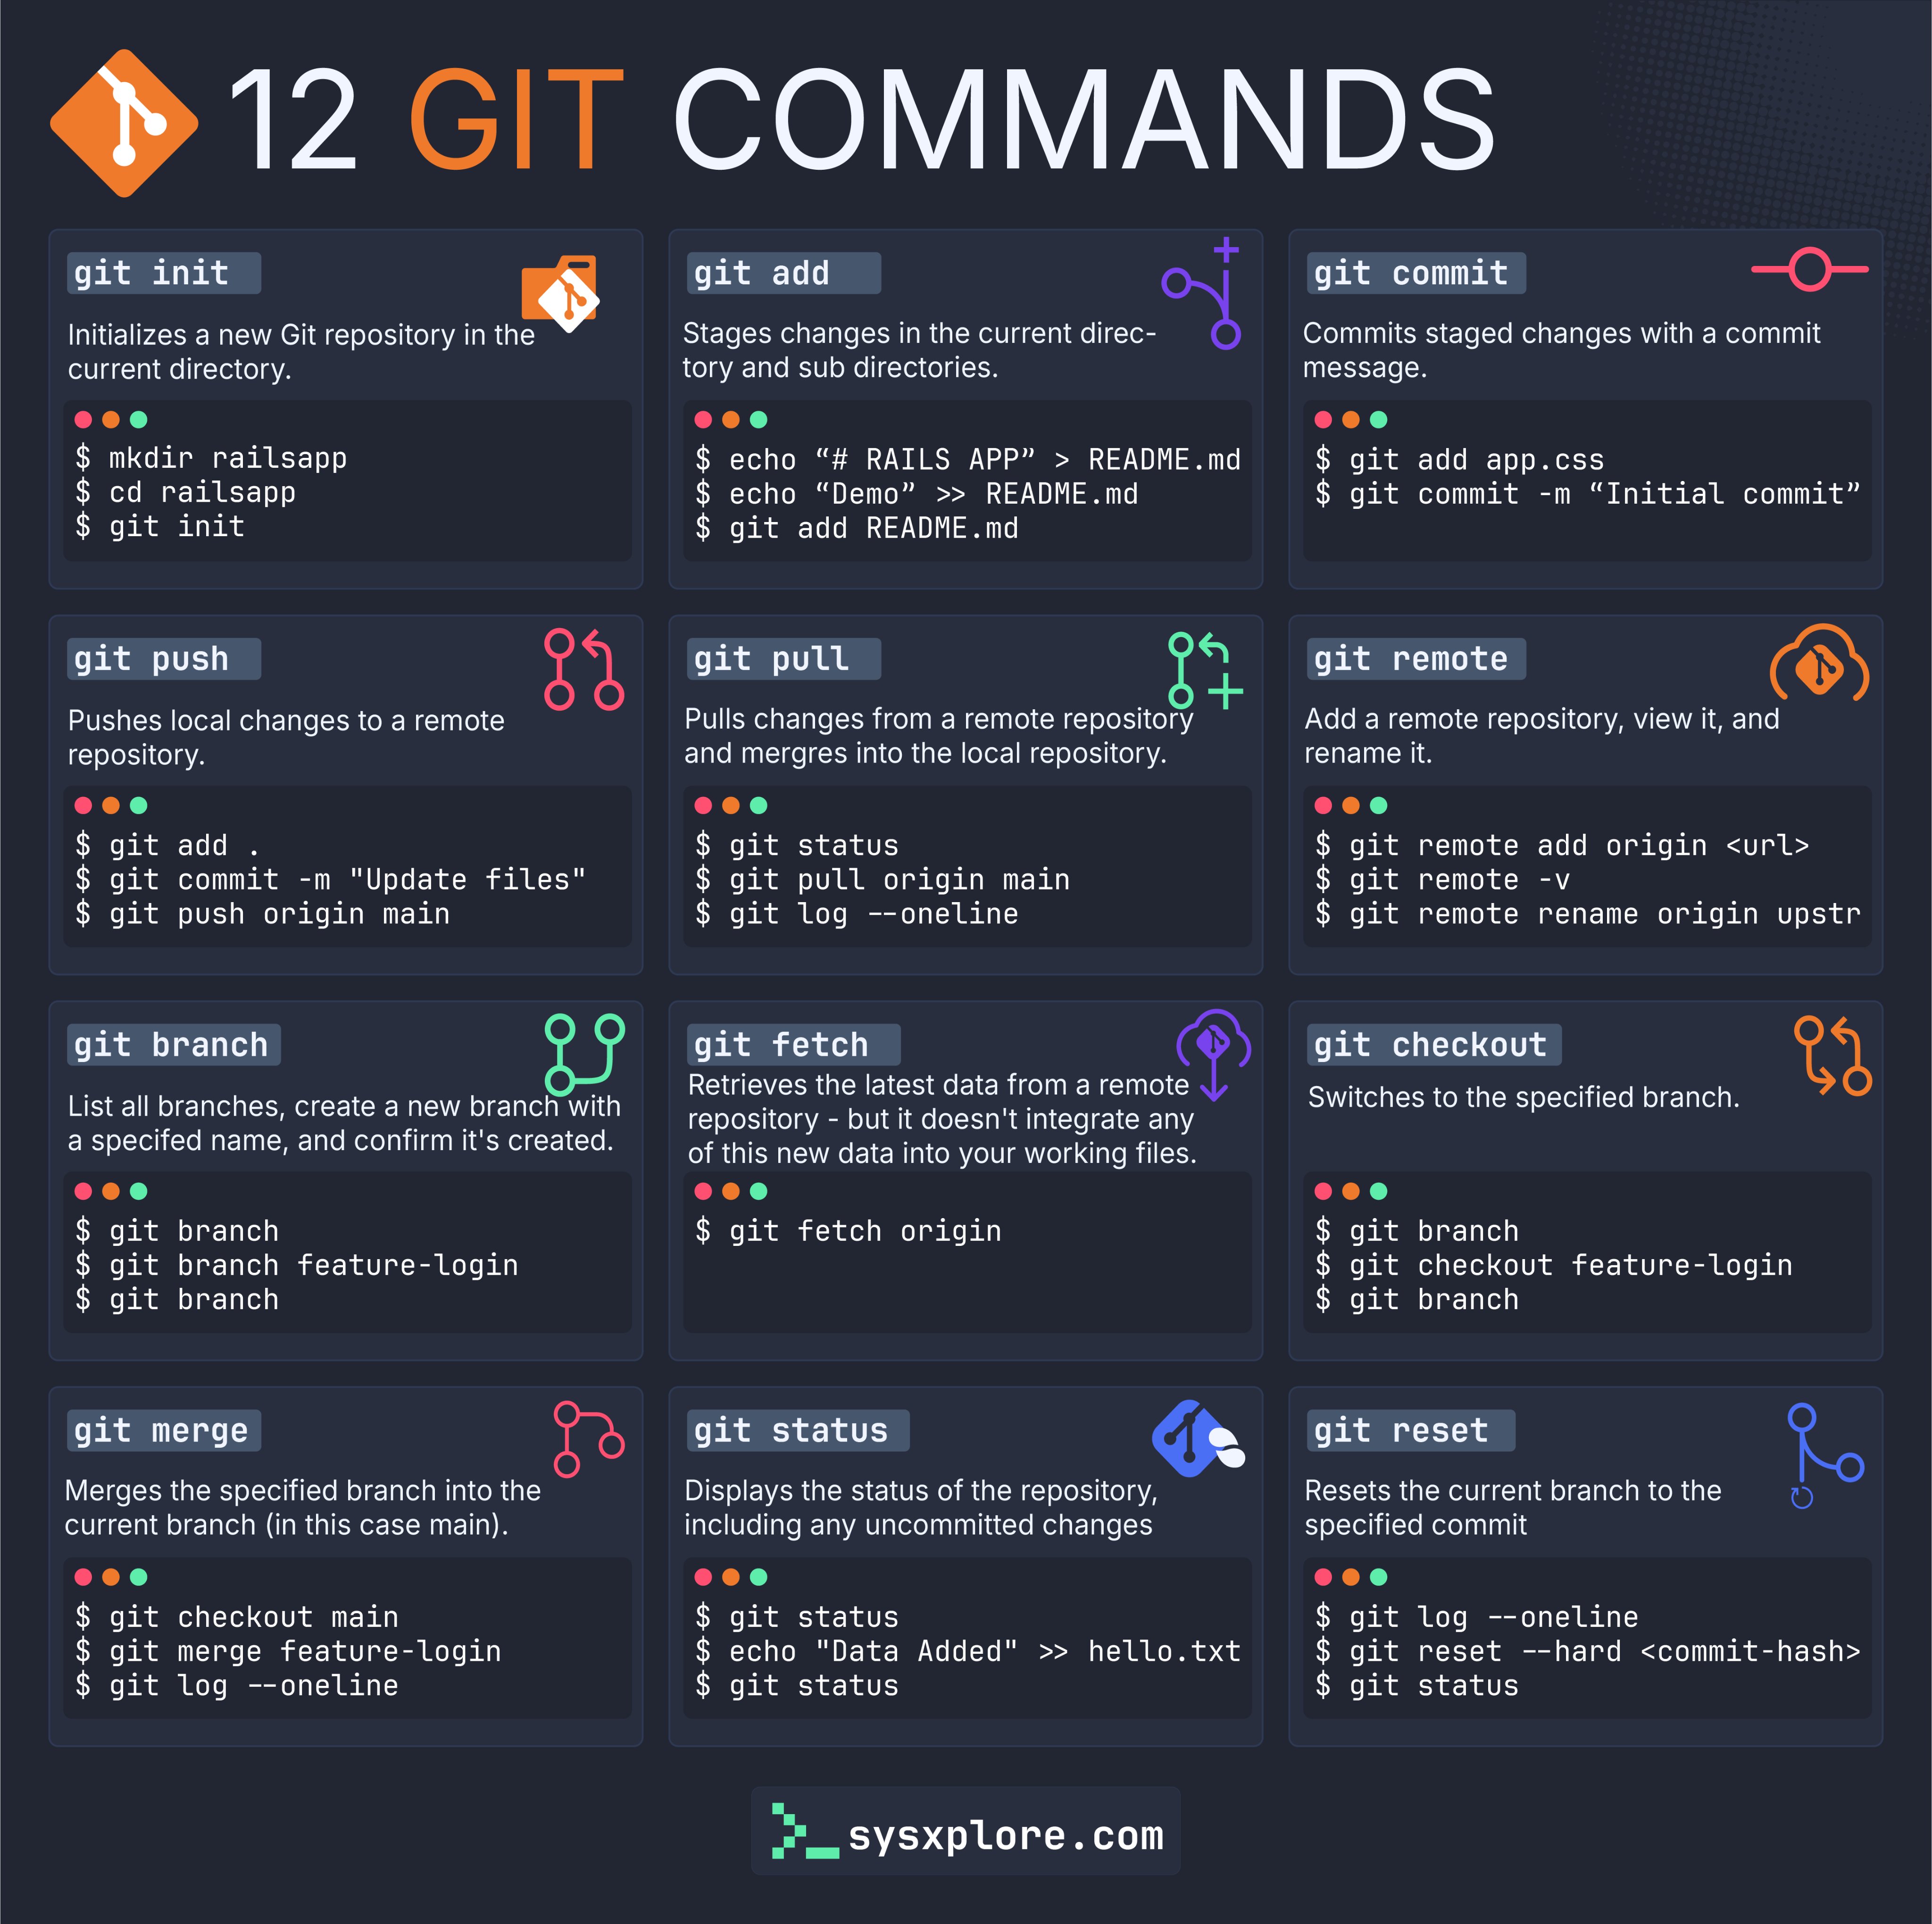
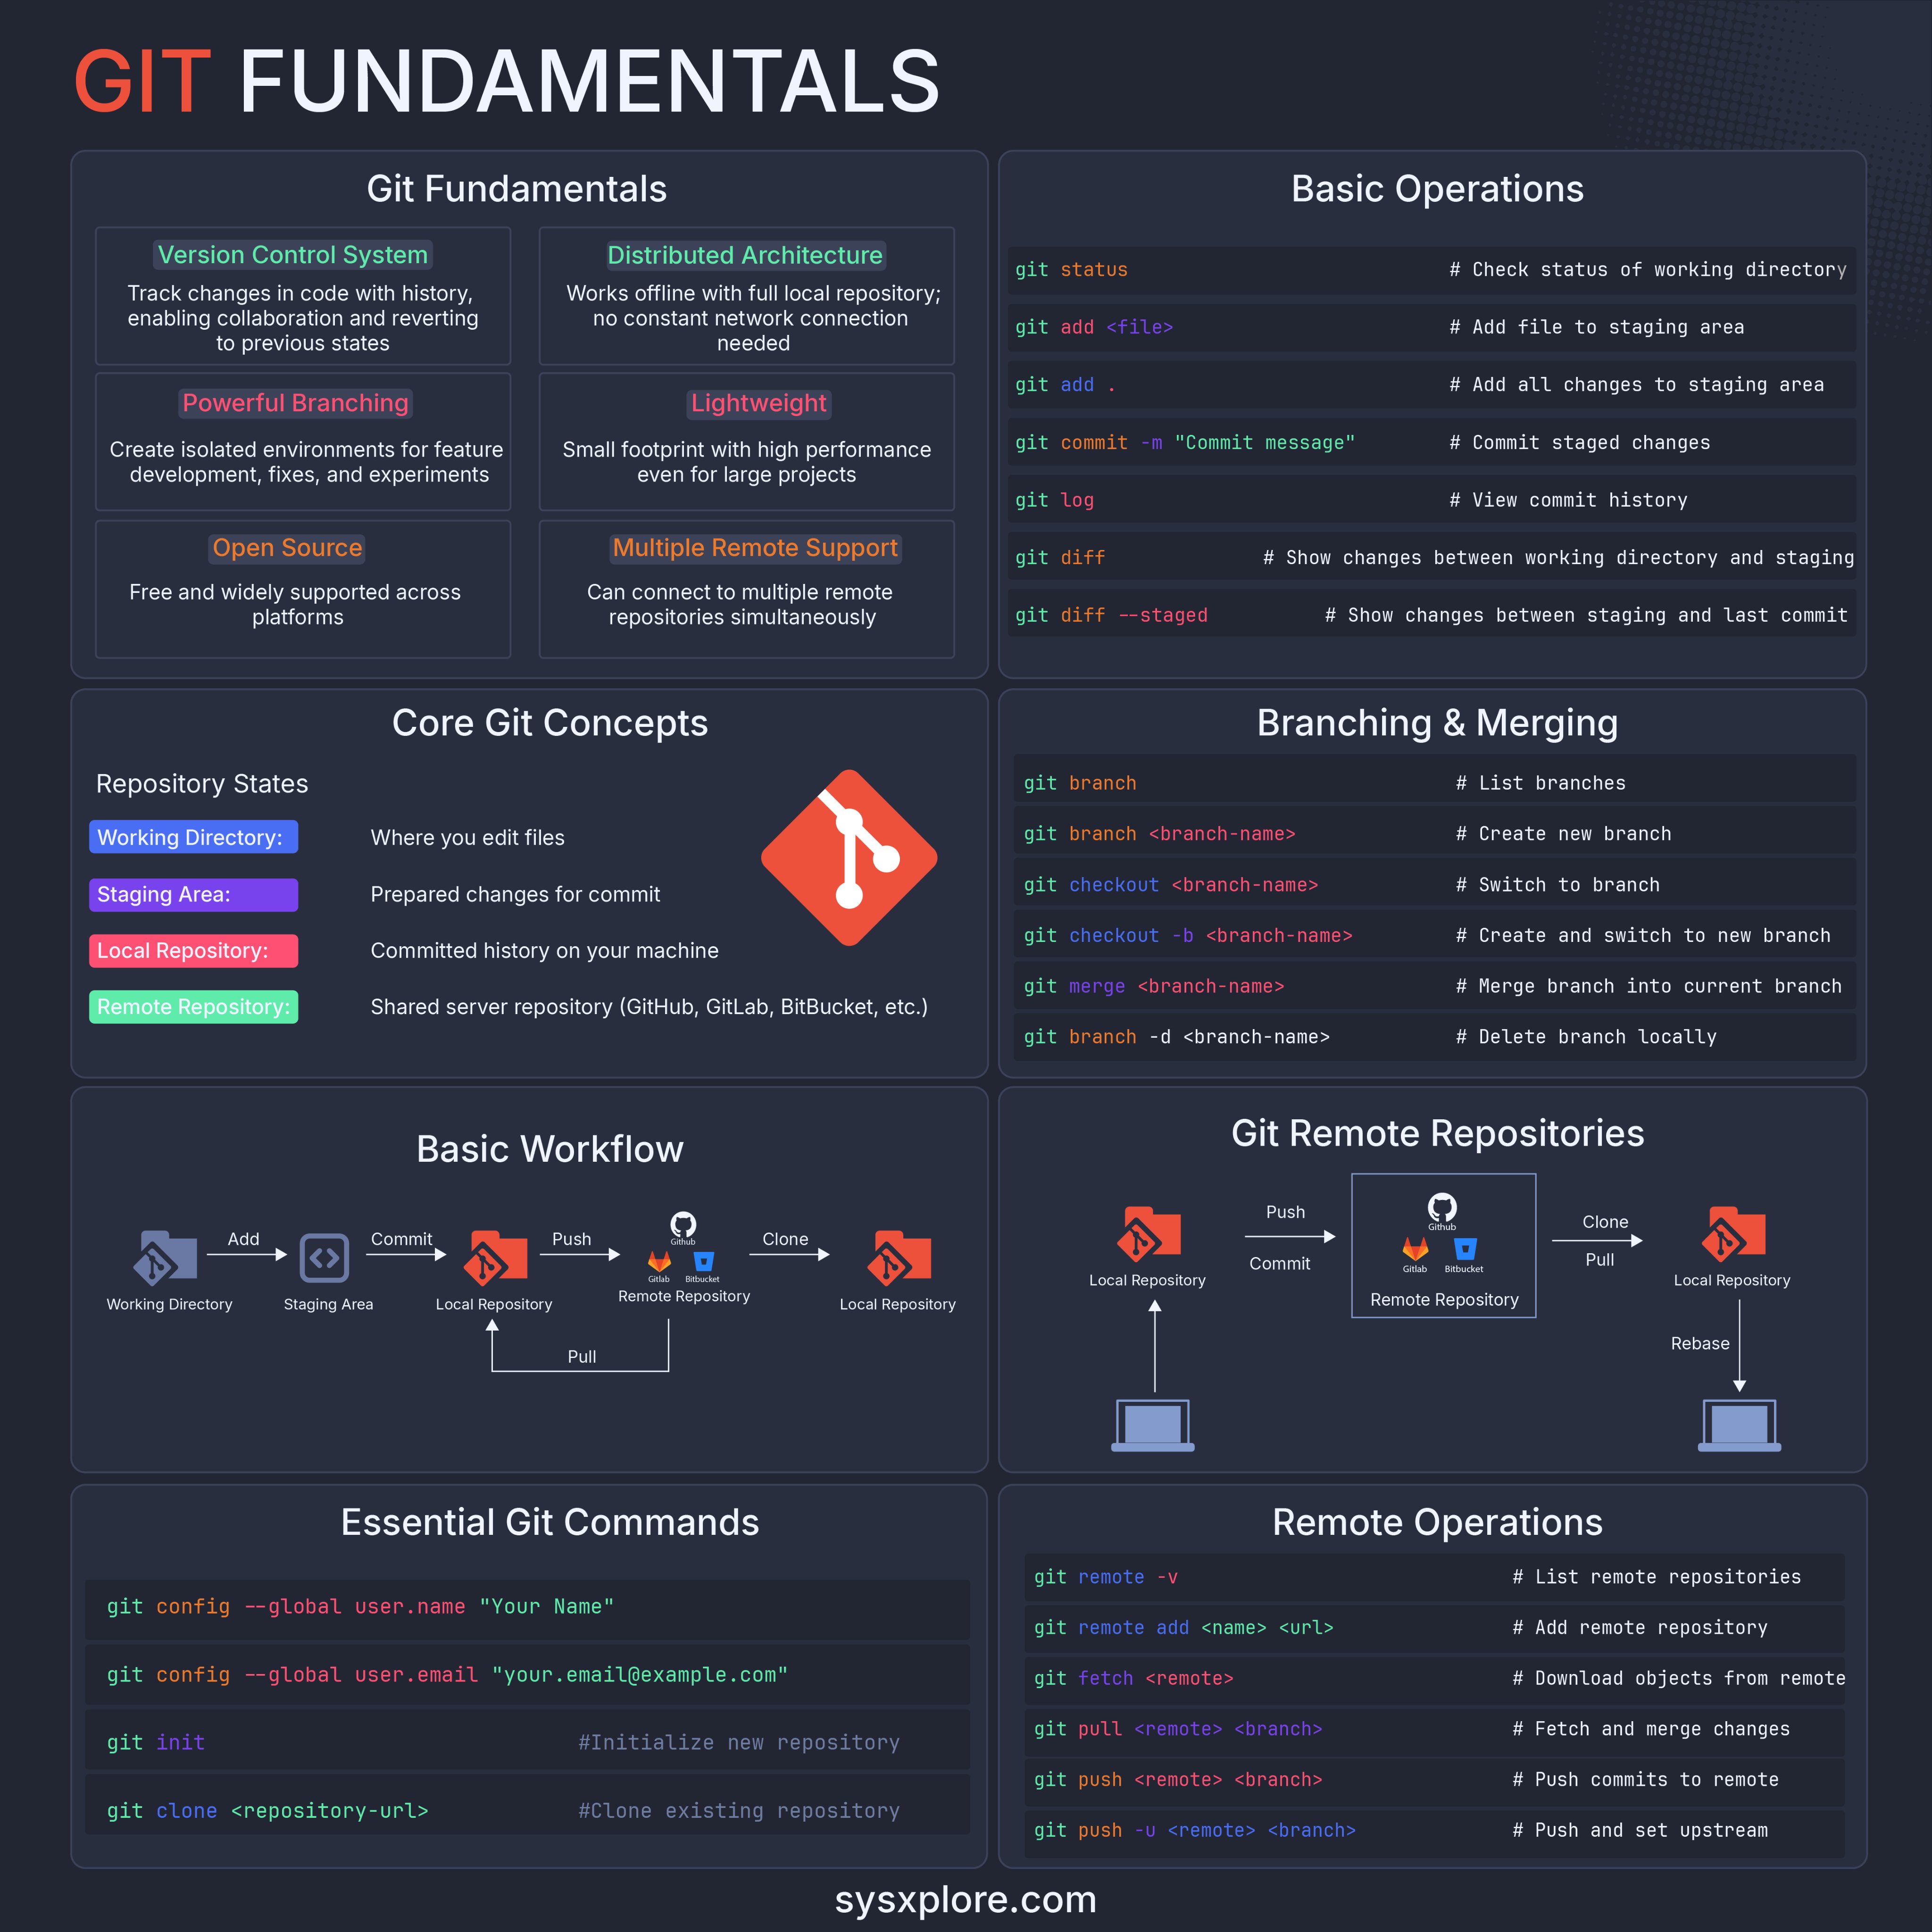
Git Fundamentals
Gitlab Server
Installation
With Docker
mkdir /mygitlab

docker run --detach \
  --hostname  mygit.example.com\
  --publish 80:80 \
  --name gitlab \
  --volume /mygitlab/config:/etc/gitlab \
  --volume /mygitlab/logs:/var/log/gitlab \
  --volume /mygitlab/data:/var/opt/gitlab \
  --rm \
  gitlab/gitlab-ce:17.11.7-ce.0
Config
重要檔案與目錄路徑:
- 主設定檔:
/etc/gitlab/gitlab.rb - 所有子服務日誌檔:
/var/log/gitlab/* - 系統密鑰檔:
/etc/gitlab/gitlab-secrets.json
Custom port
1- docker command
- 使用非標準埠時,host 與 container 必須使用相同埠號。
- 如果只修改 docker 啟動參數的外部 port,而不修改 gitlab.rb,服務可以正常啟動,首頁與帳號登入也正常,不過網頁上的專案 URL 位址會不正確。
docker run --detach \
  --hostname 10.4.1.76 \
  --publish 6080:6080 \
  --name gitlab \
  --volume /myapp/gitlab/config:/etc/gitlab \
  --volume /myapp/gitlab/logs:/var/log/gitlab \
  --volume /myapp/gitlab/data:/var/opt/gitlab \
...
2- Edit gitlab.rb
- 變更 port 會影響 container 的通訊埠,且必須與 docker 啟動參數 --publish 的內部 port 相同。
nginx['listen_port'] = 6080
external_url 'http://10.4.1.76:6080'
LDAP (Windows AD)
gitlab.rb :
gitlab_rails['ldap_enabled'] = true
gitlab_rails['ldap_servers'] = YAML.load <<-'EOS'
  main: # 'main' is the GitLab 'provider ID' of this LDAP server
    label: 'LDAP'
    host: 'ad03.example.com'
    port: 389           # LDAP服务端口389,如果LDAP基于SSL在端口通常为636
    uid: 'sAMAccountName'   # LDAP中用戶名的對應屬性,通常為'sAMAccountName'
    bind_dn: 'yourdomain\your-ad-user' # 同步用户帳戶, 格式為 'domain\username'
    password: 'ThisIsPassword'     # 同步用户帳戶密碼
    encryption: 'plain'     # 'start_tls' or 'simple_tls' or 'plain'
    verify_certificates: false  # 如果使用SSL,則設定true
    active_directory: true    # 如果是 使用 Windows Active Directory LDAP server 設定為 true
    allow_username_or_email_login: false  # 是否允許Email登入
    lowercase_usernames: false            # 是否將用戶轉成小寫
    block_auto_created_users: True       # 是否自動建立帳號
    base: 'OU=YOURDOMAIN,DC=example,DC=com' # 搜索LDAP用户是的BaseDN
    user_filter: ''
EOS
SMTP
gitlab-ctl commands
# Check the services
> gitlab-ctl status

run: alertmanager: (pid 820) 3073s; run: log: (pid 619) 3108s
run: gitaly: (pid 291) 3170s; run: log: (pid 309) 3169s
run: gitlab-exporter: (pid 799) 3075s; run: log: (pid 567) 3126s
run: gitlab-kas: (pid 452) 3158s; run: log: (pid 464) 3155s
run: gitlab-workhorse: (pid 791) 3075s; run: log: (pid 513) 3138s
run: logrotate: (pid 260) 3182s; run: log: (pid 268) 3181s
run: nginx: (pid 540) 3133s; run: log: (pid 550) 3132s
run: postgres-exporter: (pid 828) 3073s; run: log: (pid 738) 3100s
run: postgresql: (pid 316) 3164s; run: log: (pid 449) 3161s
run: prometheus: (pid 809) 3074s; run: log: (pid 606) 3112s
run: puma: (pid 467) 3152s; run: log: (pid 475) 3148s
run: redis: (pid 272) 3176s; run: log: (pid 288) 3173s
run: redis-exporter: (pid 801) 3074s; run: log: (pid 588) 3120s
run: sidekiq: (pid 479) 3145s; run: log: (pid 488) 3144s
run: sshd: (pid 36) 3192s; run: log: (pid 35) 3192s


> gitlab-ctl status postgresql
run: postgresql: (pid 316) 3748s; run: log: (pid 449) 3745s
# Reload the configuration
> gitlab-ctl reconfigure# Restart the service puma
> gitlab-ctl restart puma
# Restart all services
> gitlab-ctl restartBackup & Restore
- https://docs.gitlab.com/install/docker/backup/
- https://docs.gitlab.com/administration/backup_restore/
- 遷移至新主機
注意:除了使用指令 gitlab-backup 以外,還需要另外備份系統目錄裡 /etc/gitlab 的兩個檔案
1. gitlab.rb (主要設定檔)
2. gitlab-secrets.json (系統密鑰檔) : 用來解密資料庫的資料
With Docker
- 備份檔 (
編號_日期_版本_gitlab_backup.tar) 要先複製到 container 的目錄/var/opt/gitlab/backups(預設)
# Backup
docker exec -it <container-name> gitlab-backup create
# Backup DB only
docker exec -it <container-name> gitlab-backup create SKIP=artifacts,repositories,registry,uploads,builds,pages,lfs,packages,terraform_state

# Verify the backup file
docker exec -it <container-name> ls  /var/opt/gitlab/backups

# Restore
docker exec -it <container-name> bash
> gitlab-ctl stop puma
> gitlab-ctl stop sidekiq
> gitlab-ctl status

> gitlab-backup restore BACKUP=1704810663_2024_01_09_17.11.1
# Restore DB only
> gitlab-backup restore BACKUP=1704810663_2024_01_09_17.11.1 SKIP=artifacts,repositories,registry,uploads,builds,pages,lfs,packages,terraform_state

> gitlab-ctl restart
> gitlab-rake gitlab:check SANITIZE=true
> gitlab-rake gitlab:artifacts:check
> gitlab-rake gitlab:lfs:check
> gitlab-rake gitlab:uploads:check

# Restart the container
docker restart <container-name>
Upgrade & Patch
- Releases | GitLab
- Release Managers | GitLab
- Before you upgrade | GitLab Docs
- Upgrade 17.11 to 18: https://docs.gitlab.com/update/versions/gitlab_18_changes/
Pre-checks
1- Check the general configuration:
# With Docker
docker exec -it <container-name> gitlab-rake gitlab:check | tee mylogs/check.250916.out
2- Confirm that encrypted database values can be decrypted:
如果出現任何 failures 將會影響 Gitlab 的管理功能,請確定檔案 gitlab-secrets.json 是原始的版本,檔案內含有相關的密鑰,如果遺失,雖然系統仍可以透過備份檔回復,一般用戶也可以正常 pull/push 專案,但管理員將沒有權限操作大部分的網站管理功能。參閱詳細資訊
# With Docker
docker exec -it <container-name> gitlab-rake gitlab:doctor:secrets | tee mylogs/doctor_secrets.250916.out
3- Check the status of all background database migrations.
gitlab-psql -c "SELECT job_class_name, table_name, column_name, job_arguments FROM batched_background_migrations WHERE status NOT IN(3, 6);"

# With Docker
docker exec -it <container-name> gitlab-psql -c "SELECT job_class_name, table_name, column_name, job_arguments FROM batched_background_migrations WHERE status NOT IN(3, 6);"
4- In GitLab UI, check that:
- Users can sign in.
- The project list is visible.
- Project issues and merge requests are accessible.
- Users can clone repositories from GitLab.
- Users can push commits to GitLab.
Post-installation
Disable Gravatar Service (optional)
Enter Admin Mode > Settings > General > Account and limit
- Gravatar enabled: 不勾選
Container Log Rotation
如果使用 Docker 環境建置系統,在服務啟用後,container 的 log 檔在一段時間後可能會耗盡系統可用空間。要設定 container log 自動循環,啟動時需要增加幾個參數。
docker run --detach \
...
  --log-driver json-file \
  --log-opt max-size=10m \
  --log-opt max-file=3 \
...
Health check
- https://docs.gitlab.com/administration/monitoring/health_check/
- Gitlab 支援 HTTP 協定的服務狀態檢測,方便外部的中央監控系統做監視。
- 預設不開放外部監控,需要手動將監控主機 IP 加入設定檔。
- 監控項目:基本服務/資料庫連線/Redis 快取
/etc/gitlab/gitlab.rb :
# IP allowlist endpoints
gitlab_rails['monitoring_whitelist'] = ['127.0.0.0/8', '10.18.109.0/24']
套用設定
> gitlab-ctl reconfigureHTTP GET
GET /health_check
GET /health_check/database
GET /health_check/cache
GET /health_check/migrations
Troubleshooting
Troubleshoot Tips
- Check the container log:
docker logs -f <container-name>,檢視服務在啟動後的整個程序執行狀況。 - Check the status of the services :
gitlab-ctl status,注意每個服務的運行時間秒數,如果特定服務顯示特別短秒數,表示該服務異常且一直再重啟。 - Check the nginx's log :
/var/log/nginx/error.log,這裡可以查出是否有通訊埠衝突異常。
HTTP 502
- 記憶體至少需要 4GB,如果不足可能無法初始化所有服務。
- 通訊埠衝突,檢查 host 與 container 是否有相同 port 衝突。Gitlab 內建多個服務,啟動會開啟相應的 port,例如 puma 預設使用 8080。要檢查不同內建服務的預設 port 號,可以檢視
gitlab.rb。
HTTP 500
- 變更 Admin 的參數設定時發生
- 檢查
gitlab-secrets.json(系統密鑰檔)是否與系統初始化時相同。
CI/CD
程式碼檢查與部署自動化
Python Linter & Formatter
Python 程式碼檢查器與格式化
Linter
什麼是 Linter
Linter 或 lint,主要功能是對程式進行靜態分析——在程式未執行情況下檢查出潛在的語法錯誤。
Linter,就是協助你檢查程式語法正確性的工具,大部分程式語言都有屬於自己的 linter,而 Python 最常見的 linter 不外乎pylint、pep8(現為 pycodestyle) 和 flake8。
上述 linter 都是 Python 的 package,同時也是 CLI 工具,皆可透過命令列,獨立執行與使用。
除了語法正確性,linter 還會檢查排版風格,比如程式碼是否符合 PEP 8 要求的排版風格,也是上述 linter 檢查的一環,如此才有「排版風格一致」可言。換句話說,所謂的一致,原則上指的是與 PEP 8 規範一致。
Flake8 Linter
- GitHub: https://github.com/PyCQA/flake8
- Doc: https://flake8.pycqa.org/en/latest/
- VS Code 設定 Python Linter、Formatter 教學 - Code and Me
Formatter
什麼是 Formatter
統一程式碼排版風格第一步是使用 linter,通用型 linter 會檢查(但不限於)程式碼風格上所有違反 PEP 8 的部分,發現風格不符後,接著就要用 formatter(格式化器)進行格式化!
換句話說,formatter 就是自動幫你修正這些排版問題的工具!而這個過程,就是「格式化」。
程式語法錯誤——比如使用未設定的變數——雖然也可能被 linter 檢測出並提示,但這部分的修正通常得手動為之。Formatter 只能協助處理排版風格上的缺失。
雖然修正排版一樣也可以手動為之,但是一來麻煩,二來難免會有遺漏,還是靠機器比較實在,也輕鬆得多。
Black Formatter
- GitHub: https://github.com/psf/black
- Doc: https://black.readthedocs.io/en/stable/index.html
- Python Flake8 與 Black Formatter 擴充套件快速上手 - Code and Me
- 使用 Black 格式化程式碼——《Python 功力提升的樂趣》 - Code and Me
Ruff Formatter
- GitHub: https://github.com/astral-sh/ruff
- Doc: Ruff
GitHub Action Workflow
GitHub Actions 是 GitHub 提供的 CI/CD 解決方案。
免費版的限制:
- 私有專案庫:2000 分鐘/月
- 公開專案庫:無限制
Tutorials
- GitHub Actions 入門:自動化 Lint、Format 與 Type Check - Code and Me
- How to Build a Production-Ready DevOps Pipeline with Free Tools
Building Docker Image (workflow)
- Your Repo ➞ Settings ➞ Security ➞ Secrets and variables ➞ Actions
- Repository secrets
- Name: DOCKERHUB_TOKEN
- Value: <YOUR-TOKEN>
- Repository variables
- Name: DOCKERHUB_USERNAME
- Value: <YOUR-USERNAME>
- Repository secrets
- 其他 Docker Registry 平台登入方式:Docker Login · Actions · GitHub Marketplace
.github/workflows/deploy.yml :
name: Build and Push Docker Image

# ============================================================================
# 【觸發條件】
# ============================================================================
# - push: 當代碼推送到 master 分支時自動觸發
# - workflow_dispatch: 允許在 GitHub Actions 頁面手動觸發部署
# ============================================================================
on:
  #push:
  #  branches:
  #    - main
  workflow_dispatch:

# ============================================================================
# 【環境變數】
# ============================================================================
env:
  IMAGE_NAME: gemini-ocr-fastapi

jobs:
  build-and-push:
    runs-on: ubuntu-latest
    steps:
      # ----------------------------------------------------------------------
      # Step : 檢出代碼倉庫
      # ----------------------------------------------------------------------
      # 將 GitHub 倉庫的代碼下載到 runner 的工作目錄
      # 這是後續構建步驟的基礎
      # ----------------------------------------------------------------------
      - name: Checkout
        uses: actions/checkout@v4

      # ----------------------------------------------------------------------
      # Step : 釋放磁盤空間
      # ----------------------------------------------------------------------
      # GitHub Actions runner 的磁盤空間有限(約 14GB),為了確保構建過程順利進行,
      # 需要清理不必要的文件。此步驟會:
      # - 刪除 .NET SDK(如果不需要)
      # - 刪除 Android SDK(如果不需要)
      # - 刪除 GHC(Haskell 編譯器,如果不需要)
      # - 清理 Docker 系統(鏡像、容器、卷等)
      # - 顯示磁盤使用情況
      #
      # 注意:docker system prune 有時可能導致不穩定,如果空間足夠可以註解掉
      # ----------------------------------------------------------------------
      - name: Free GitHub Actions Disk Space
        run: |
          sudo rm -rf /usr/share/dotnet
          sudo rm -rf /usr/local/lib/android
          sudo rm -rf /opt/ghc
          # 建議:prune 有時會導致不穩,如果空間還夠,可以先註解掉下面這行測試
          sudo docker system prune -af || true
          df -h

      # ----------------------------------------------------------------------
      # Step : 設置 Docker Buildx
      # ----------------------------------------------------------------------
      # Docker Buildx 是 Docker 的擴展構建工具,支持:
      # - 多平台構建(如 linux/amd64, linux/arm64)
      # - 構建緩存優化
      # - 並行構建
      #
      # 配置說明:
      # - image=moby/buildkit:latest: 使用最新版本的 buildkit 作為構建引擎
      # - platforms: 聲明支持的平台(雖然這裡只構建 arm64,但保留 amd64 以備未來擴展)
      # ----------------------------------------------------------------------
      - name: Setup Docker Buildx
        uses: docker/setup-buildx-action@v2
        with:
          driver-opts: |
            image=moby/buildkit:latest
          platforms: linux/amd64,linux/arm64

      # ----------------------------------------------------------------------
      # Step : 登錄到 Docker Hub Registry
      # ----------------------------------------------------------------------
      # 在推送鏡像之前,必須先通過身份驗證登錄到 Docker Hub
      #
      # 認證方式:
      # # - username/password: 從 GitHub Secrets 中讀取,確保敏感信息不會暴露在代碼中
      #
      # 安全提示:Docker Hub 憑證存儲在 GitHub Variables 與 Secrets 中,名稱為:
      # - DOCKERHUB_USERNAME (Var)
      # - DOCKERHUB_TOKEN  (Secret) 註: 使用 Personal Access Token
      # ----------------------------------------------------------------------
      - name: Log in to Docker Hub
        uses: docker/login-action@v3
        with:
          username: ${{ vars.DOCKERHUB_USERNAME }}
          password: ${{ secrets.DOCKERHUB_TOKEN }}

      # ----------------------------------------------------------------------
      # Step 5: 構建並推送 Docker 鏡像到 ACR
      # ----------------------------------------------------------------------
      # 這是核心構建步驟,負責:
      # 1. 使用 ./docker/Dockerfile 構建鏡像
      # 2. 將構建好的鏡像推送到 ACR
      #
      # 配置說明:
      # - context: 構建上下文目錄(整個倉庫根目錄)
      # - file: Dockerfile 的路徑
      # - push: true 表示構建完成後自動推送到 registry
      # - platforms: linux/arm64 表示構建 ARM64 架構的鏡像(適用於 Apple Silicon 或 ARM 服務器)
      # - tags: 鏡像標籤,使用 commit SHA 作為版本號,確保每次構建都有唯一標識
      #
      # 緩存策略:
      # - cache-from: 從 registry 拉取之前的構建緩存,加速構建過程
      # - cache-to: 將構建緩存推送到 registry,供下次構建使用
      # - mode=max: 使用最大緩存模式,保存所有構建層
      #
      # 鏡像標籤格式:stktrade.azurecr.io/stk-jixun-model:<commit-sha>
      # 例如:stktrade.azurecr.io/stk-jixun-model:abc123def456
      # ----------------------------------------------------------------------
      - name: Build and push Docker image
        uses: docker/build-push-action@v5
        with:
          context: ${{ github.workspace }}
          file: ./Dockerfile
          push: true
          platforms: linux/amd64
          tags: ${{ vars.DOCKERHUB_USERNAME }}/${{ env.IMAGE_NAME }}:${{ github.sha }}
          cache-from: type=registry,ref=${{ vars.DOCKERHUB_USERNAME }}/${{ env.IMAGE_NAME }}:buildcache
          cache-to: type=registry,ref=${{ vars.DOCKERHUB_USERNAME }}/${{ env.IMAGE_NAME }}:buildcache,mode=max

      # ----------------------------------------------------------------------
      # Step 6: 生成鏡像構建摘要
      # ----------------------------------------------------------------------
      # 在 GitHub Actions 的 Summary 頁面生成一個美觀的 Markdown 報告,
      # 包含:
      # - 鏡像的完整信息(registry、名稱、標籤)
      # - 如何手動拉取和運行鏡像的說明
      # - 本次構建的元數據(commit SHA、workflow run ID)
      #
      # 這個摘要對於:
      # - 快速查看構建結果
      # - 手動測試特定版本的鏡像
      # - 問題排查和版本追蹤
      # 非常有用
      # ----------------------------------------------------------------------
      - name: Image Pull Summary
        run: |
          DOCKERHUB_NAME="${{ vars.DOCKERHUB_USERNAME }}"
          IMAGE_NAME="${{ env.IMAGE_NAME }}"
          IMAGE_TAG="${DOCKERHUB_NAME}/${IMAGE_NAME}:${{ github.sha }}"
          COMMIT_SHA="${{ github.sha }}"
          RUN_ID="${{ github.run_id }}"
          echo "## 🐳 Image Build Summary" >> $GITHUB_STEP_SUMMARY
          echo "" >> $GITHUB_STEP_SUMMARY
          echo "### Image Information" >> $GITHUB_STEP_SUMMARY
          echo "- **Registry:** docker.io/\`${DOCKERHUB_NAME}\`" >> $GITHUB_STEP_SUMMARY
          echo "- **Image Name:** \`${IMAGE_NAME}\`" >> $GITHUB_STEP_SUMMARY
          echo "- **Tag:** \`${COMMIT_SHA}\`" >> $GITHUB_STEP_SUMMARY
          echo "- **Full Image:** \`${IMAGE_TAG}\`" >> $GITHUB_STEP_SUMMARY
          echo "" >> $GITHUB_STEP_SUMMARY
          echo "### How to Pull This Image" >> $GITHUB_STEP_SUMMARY
          echo "" >> $GITHUB_STEP_SUMMARY
          echo "1. **Login to Docker Hub:**" >> $GITHUB_STEP_SUMMARY
          echo "\`\`\`bash" >> $GITHUB_STEP_SUMMARY
          echo "docker login -u"  >> $GITHUB_STEP_SUMMARY
          echo "\`\`\`" >> $GITHUB_STEP_SUMMARY
          echo "" >> $GITHUB_STEP_SUMMARY
          echo "2. **Pull the image:**" >> $GITHUB_STEP_SUMMARY
          echo "\`\`\`bash" >> $GITHUB_STEP_SUMMARY
          echo "docker pull ${DOCKERHUB_NAME}/${IMAGE_TAG}" >> $GITHUB_STEP_SUMMARY
          echo "\`\`\`" >> $GITHUB_STEP_SUMMARY
          echo "" >> $GITHUB_STEP_SUMMARY
          echo "3. **Run the container:**" >> $GITHUB_STEP_SUMMARY
          echo "\`\`\`bash" >> $GITHUB_STEP_SUMMARY
          echo "docker run -d -e \"GOOGLE_API_KEY=你的金鑰\" -p 8000:8000 ${IMAGE_TAG}" >> $GITHUB_STEP_SUMMARY
          echo "\`\`\`" >> $GITHUB_STEP_SUMMARY
          echo "" >> $GITHUB_STEP_SUMMARY
          echo "---" >> $GITHUB_STEP_SUMMARY
          echo "**Commit SHA:** \`${COMMIT_SHA}\` | **Workflow Run:** \`${RUN_ID}\`" >> $GITHUB_STEP_SUMMARY
K8s deployment with Helm
- 在跳板機 (Bastion) 上執行 Helm 部署命令
- 流程:GitHub Actions → SSH to Bastion → Execute Helm Upgrade → K8s Cluster Updated
.github/workflows/deploy.yml :
jobs:
  # ==========================================================================
  # Job 2: 使用 Helm 部署到 Kubernetes 集群
  # ==========================================================================
  # 此 job 負責:
  # 1. 等待 build-and-deploy job 完成(確保鏡像已構建並推送)
  # 2. 通過 SSH 連接到 Azure Bastion 主機
  # 3. 在 Bastion 主機上執行 Helm 部署命令
  # 4. 更新 Kubernetes 集群中的應用程序
  #
  # 為什麼需要通過 Bastion?
  # - 安全考慮:Kubernetes 集群不直接暴露在公網
  # - 網絡隔離:只有通過 Bastion 才能訪問集群
  # - 權限控制:Bastion 作為跳板機,集中管理訪問權限
  #
  # 部署流程:
  # GitHub Actions → SSH to Bastion → Execute Helm Upgrade → K8s Cluster Updated
  # ==========================================================================
  helm-deploy:
    # 確保在 build-and-push job 成功完成後才執行
    needs: build-and-push

    # 使用可重用的 Helm 部署 workflow
    # 這個 workflow 定義在 ./.github/workflows/helm-deploy-reusable.yml
    # 採用可重用 workflow 的好處:
    # - 代碼復用:多個項目可以共享相同的部署邏輯
    # - 易於維護:部署邏輯集中管理,修改一處即可影響所有使用它的 workflow
    # - 標準化:確保所有項目的部署流程一致
    uses: ./.github/workflows/helm-deploy-reusable.yml

    # ========================================================================
    # 【輸入參數】
    # ========================================================================
    # 這些參數會傳遞給可重用 workflow,用於配置部署行為
    #
    # - repo_path: 在 Bastion 主機上的倉庫路徑(用於拉取最新代碼或配置)
    # - helm_release: Helm release 名稱,用於標識和管理部署的應用
    # - helm_namespace: Kubernetes namespace,用於隔離不同環境的資源
    #   (stktrade-prod 表示生產環境)
    # - helm_chart_path: Helm chart 的本地路徑(在 Bastion 主機上)
    # - helm_values_file: Helm values 文件路徑,包含部署配置(如資源限制、環境變數等)
    # - kubeconfig_path: Kubernetes 配置文件路徑,用於認證和連接到集群
    # - helm_set_values: 動態設置的 Helm values
    #   image.tag=${{ github.sha }} 表示使用本次構建的鏡像版本(commit SHA)
    #   這確保部署的是剛剛構建好的鏡像
    # ========================================================================
    with:
      repo_path: /home/alang/gemini-ocr-fastapi
      helm_release: gemini-ocr
      helm_namespace: my-devops-prod
      helm_chart_path: ~/gemini-ocr-fastapi/k8s/chart
      helm_values_file: ~/gemini-ocr-fastapi/k8s/chart/values.yaml
      kubeconfig_path: ~/my.kubeconfig
      helm_set_values: image.tag=${{ github.sha }}

    # ========================================================================
    # 【SSH 認證信息】
    # ========================================================================
    # 這些 secrets 存儲在 GitHub Secrets 中,用於 SSH 連接到 Bastion 主機
    #
    # - SSH_PRIVATE_KEY: SSH 私鑰,用於身份驗證
    # - SSH_HOST: Bastion 主機的 IP 地址或域名
    # - SSH_USER: SSH 登錄用戶名
    #
    # 安全提示:
    # - 所有敏感信息都存儲在 GitHub Secrets 中,不會暴露在代碼中
    # ========================================================================
    secrets:
      SSH_PRIVATE_KEY: ${{ secrets.MY_BASTION_KEY }}
      SSH_HOST: ${{ secrets.MY_BASTION_HOST }}
      SSH_USER: ${{ secrets.MY_BASTION_USERNAME }}
.github/workflows/helm-deploy-reusable.yml :
# ============================================================================
# GitHub Actions Reusable Workflow: Helm 部署可重用工作流
# ============================================================================
#
# 【什麼是可重用 Workflow?】
# 這是一個可重用的 workflow(reusable workflow),可以被其他 workflow 通過
# workflow_call 事件調用。類似於函數的概念,可以讓多個項目共享相同的部署邏輯。
#
# 【使用場景】
# 當多個項目需要執行相同的 Helm 部署流程時,可以:
# 1. 在各自的 workflow 中調用此可重用 workflow
# 2. 通過 inputs 參數傳入項目特定的配置
# 3. 避免重複編寫相同的部署代碼
#
# 【工作流程】
# 1. 通過 SSH 連接到遠程機器(通常是 Azure Bastion 或跳板機)
# 2. 更新遠程機器上的代碼倉庫到指定分支
# 3. 設置 Kubernetes 配置文件路徑
# 4. 構建並執行 Helm 部署命令
# 5. 清理環境(無論成功或失敗)
#
# 【優勢】
# - 代碼復用:多個項目共享同一套部署邏輯
# - 易於維護:修改一處即可影響所有使用它的 workflow
# - 標準化:確保所有項目的部署流程一致
# - 靈活性:通過參數化配置支持不同項目的需求
# ============================================================================

name: Helm Deploy (Reusable)

# ============================================================================
# 【觸發方式】
# ============================================================================
# workflow_call: 表示此 workflow 可以被其他 workflow 調用
# 當其他 workflow 使用 uses: 關鍵字引用此 workflow 時,會觸發執行
# ============================================================================
on:
  workflow_call:
    # ========================================================================
    # 【輸入參數 (Inputs)】
    # ========================================================================
    # 這些參數由調用此 workflow 的父 workflow 傳入
    # 分為必需參數(required: true)和可選參數(required: false)
    # ========================================================================
    inputs:
      # ----------------------------------------------------------------------
      # 必需參數
      # ----------------------------------------------------------------------

      # repo_path: 遠程機器上的倉庫路徑
      # 用於定位需要更新的代碼倉庫位置
      # 例如:/home/azureuser/stk.jixun.model
      repo_path:
        description: 'Path to repository on remote machine'
        required: true
        type: string

      # helm_release: Helm release 名稱
      # 用於標識和管理 Kubernetes 中的應用部署
      # 同一個 namespace 中,release 名稱必須唯一
      helm_release:
        description: 'Helm release name'
        required: true
        type: string

      # helm_namespace: Kubernetes namespace
      # 用於隔離不同環境或項目的資源
      # 例如:stktrade-prod(生產環境)、stktrade-dev(開發環境)
      helm_namespace:
        description: 'Kubernetes namespace'
        required: true
        type: string

      # helm_chart_path: Helm chart 在遠程機器上的路徑
      # Chart 包含應用程序的部署模板和配置
      # 例如:~/stk.jixun.model/k8s/chart
      helm_chart_path:
        description: 'Path to helm chart on remote machine'
        required: true
        type: string

      # helm_values_file: Helm values 文件路徑
      # Values 文件包含部署配置,如資源限制、環境變數、副本數等
      # 例如:~/stk.jixun.model/k8s/chart/values.yaml
      helm_values_file:
        description: 'Path to values file on remote machine'
        required: true
        type: string

      # ----------------------------------------------------------------------
      # 可選參數(SSH 連接相關)
      # ----------------------------------------------------------------------

      # ssh_host: 目標機器的主機名或 IP 地址
      # 如果通過 secrets.SSH_HOST 提供,此參數可選
      # 優先級:secrets.SSH_HOST > inputs.ssh_host
      ssh_host:
        description: 'Target machine hostname or IP address (optional if SSH_HOST secret is provided)'
        required: false
        type: string

      # ssh_user: SSH 登錄用戶名
      # 如果通過 secrets.SSH_USER 提供,此參數可選
      # 優先級:secrets.SSH_USER > inputs.ssh_user
      ssh_user:
        description: 'SSH username (optional if SSH_USER secret is provided)'
        required: false
        type: string

      # ssh_port: SSH 端口號
      # 默認值為 22(標準 SSH 端口)
      # 如果目標機器使用非標準端口,可以通過此參數指定
      ssh_port:
        description: 'SSH port'
        required: false
        type: string
        default: '22'

      # ----------------------------------------------------------------------
      # 可選參數(Kubernetes 和 Helm 相關)
      # ----------------------------------------------------------------------

      # kubeconfig_path: Kubernetes 配置文件路徑
      # Kubeconfig 文件包含集群連接信息和認證憑證
      # 默認值:~/.kube/config(Kubernetes 標準配置路徑)
      kubeconfig_path:
        description: 'Kubeconfig path on remote machine'
        required: false
        type: string
        default: '~/.kube/config'

      # helm_timeout: Helm 部署超時時間
      # 如果部署在指定時間內未完成,Helm 會超時並失敗
      # 默認值:5m(5 分鐘)
      # 格式:數字 + 單位(s=秒, m=分鐘, h=小時)
      helm_timeout:
        description: 'Helm upgrade timeout'
        required: false
        type: string
        default: '5m'

      # helm_wait: 是否等待部署完成
      # true: 等待所有 Pod 就緒後才返回(推薦用於生產環境)
      # false: 提交部署後立即返回(不等待 Pod 就緒)
      # 默認值:true
      helm_wait:
        description: 'Wait for deployment to complete'
        required: false
        type: boolean
        default: true

      # helm_set_values: 動態設置的 Helm values
      # 用於覆蓋 values.yaml 中的默認值
      # 格式:key1=value1,key2=value2(逗號分隔)
      # 例如:image.tag=abc123,replicaCount=3
      #
      # 使用場景:
      # - 設置鏡像標籤(如:image.tag=${{ github.sha }})
      # - 臨時調整副本數
      # - 覆蓋環境變數
      helm_set_values:
        description: 'Additional --set values (format: key1=value1,key2=value2)'
        required: false
        type: string

    # ========================================================================
    # 【Secrets(機密信息)】
    # ========================================================================
    # Secrets 用於存儲敏感信息,不會暴露在日誌中
    # 這些 secrets 由調用此 workflow 的父 workflow 傳入
    # ========================================================================
    secrets:
      # SSH_PRIVATE_KEY: SSH 私鑰(必需)
      # 用於身份驗證,連接到遠程機器
      # 必須是與遠程機器上 authorized_keys 對應的私鑰
      SSH_PRIVATE_KEY:
        description: 'SSH private key for authentication'
        required: true

      # SSH_HOST: 目標機器主機名或 IP(可選)
      # 如果主機信息是敏感信息,可以通過 secret 傳入
      # 優先級高於 inputs.ssh_host
      SSH_HOST:
        description: 'Target machine hostname or IP address (optional, use if ssh_host input is a secret)'
        required: false

      # SSH_USER: SSH 用戶名(可選)
      # 如果用戶名是敏感信息,可以通過 secret 傳入
      # 優先級高於 inputs.ssh_user
      SSH_USER:
        description: 'SSH username (optional, use if ssh_user input is a secret)'
        required: false

jobs:
  # ==========================================================================
  # Job: Helm 部署
  # ==========================================================================
  # 此 job 負責通過 SSH 連接到遠程機器並執行 Helm 部署
  # ==========================================================================
  helm-deploy:
    runs-on: ubuntu-latest

    steps:
      # ----------------------------------------------------------------------
      # Step: 通過 SSH 執行 Helm 部署
      # ----------------------------------------------------------------------
      # 使用 appleboy/ssh-action 連接到遠程機器並執行部署腳本
      #
      # 執行流程:
      # 1. 建立 SSH 連接
      # 2. 在遠程機器上執行 script 中的命令
      # 3. 返回執行結果
      # ----------------------------------------------------------------------
      - name: Deploy with Helm
        uses: appleboy/ssh-action@v1
        with:
          # SSH 連接配置
          # 優先級:secrets > inputs
          # 這樣設計的好處是:如果主機信息是敏感信息,可以通過 secret 傳入
          host: ${{ secrets.SSH_HOST || inputs.ssh_host }}
          username: ${{ secrets.SSH_USER || inputs.ssh_user }}
          key: ${{ secrets.SSH_PRIVATE_KEY }}
          port: ${{ inputs.ssh_port || '22' }}

          # 在遠程機器上執行的腳本
          # 注意:這些命令會在遠程機器上執行,而不是在 GitHub Actions runner 上
          script: |

            # ==================================================================
            # 【清理函數】
            # ==================================================================
            # 定義清理函數,用於在腳本退出時(無論成功或失敗)恢復倉庫狀態
            #
            # 為什麼需要清理?
            # - 部署過程中會切換到特定分支(如 master)
            # - 如果部署失敗,倉庫可能停留在錯誤的分支
            # - 清理函數確保倉庫恢復到默認分支(main 或 master)
            #
            # 清理邏輯:
            # 1. 檢查倉庫路徑是否存在
            # 2. 切換回默認分支(main 優先,如果不存在則嘗試 master)
            # 3. 使用 || true 確保即使切換失敗也不會中斷流程
            # ==================================================================
            cleanup() {
              if [ -d "${{ inputs.repo_path }}" ]; then
                cd "${{ inputs.repo_path }}" && git checkout main || git checkout master || true
              fi
            }

            # ==================================================================
            # 【註冊清理函數】
            # ==================================================================
            # 使用 trap 命令註冊清理函數,使其在腳本退出時自動執行
            # EXIT 信號會在腳本正常退出或異常退出時觸發
            #
            # 這類似於編程語言中的 finally 塊,確保清理邏輯一定會執行
            # ==================================================================
            trap cleanup EXIT

            # ==================================================================
            # 【步驟 1: 更新代碼倉庫】
            # ==================================================================
            # 確保遠程機器上的代碼倉庫是最新的,並且切換到正確的分支
            #
            # 執行流程:
            # 1. cd 到倉庫目錄(如果失敗則退出)
            # 2. git fetch origin: 從遠程倉庫獲取最新信息(不修改工作目錄)
            # 3. git checkout -B: 創建或切換到指定分支,並追蹤遠程分支
            #    - -B 表示如果分支存在則重置,不存在則創建
            #    - "${{ github.ref_name }}" 是觸發 workflow 的分支名稱(如 master)
            #    - "origin/${{ github.ref_name }}" 是遠程分支的引用
            #
            # 為什麼需要這一步?
            # - 确保部署使用的是最新代码
            # - 确保 Helm chart 和 values 文件是最新版本
            # - 支持多分支部署(不同分支可能有不同的配置)
            # ==================================================================
            cd "${{ inputs.repo_path }}" || exit 1
            git fetch origin
            # 使用 reset --hard 强制更新所有文件,包括已修改的文件
            git reset --hard "origin/${{ github.ref_name }}"

            # ==================================================================
            # 【步驟 2: 設置 Kubernetes 配置】
            # ==================================================================
            # 導出 KUBECONFIG 環境變數,告訴 kubectl 和 helm 使用哪個配置文件
            #
            # KUBECONFIG 的作用:
            # - 指定 Kubernetes 集群的連接信息
            # - 包含認證憑證和上下文信息
            # - 允許訪問特定的 Kubernetes 集群
            #
            # 默認值:~/.kube/config(Kubernetes 標準配置路徑)
            # 如果集群使用自定義配置文件,可以通過 kubeconfig_path 參數指定
            # ==================================================================
            export KUBECONFIG=${{ inputs.kubeconfig_path || '~/.kube/config' }}

            # ==================================================================
            # 【步驟 3: 構建基礎 Helm 命令】
            # ==================================================================
            # 構建 Helm upgrade --install 命令的基礎部分
            #
            # helm upgrade --install 說明:
            # - --install: 如果 release 不存在則安裝,存在則升級
            #   這是一個智能命令,無需手動判斷是安裝還是升級
            #
            # 命令結構:
            # helm upgrade --install <release-name> <chart-path> \
            #   --namespace <namespace> \
            #   --values <values-file> \
            #   --timeout <timeout>
            #
            # 參數說明:
            # - ${{ inputs.helm_release }}: release 名稱(如:stk-jixun-model)
            # - ${{ inputs.helm_chart_path }}: chart 路徑(如:~/stk.jixun.model/k8s/chart)
            # - --namespace: 指定部署的 namespace
            # - --values: 指定 values 文件路徑
            # - --timeout: 設置超時時間(默認 5m)
            # ==================================================================
            HELM_CMD="helm upgrade --install ${{ inputs.helm_release }} ${{ inputs.helm_chart_path }} --namespace ${{ inputs.helm_namespace }} --values ${{ inputs.helm_values_file }} --timeout ${{ inputs.helm_timeout || '5m' }}"

            # ==================================================================
            # 【步驟 4: 添加 --wait 選項(可選)】
            # ==================================================================
            # 如果 helm_wait 為 true,添加 --wait 標誌
            #
            # --wait 的作用:
            # - 等待所有 Pod 就緒後才返回
            # - 確保部署成功完成,而不僅僅是提交了部署請求
            # - 如果 Pod 無法就緒,會超時並失敗
            #
            # 為什麼需要條件判斷?
            # - helm_wait 是 boolean 類型,但在 shell 中會被轉換為字符串 "true" 或 "false"
            # - 需要字符串比較來判斷是否啟用
            #
            # 使用場景:
            # - 生產環境:通常設置為 true,確保部署成功
            # - 開發環境:可以設置為 false,快速返回
            # ==================================================================
            if [ "${{ inputs.helm_wait }}" = "true" ]; then
              HELM_CMD="${HELM_CMD} --wait"
            fi

            # ==================================================================
            # 【步驟 5: 添加 --set 值(可選)】
            # ==================================================================
            # 如果提供了 helm_set_values,解析並添加到命令中
            #
            # 處理邏輯:
            # 1. 檢查 helm_set_values 是否為空
            # 2. 如果非空,按逗號分割成數組
            # 3. 遍歷數組,為每個值添加 --set 標誌
            #
            # 示例:
            # 輸入:image.tag=abc123,replicaCount=3
            # 輸出:--set image.tag=abc123 --set replicaCount=3
            #
            # IFS(Internal Field Separator)說明:
            # - IFS=',' 設置字段分隔符為逗號
            # - read -ra SET_VALUES 將字符串讀入數組
            # - <<< 是 here-string,將變數內容作為輸入
            #
            # 使用場景:
            # - 動態設置鏡像標籤(如:image.tag=${{ github.sha }})
            # - 臨時調整配置(如:replicaCount、資源限制等)
            # - 覆蓋環境變數
            # ==================================================================
            HELM_SET_VALUES="${{ inputs.helm_set_values }}"
            if [ -n "${HELM_SET_VALUES}" ]; then
              # 按逗號分割字符串為數組
              IFS=',' read -ra SET_VALUES <<< "${HELM_SET_VALUES}"
              # 遍歷數組,為每個值添加 --set 標誌
              for set_val in "${SET_VALUES[@]}"; do
                HELM_CMD="${HELM_CMD} --set ${set_val}"
              done
            fi

            # ==================================================================
            # 【步驟 6: 執行 Helm 命令】
            # ==================================================================
            # 使用 eval 執行構建好的 Helm 命令
            #
            # 為什麼使用 eval?
            # - HELM_CMD 是一個包含完整命令的字符串
            # - 需要將字符串解析為命令並執行
            # - eval 會先展開變數,然後執行命令
            #
            # 執行結果:
            # - 成功:Helm 會部署或升級應用,返回成功狀態碼
            # - 失敗:Helm 會返回錯誤信息和非零狀態碼,導致 workflow 失敗
            #
            # 注意:
            # - 如果使用了 --wait,會等待所有 Pod 就緒
            # - 如果超時,會返回超時錯誤
            # - 無論成功或失敗,trap 註冊的清理函數都會執行
            # ==================================================================
            eval $HELM_CMD
Manually run
# Create a secret for dockerhub-pull-secret
kubectl create secret docker-registry dockerhub-pull-secret \
  --docker-server=docker.io \
  --docker-username=alangtw \
  --docker-password='XXXXXXXXXXXXXXXXXXXX' \
  -n my-devops-prod

# Create a secret for gemini-ocr-secret
kubectl create secret generic gemini-ocr-api-secret \
  --from-literal=API_KEY='ThisIsTheAPKey' \
  --from-literal=GEMINI_API_KEY='XXXXXXXXXXXXXX' \
  -n my-devops-prod

# Deploy with helm
# Usage:
#  helm upgrade --install your-app-name k8s/chart \
#    --namespace your-namespace-prod \
#    --create-namespace
cd /path/to/your/repo
helm upgrade --install gemini-ocr k8s/chart --namespace my-devops-prod --values k8s/chart/values.yml --timeout 5m
Build .deb package (workflow)
- workflow: https://github.com/zquestz/plank-reloaded/blob/master/.github/workflows/debian-release.yml
- Build and Release on Debian Bookworm
- Use Package-checking tool - Lintian
自動更新 README 的內容
Learning CI/CD
Introduction
Drone CI
- Drone CI is a self-service Continuous Integration platform for busy development teams.
Jenkins
- Jenkins - A common open source CI system
Codefresh
Bitbucket Webhook
URL: How to Create a Basic CI/CD Pipeline with Webhooks on Linux
Tech Stacks
- Bitbucket
- Webhook
- Flask-based Python server