Virtualization
Hypervisor
- Oracle Virtualization
- XCP-ng
- VMware
- Import Virtualbox ova Image
- ESXi Bug Fix & Upgrade
- ESXi Commands
- vCenter Patch
- vCenter 管理
- vCenter Converter
- XenServer (Citrix Hypervisor)
- VirtualBox
- KVM/QEMU
- Proxmox VE
Oracle Virtualization
Oracle VM 為甲骨文公司(Oracle)所發行的企業級虛擬化作業系統平台,其架構是基於 Xen 的虛擬技術,可免費下載使用,Oracle 官方也提供付費的技術支援。
FAQ
Log 解析
Log Files
檔案目錄: /u01/app/oracle/ovm-manager-3/domains/ovm_domain/servers/AdminServer/logs/
- access.log: Used to track HTTP access to the Web interface of the Oracle VM Manager and to the underlying Oracle WebLogic Server HTTP interface. This log can be used to track access and HTTP operations within Oracle VM Manager to help debug access issues and to audit access to the Oracle VM Manager.
- AdminServer.log: Used to track events within the underlying Oracle WebLogic Server framework, including events triggered by Oracle VM Manager. This log can be used to track a variety of issues within Oracle VM Manager including TLS/SSL certificate issues, server availability issues, and any actions performed within Oracle VM Manager which are usually identifiable by searching for items containing the string com.oracle.ovm.mgr. Log in failures resulting from locked accounts (as opposed to incorrect credentials) are also in this file.
- AdminServer-diagnostic.log: Used to track exceptions within the underlying Oracle WebLogic Server framework, including particular events triggered by Oracle VM Manager such as log in failures due to incorrect credentials. This log can be used to track Oracle VM Manager behavior that results in an exception or for log in failure, which can be tracked by searching for the string An incorrect username or password was specified.
Log Parsing Tool: OvmLogTool.py
檔案目錄: /u01/app/oracle/ovm-manager-3/ovm_tools/
由於 AdminServer.log 的內容不易讀取,使用這指令格式化 log 內容。
cd /u01/app/oracle/ovm-manager-3/ovm_tools/
python OvmLogTool.py -s -o ~/ovm_logs/summary.`date +%y%m%d_%H%M`- 格式化後的結果會儲存在 ~/ovm_logs/summary.<todaty_now>
- -s , 只會顯示 Error 相關的 Log; 不加則會顯示所有 Log。
日誌檔 AdminServer.out 佔用很大的磁碟空間
檔案目錄: /u01/app/oracle/ovm-manager-3/domains/ovm_domain/servers/AdminServer/logs/AdminServer.out
清空檔案
service ovmm stop
cat /dev/null > /u01/app/oracle/ovm-manager-3/domains/ovm_domain/servers/AdminServer/logs/AdminServer.out
service ovmm start
執行手動備份 OVMM 資料庫失敗
執行 /u01/app/oracle/ovm-manager-3/ovm_tools/bin/BackupDatabase -w
mysqlbackup: WARNING: The value of 'innodb_checksum_algorithm' option provided to mysqlbackup might be incompatible with server config.mysqlbackup: ERROR: Page at offset 5242880 in /u01/app/oracle/mysql/data/appfw/APPFW_EVENTS.ibd seems corrupt!
Solution:
- 檢查資料表 APPFW_EVENTS 是否已損壞
- 如果已損壞,嘗試執行修復資料表
- 如果顯示正常,嘗試手動重建資料表
- 再執行備份一次
檢查資料表狀態
mysqlcheck -uroot -p -S /u01/app/oracle/mysql/data/mysqld.sock --databases appfw

mysql -u appfw -p -S /u01/app/oracle/mysql/data/mysqld.sock appfw
mysql> select count(*) from APPFW_EVENTS;
+----------+
| count(*) |
+----------+
|    18650 |
+----------+
1 row in set (0.01 sec)
重建 table APPFW_EVENTS
service ovmm stop
mysqldump -uappfw -p -S /u01/app/oracle/mysql/data/mysqld.sock --databases appfw --tables APPFW_EVENTS > table_dump.appfw_events.sql

mysql -u appfw -p -S /u01/app/oracle/mysql/data/mysqld.sock appfw
mysql> create table APPFW_EVENTS_NEW like APPFW_EVENTS;
mysql> rename table APPFW_EVENTS to APPFW_EVENTS_OLD;
mysql> rename table APPFW_EVENTS_NEW to APPFW_EVENTS;

// Import the table
mysql -uappfw -p -S /u01/app/oracle/mysql/data/mysqld.sock appfw < table_dump.appfw_events.sql

// Drop the old table
mysql -u appfw -p -S /u01/app/oracle/mysql/data/mysqld.sock appfw
mysql> drop table APPFW_EVENTS_OLD;
OVMM 主機的 MySQL DB 耗盡所有磁碟空間
檢查 MySQL 的資料表使用空間
# du -chs /u01/app/oracle/mysql/data/ovs/OVM_STATISTIC*
16K /u01/app/oracle/mysql/data/ovs/OVM_STATISTIC.frm
121G /u01/app/oracle/mysql/data/ovs/OVM_STATISTIC.ibd <===
Solution:
- 先釋出一些其他的可用空間,使 MySQL 可正常運作。
- 關閉 ovmm 服務,避免更多資料的寫入。
- 清除資料表 OVM_STATISTIC 的內容。
關閉 ovmm
service ovmm stop檢查資料表 OVM_STATISTIC 的筆數
mysql -u ovs -p -S /u01/app/oracle/mysql/data/mysqld.sock ovs
Enter password: <網頁登入密碼>
mysql> select count(*) from OVM_STATISTIC;
+-----------+
| count(*)  |
+-----------+
| 184795278 |
+-----------+
1 row in set (6 min 35.98 sec)
清除資料表 OVM_STATISTIC
mysql> truncate table OVM_STATISTIC;TIP: truncate 基本上是先執行 drop 再 create,就算有 1 億多筆資料在幾秒鐘就會完成清除。
另一個方式取代 truncate
mysql> create table NEW_OVM_STATISTIC like OVM_STATISTIC;
mysql> rename table OVM_STATISTIC to OLD_OVM_STATISTIC, NEW_OVM_STATISTIC to OVM_STATISTIC;
mysql> drop table OLD_OVM_STATISTIC;
VM 無法結束,使用 Kill 也沒用
VM 狀態一直顯示 Stopping,執行 Kill 失敗,出現錯誤:
tpeoddovm-db01 <1108> is locked. job info: job id(time):1525839275699 name:Stop VM: tpeoddovm-db01 description:Stop VM: tpeoddovm-db01
Solution: 試試重啟該 VM 所在的 OVS 主機裡的 ovs-agent 服務
service ovs-agent stop
service ovs-agent start
無法建立 Server Pool
重裝完 OVS 與 OVM Manager 主機後,無法使用原有的 LUNs 建立 Server Pool 與 Repository。
Solution: SSH 登入 OVS 主機,清空 LUNs 的資料
# 找出 LUN 路徑
multipath -ll

dd if=/dev/zero of=/dev/mapper/360a980004434375a385d4747374b5155 bs=1M count=256
[OVM 3.3.x] 管理介面網頁突然無法登入
Unexpected error during login (java.lang.NullPointerException)
Solution: 二擇一
- 重啟 ovmm 服務
- 重啟 OVMM 主機
無法啟動 VM
Server Pool 的 Master Server 硬體故障並意外關機,隨後將 VM 遷移(Migrate) 至另一部 OVS 後,啟動 VM 時發生錯誤
Caught during invoke method: com.oracle.ovm.mgr.api.exception.IllegalOperationException....
Solution: 在遷移 VM 之前,請先將它的 Event Serverity 狀態從 Critical 變更成 Informational。步驟如下:
- 確認主機故障原因
- 確認第二部主機服務正常,與所有 Repositories Storage 正常
- 將 VM 從故障主機遷移(Migrate) 至另一部主機
- OVMM > Servers and VMs > 選擇第二部OVS主機 > 選擇要啟動的 VM > 按右鍵 Display Events
將每個 Critical Event 做完 Acknowledge,完成後這 VM 的 Event Serverity 狀態應該會顯是正常 Informational。 - 啟動 VM 試試
Repositories 總是顯示 Error 圖示
先前由於硬體維護工作,造成 Storage 短暫的連接異常,但解決異常後,Error 圖示 仍保持顯示。
Solution:
OVMM Admin > Repositories > 選擇 Storage Repository > Perspective: 選擇 Events
選擇尚未處理的舊事件,按 Acknowledge,完成。
[OVM 3.3.x]無法從 Clustered Server Pool 移除既有 Oracle VM Server(OVS)
有一個 OVS 需要重新安裝,但無法從已經加入的 Clustered Server Pool 中移除,出現以下錯誤:
OVMRU_000036E Cannot remove server: tycoddovs01.winfoundry.com, from pool: oddfdc_db. There are still OCFS2 file systems
要移除從 Clustered Server Pool 裡移除其中一台 OVS 主機,必須符合下列條件
- 要移除的 OVS 不可以是 Master Server。
- 必須先移除(un-present) 與這個 OVS 主機所有相關的 Storage Repositories。
假使這個 OVS 是 Server Pool 裡唯一的主機,可以使用下述步驟,強制將它從 Server Pool 內移除。
1. SSH 登入至該 OVS 主機,執行以下指令:
service ovs-agent stop
rm -rf /etc/ovs-agent/db
cat /dev/null > /etc/ocfs2/cluster.conf
service ovs-agent start
2. 登入 OVMM 後,從控制台的視窗,應該就會顯示該 OVS 主機是在 Unassigned Servers 狀態。
TIPs:
- 一旦 OVS 呈現 Unassigned 狀態後,如果還是無法刪除舊 Server Pool (可能出現錯誤 Internal Error),可以先重啟 OVMM 主機後,確認 OVS 與 OVMM 的時間都有同步,再刪除一次。
- 呈現 Unassigned 的舊 OVS 主機,若要在控制台上將它刪除,可能無法成功,此時先對舊 OVS 做一次 Discover Servers,完成後應該就能從控制台,將舊 OVS 主機移除。 NOTE:做完 Discover Servers 後,控制台可能會出現 Unknown Server Pool.....,這是來自舊的設定,請將它徹底移除即可。
如何加大 VM 既有磁碟的可用空間
使用 VM template 新增的 VM 後,發現預設的系統磁碟容量太小,要如何才能加大容量?
1. 使用 OVMM 將 VM 的 System 磁碟增大
OVMM > Servers and VMs > 選擇 VM > 編輯 VM > Disks > 編輯 Slot 0 的磁碟
- Virtual Disk Name:system (x) <可不用變更>
- Size (GB):12 -> 50GB
- Shareable:空白
2. 登入 VM 後,執行以下操作
記下 SWAP 的大小
> free -m
例如是 2048M
關閉 SWAP
> swapoff /dev/xvda3重建磁區
> fdisk /dev/xvda- 刪除 xvda3 & xvda2 磁區
- 重建 xvda2 (+48G) & xvda3 (剩餘空間)
- 寫入後離開
# 重啟 VM
reboot

# 格式化 SWAP
mkswap /dev/xvda3
swapon /dev/xvda3

# Resize 根目錄
resize2fs /dev/xvda2
如何取得 Oracle VM 的擁有權
- 在 OVMM 執行 Discover Servers 時,如果 OVM 是處於 Unowned 狀態,OVMM 會自動取得該擁有權。
- 如果連結某一台 OVM 顯示 Owned by Another.... 狀態時,必須回到最近加入這個 OVM 的 OVMM,然後解除該OVM主機的擁有權後,才可以再被新的 OVMM 加入。
- 要從 OVMM 介面解除某個 OVM 主機的擁有權,必須先移出 server pool,然後刪除該主機,或編輯該主機,將 take ownership 取消。
如何做校時設定
建議做法是將 OVMM 設定為 NTP Server,所有的 OVS 主機與 VM 自動向 OVMM 做校時。
OVMM 設定 NTP)
1. 設定系統時區: 編輯 /etc/sysconfig/clock 或指令 setup。
2. 設定 ntp.conf:
## 這裡要設定 OVS 的網段,如果有其他網段的主機也要做校時,也可以加上。
# Hosts on local network are less restricted.
restrict 192.168.7.0 mask 255.255.255.0 nomodify notrap

# 註解這兩行
#server 127.127.1.0     # local clock
#fudge  127.127.1.0 stratum 10

# 這裡是上層的 NTP 校時主機位址
server 0.rhel.pool.ntp.org
server 1.rhel.pool.ntp.org
server 2.rhel.pool.ntp.org
3. 啟動 ntpd 服務
OVS 設定 NTP)
OVMM 3.3.x 不需要在 OVS 上做設定,當使用 VM Manager 第一次加入 OVS 時,系統會自動修改 OVS 的 ntp.conf。
VM 設定 NTP)
VM(guest OS) 如果是用 OEL template,而且 Linux kernel 是 UEK based。當 VM 重啟時,系統時間會與 OVS 主機相同,不過,直到下次重啟前,系統運行過程並不會與 OVS 主機做校時,如果 VM 長時間不做重啟,必須手動設定 NTPD 或 ntpdate 校時功能。
編輯 /etc/ntp.conf
# 註解這兩行
#server 127.127.1.0     # local clock
#fudge  127.127.1.0 stratum 10

# 最後一行加上
# OVM Manager
server 10.23.0.203
重啟 ntpd 服務
Oracle VM Server for x86
Document
Oracle Linux KVM
Tutorials
- Virtualization | Oracle
- Document: Oracle Linux Virtualization Manager
- Document: KVM User's Guide
- Hardware Certification List
- Oracle Linux Virtualization Manager · Oracle Linux Training Station (oracle-samples.github.io)
- Forum: https://forums.oracle.com/ords/apexds/domain/dev-community/category/infrastructure-software
XCP-ng
Based on XenServer, XCP-ng is the result of massive cooperation between individuals and companies, to deliver a product without limits. No restrictions on features and every bit available on GitHub!
Tutorials
VMware
威睿是戴爾科技旗下軟體公司,提供雲端運算和硬體虛擬化的軟體和服務,並號稱是第一個成功商業化的虛擬化x86架構。公司成立於1998年,總部設在美國加利福尼亞州帕洛阿爾托。
Import Virtualbox ova Image
Export from Virtualbox
*.ova image- 格式選 OVF1.0。(非必要)
- 不要勾選網卡。(建議:在匯入 vmware 以後,再手動新增合適的虛擬網卡)
Import to vSphere 6 Server
- 下載 VMware-ovftool: https://www.dropbox.com/s/k925gfb2zn4ffgw/ovftool.zip?dl=0
- 將
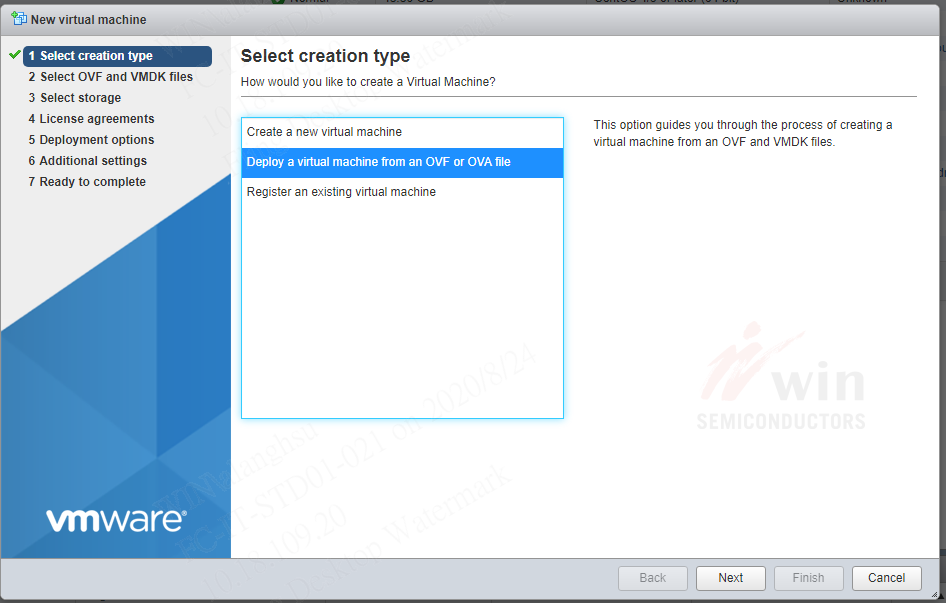
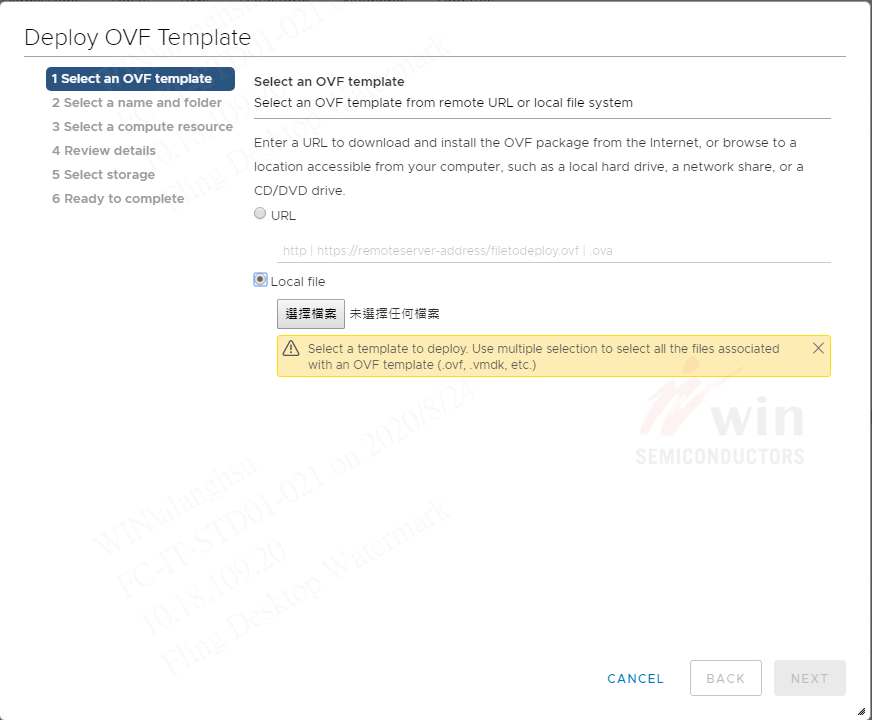
*.ova轉換成 OVF 格式(輸出檔案包含有*.ovf,*.mf,*.vmdk) - 從 vSphere Web 選擇 Deploy OVF Template,來源必須同時選擇兩個檔案
*.ovf與*.vmdk - 使用 vCenter 介面無法完成匯入,必須改用 ESXi 介面。
OVFTool 轉換
"C:\Program Files\VMware\VMware OVF Tool\ovftool.exe" --lax source.ova target.ovfDeploy OVF template
vSphere ESXi Web)
vCenter Web)
F.A.Q
Error: No supported hardware versions
Issues detected with selected template. Details: - -1 : -1:VALUE_ILLEGAL: No supported hardware versions among [virtualbox-2.2]; supported: [vmx-04, vmx-07, vmx-08, vmx-09, vmx-10, vmx-11, vmx-12, vmx-13].
解決:
編輯 *.ovf,找到這一段
<System>
  <vssd:ElementName>Virtual Hardware Family</vssd:ElementName>
  <vssd:InstanceID>0</vssd:InstanceID>
  <vssd:VirtualSystemIdentifier>graylog#95</vssd:VirtualSystemIdentifier>
  <vssd:VirtualSystemType>virtualbox-2.2</vssd:VirtualSystemType>
</System>
搜尋 VirtualSystemType 將 virtualbox-2.2 改成 vmx-07,存檔後,再匯入一次。
Error: No space left for device ‘7’ on parent controller ‘5’.
Line 85: No space left for device ‘7’ on parent controller ‘5’.
Line 66: Unsupported virtual hardware device ‘AHCI’.
Solution: 更換更高版本的 vmx-?? 試試。
Error: The checksum(s) from the provided manifest file do not match
The checksum(s) from the provided manifest file do not match the content of file(s): zabbix5.ovf.
Solution: 如果修改過 *.ovf ,在匯入時不要選擇 *.mf。
Error: Value ‘‘PIIX4’’ of ResourceSubType element not found in [#]
48:7:VALUE_ILLEGAL: Value ‘‘PIIX4’’ of ResourceSubType element not found in [].
57:7:VALUE_ILLEGAL: Value ‘‘PIIX4’’ of ResourceSubType element not found in [].
85:7:VALUE_ILLEGAL: Value ‘‘5’’ of Parent element does not refer to a ref of type DiskControllerReference.
75:7:VALUE_ILLEGAL: Value ‘‘4’’ of Parent element does not refer to a ref of type DiskControllerReference.
Solution: 不要使用 vCenter 做匯入;改用 ESX Host 的 Web 管理介面。
vmx 版本對應表
| ESX version | |
|---|---|
| vmx-07 | ESX 4.0 |
| vmx-10 | ESX 5.5 |
| vmx-13 | ESX 6.5 |
Reference
- Deploy a Virtual Machine from an OVF or OVA File in the VMware Host Client
- Migrate virtual machine from Oracle VirtualBox to Esxi 5.5
- 把 VM 從 VirtualBox 搬到 VMware ESXi
ESXi Bug Fix & Upgrade
升級或更新 ESX 主機步驟
用 SSH 方式
以 SSH Client 登入 vSphere 主機進行軟體修正程序。
NOTE: vSphere 主機必須事先手動啟用 SSH 服務。
上傳更新/升級檔至主機
從官網下載的更新/升級檔 esxi6.5uX-mgmt-bundle-3.4.5-8.zip 上傳到 vSphere 主機的任一個 datastore。
- 更新檔:修正 Bug,檔名 *-bundle-*.zip
- 升級檔:ESXi 版本升級,檔名 *-depot.zip
NOTE:
- 不同的 vSphere 版本會有相對應的特定更新/升級檔,必須下載正確的版本。
- zip 檔案不需要解壓縮。
- 升級 ESX 軟體時,不能使用 *.iso 安裝檔
檢查系統版本資訊
vSphere 軟體版本
[root@tpeitpesx-a02:~] esxcli system version get
   Product: VMware ESXi
   Version: 6.5.0
   Build: Releasebuild-10719125
   Update: 2
   Patch: 67
vSphere 安裝紀錄
[root@tpeitpesx-a02:~] esxcli software profile get
(Updated) HPE-ESXi-6.5.0-Update1-iso-650.U1.10.1.3.3
   Name: (Updated) HPE-ESXi-6.5.0-Update1-iso-650.U1.10.1.3.3
   Vendor: Hewlett Packard Enterprise
   Creation Time: 2019-06-14T03:16:25
   Modification Time: 2019-06-14T03:16:35
   Stateless Ready: True
   Description:

      2019-06-14T03:16:25.647136+00:00: The following VIBs are
      installed:
        ilo   650.10.3.0.2-1OEM.650.0.0.4240417
        nmlx4-rdma    3.16.11.6-1OEM.650.0.0.4598673
        scsi-iscsi-linux-92   1.0.0.2-3vmw.650.0.0.4564106
        sata-sata-sil 2.3-4vmw.650.0.0.4564106
        shim-libata-9-2-2-0   6.5.0-0.0.4564106
...
...
      ----------
      HPE Custom Image Profile for ESXi 6.5.0 ISO

   VIBs: amsd 650.11.4.0-18.4240417, ata-libata-92 3.00.9.2-16vmw.650.0.0.4564106, ...
TIP:
- 列出最開始 ISO 的安裝與之後做過的所有更新記錄。
- 如有執行升級,這裡 profile 的版本資訊並不會更新。
檢查更新/升級檔的資訊
上傳目錄: /vmfs/volumes/{your-datastore-name}/{path-to-the-file}
[root@tpeitpesx-a02:~] esxcli software sources vib list -d /vmfs/volumes/LocalDisk/Patches/esxi6.5uX-mgmt-bundle-3.4.
5-8.zip
Name           Version                            Vendor  Creation Date  Acceptance Level  Status
-------------  ---------------------------------  ------  -------------  ----------------  ---------
amsd           650.11.4.5-18.4240417              HPE     2019-07-19     PartnerSupported  Update
fc-enablement  650.3.4.0.10-4240417               HPE     2019-03-12     PartnerSupported  Installed
cru            650.6.5.10.4-1OEM.650.0.0.4240417  HPE     2018-04-04     PartnerSupported  Installed
ilo            650.10.3.0.2-1OEM.650.0.0.4240417  HPE     2018-03-29     PartnerSupported  Installed
smx-provider   650.03.15.00.4-4240417             HPE     2018-08-29     VMwareAccepted    Installed
TIP: 透過這指令可以在**安裝前**,列出那些套件將會被更新。以本次為例,這次更新主要是針對 amsd 套件的 bug 重要修正。
Before: amsd 650.11.4.0-18.4240417
After: amsd 650.11.4.5-18.4240417
安裝更新/升級檔
- 關閉或遷移主機上所有的 VMs
- 啟用主機的 Maintenance Mode
- 開始安裝更新/升級檔
- 重啟主機
- 關閉主機的 Maintenance Mode
- 開啟所有 VMs
啟用/關閉 Maintenance Mode (也可以改用 GUI 操作)
# 啟用
vim-cmd hostsvc/maintenance_mode_enter

# 關閉
vim-cmd hostsvc/maintenance_mode_exit
安裝更新/升級檔
應該要用哪種方式升級,這很難有個絕對答案。比較安全的方式,是用 update;而 install 才會安裝完整最新的套件。對於某些情況下也有可能這兩種方式沒有差異。官方說明參閱 “esxcli software vib” commands to patch an ESXi 6.x/7.x host (2008939) (vmware.com)
- install : 安裝、升級/降級套件
- update : 僅更新既有套件
- -d : .zip 檔
- -v : .vib 檔
esxcli software vib update --dry-run -d "/vmfs/volumes/LocalDisk/Patches/esxi6.5uX-mgmt-bundle-3.4.5-8.zip"
esxcli software vib update -d "/vmfs/volumes/LocalDisk/Patches/esxi6.5uX-mgmt-bundle-3.4.5-8.zip"

esxcli software vib install --dry-run -d "/vmfs/volumes/LocalDisk/Patches/ESXi670U3-18828794-HPE-Gen9plus-depot.zip"
esxcli software vib install -d "/vmfs/volumes/LocalDisk/Patches/ESXi670U3-18828794-HPE-Gen9plus-depot.zip"
更新後的檢查
確認 amsd 更新後的版本號
esxcli software vib list | grep amsdESXi Commands
Check whether the /tmp directory is full
vdf | grep tmpSystem Module
esxcli system module list
esxcli system module set --enabled=false --module=<module-name>
esxcli system module set --enabled=true --module=<module-name>
手動修改 vmx
經由 OVF 匯入 VM 後,設定裡有音效卡無法移除。必須手動修改 vmx 檔,將以下內容移除:
sound.autoDetect = "TRUE"
sound.virtualDev = "hdaudio"
sound.fileName = "-1"
sound.present = "TRUE"
sound.pciSlotNumber = "35"
手動修改 vmx 檔後,還須執行以下指令更新 VM
# Find the Vmid for the affected VM
vim-cmd vmsvc/getallvms

# Reload configuration for the VM
vim-cmd vmsvc/reload <Vmid-of-VM>
Network
[root@tpeitpexb95:~] esxcli network ip interface list
vmk0
   Name: vmk0
   MAC Address: 80:30:e0:3b:a0:c4
   Enabled: true
   Portset: vSwitch0
   Portgroup: Management Network
   Netstack Instance: defaultTcpipStack
   VDS Name: N/A
   VDS UUID: N/A
   VDS Port: N/A
   VDS Connection: -1
   Opaque Network ID: N/A
   Opaque Network Type: N/A
   External ID: N/A
   MTU: 1500
   TSO MSS: 65535
   RXDispQueue Size: 1
   Port ID: 33554442

vmk1
   Name: vmk1
   MAC Address: 00:50:56:6b:5c:ed
   Enabled: true
   Portset: vSwitch1
   Portgroup: FT1
   Netstack Instance: defaultTcpipStack
   VDS Name: N/A
   VDS UUID: N/A
   VDS Port: N/A
   VDS Connection: -1
   Opaque Network ID: N/A
   Opaque Network Type: N/A
   External ID: N/A
   MTU: 1500
   TSO MSS: 65535
   RXDispQueue Size: 1
   Port ID: 50331654

vmk2
   Name: vmk2
   MAC Address: 00:50:56:62:26:d7
   Enabled: true
   Portset: vSwitch1
   Portgroup: FT2
   Netstack Instance: defaultTcpipStack
   VDS Name: N/A
   VDS UUID: N/A
   VDS Port: N/A
   VDS Connection: -1
   Opaque Network ID: N/A
   Opaque Network Type: N/A
   External ID: N/A
   MTU: 1500
   TSO MSS: 65535
   RXDispQueue Size: 1
   Port ID: 50331655
[root@tpeitpexb95:~] esxcli network ip interface ipv4 get
Name  IPv4 Address   IPv4 Netmask   IPv4 Broadcast   Address Type  Gateway      DHCP DNS
----  -------------  -------------  ---------------  ------------  -----------  --------
vmk0  10.14.1.95     255.255.248.0  10.14.7.255      STATIC        10.14.0.254     false
vmk1  192.168.101.7  255.255.255.0  192.168.101.255  STATIC        0.0.0.0         false
vmk2  192.168.103.7  255.255.255.0  192.168.103.255  STATIC        0.0.0.0         false
[root@tpeitpexb95:~] esxcli network ip route ipv4 list
Network Netmask Gateway Interface Source
------------- ------------- ----------- --------- ------
default 0.0.0.0 10.14.0.254 vmk0 MANUAL
10.14.0.0 255.255.248.0 0.0.0.0 vmk0 MANUAL
192.168.101.0 255.255.255.0 0.0.0.0 vmk1 MANUAL
192.168.103.0 255.255.255.0 0.0.0.0 vmk2 MANUALvCenter Patch
官方連結
步驟程序
- 下載 Patch file:
VMware-vCenter-Server-Appliance-6.7.0.48000-18010531-patch-FP.iso - 上傳 *.iso 到 vCenter VM 可以存取的任一個 datastore 裡 (Recommend: 建立一個 Patches 目錄)
- 確認 vCenter VM 在哪一個 ESXi Host
- 登入 ESXi Web Admin (NOTE: 這裡不是 vCenter Web)
- 將 vCenter VM 關閉
- 對 vCenter VM 進行一次快照備份
- 重新開啟 vCenter VM
- 設定 vCenter VM 掛載這次要 patch 的 iso 檔
- 遠端工作電腦以 SSH 登入 vCenter VM
- 開始執行系統 Patch 指令
- 重啟 vCenter VM 後完成
Patch Commands
# To stage the ISO:
software-packages stage --iso

# To see the staged content:
software-packages list --staged

#To install the staged rpms:
software-packages install --stagedvCenter 管理
忘記 root 密碼
首先,連線到 ESXi 主機的 VMware Host Client,並選擇以網頁瀏覽器或 VMware Remote Console 方式,開啟 vCenter Server Appliance 的 Console 介面。來到「PHOTON」啟動頁面後,按下〔e〕鍵以開啟開機選項。
在「GNU GRUB」命令視窗中,添加 rw init=/bin/bash 命令參數,然後按下〔F10〕鍵繼續啟動系統。
接著,會來到 root 根路徑命令提示字元下,執行 mount -o remount,rw / 命令參數,以完成檔案系統根路徑的掛載。
最後執行 passwd 命令,即可完成 root 密碼的修改。
完成密碼修改後,記得執行 umount / 命令來停止檔案系統的掛載,最後執行 reboot -f 命令參數以便重新啟動 vCenter Server Appliance。
root 密碼到期設定
vCenter Backup & Restore
這裡的備份不是指 VM snapshot,而是異地備份或者稱為冷備份。
備份工具需使用 VMware Appliance Management Interface (https://<FQDN-of-VCSA>:5480/)。
備份目的支援以下傳輸協定:
- FTP(s)
- NFS
- SFTP
- SMB
- HTTPS
系統還原注意事項:
- 需要使用相同版本 VCSA ISO 安裝檔。
- 還原步驟與初始安裝程序類似,需要有一個 Windows 工作站 (VM 或實體機),而且網路必須與 vCenter 主機 (VCSA) 同一個子網路。
- Windows 工作站先掛載 VCSA ISO 檔,執行
vcsa-ui-install/win32/installer.exe開啟安裝/復原程序。
教學連結:
- vCenter Server Appliance 6.7 File-Based Backup and Restore Walkthroughs - VMware vSphere Blog
- New vCenter Server Appliance File-Based Backup / Restore Walkthroughs - VMware vSphere Blog
Syslog Server
將 vCenter 系統日誌導出至遠端的日誌伺服主機。
教學連結:
- Configure desired level of vCenter logs sent to Remote Syslog Server
- Streaming Events to a Remote Syslog Server
vCenter Converter
簡介
VMware vCenter Converter Standalone
Home: https://www.vmware.com/products/converter.html
安裝
錯誤: Error 1053
Error 1053: The service did not respond to the start or control request in a timely fashion .
解決:參閱 KB: https://kb.vmware.com/s/article/64993
- Click the Start button, then click Run, type regedit, and click OK.
- In the Registry Editor, click the registry subkey
HKEY_LOCAL_MACHINE\SYSTEM\CurrentControlSet\Control. - In the details pane, locate the ServicesPipeTimeout entry, right-click that entry and then select Modify.
Note: If the ServicesPipeTimeout entry does not exist, you must create it by selecting New on the Edit menu, followed by the DWORD Value, then typing ServicesPipeTimeout, and clicking Enter. - Click Decimal, enter the new timeout value in milliseconds, and then click OK.(Modify the value to a larger one. Here is no recommended value, adjust this value accordingly.)
- Restart the computer.
- Manual start vCenter Converter Agent/Server/Worker service in Windows Service Manager. If the service is still failed to start with Windows event 7009, increase the "ServicesPipeTimeout" value.
XenServer (Citrix Hypervisor)
URLs
VirtualBox
Oracle VirtualBox是由德國InnoTek軟體公司出品的虛擬機器軟體,現在則由甲骨文公司進行開發,是甲骨文公司xVM虛擬化平臺技術的一部份。它提供使用者在32位元或64位元的Windows、Solaris及Linux 作業系統上虛擬其它x86的作業系統。
官方首頁:https://www.virtualbox.org/
Tips
教學文章
Command Line
Tutorials
Basic Commands
vboxmanage list vms
vboxmanage list -l vms
Create VM
VBoxManage list ostypes
VBoxManage createvm --name OracleLinux6Test --ostype Oracle_64 --register
Setting UP a VM's Properties
VBoxManage showvminfo <vm-name>
VBoxManage modifyvm <vm-name> --cpus 2 --memory 2048 --vram 12
VBoxManage modifyvm <vm-name> --nic1 bridged --bridgeadapter1 eth0
Export Appliance
vboxmanage list vms
vboxmanage export UBUNTUSERVER164 -o ubuntu_server_new.ova
KVM/QEMU
簡介
QEMU為Fabrice Bellard開發的開源硬體模擬器軟體,支援模擬x86、ARM、SPARC、RISC-V、MIPS各種架構的電腦。
Home: QEMU
Installation
- Ubuntu安裝QEMU/KVM和Virt Manager虛擬機管理員 · Ivon的部落格 (ivonblog.com)
- How to Install and Use Qemu on Ubuntu (itsfoss.com)
- EmuGUI + QEMU,Windows系統安裝虛擬機軟體 · Ivon的部落格 (ivonblog.com)
- Setting Up Virtual Machines with QEMU, KVM, and Virt-Manager on Debian/Ubuntu - LinuxConfig
- How to run virtual machines with virt-manager - Fedora Magazine
- How to Install KVM on Fedora 37/36 Step-by-Step
- Virtualization Deployment and Administration Guide | Red Hat Product Documentation
Fedora
QEMU
sudo dnf update
sudo dnf install qemu
From QEMU's source files
# Install prerequisite rpms to build the source code
sudo dnf install pixman-devel gcc make git python38

# Download source code
wget https://download.qemu.org/qemu-9.1.0.tar.xz
tar xvJf qemu-9.1.0.tar.xz
cd qemu-9.1.0
mkdir build
cd build
../configure --target-list='ppc64-softmmu ppc-softmmu' --prefix=/opt/qemu
make
sudo make install
/opt/qemu/bin/qemu-system-ppc64 --version
If you don not mentioned the --target-list='ppc64-softmmu ppc-softmmu', it will build more than 50 machines emulator, and will take a longer time to compile. fore more info, type #../configure -h
KVM/QEMU/Virt-Manager
sudo dnf install -y qemu-kvm libvirt virt-install bridge-utils qemu virt-manager \
  libvirt-devel virt-top libguestfs-tools guestfs-tools libvirt-client libvirt-python

sudo systemctl start libvirtd
sudo systemctl enable libvirtd

sudo usermod -a -G libvirt $(whoami)
sudo usermod -a -G kvm $(whoami)
sudo usermod -a -G input $(whoami)
RedHat
# RHEL 7
yum install qemu-kvm libvirt
yum install virt-install libvirt-python virt-manager virt-install libvirt-client

# RHEL 8
yum module install virt
yum install virt-install virt-viewer
systemctl start libvirtd

## Verification
virt-host-validate
Ubuntu 22.04
sudo apt-get install git libglib2.0-dev libfdt-dev libpixman-1-dev zlib1g-dev ninja-build
sudo apt-get install libnfs-dev libiscsi-dev python3-tomli

# Download source code
wget https://download.qemu.org/qemu-9.1.0.tar.xz
tar xvJf qemu-9.1.0.tar.xz
cd qemu-9.1.0
mkdir build
cd build
../configure --target-list='ppc64-softmmu ppc-softmmu' --prefix=/opt/qemu
make
sudo make install
/opt/qemu/bin/qemu-system-ppc64 --version
Command Line
- How To Use QEMU From the Linux Command-Line | Baeldung on Linux
- A Comprehensive Guide to Using QEMU from the Linux Command-Line — nixFAQ
- Chapter 20. Managing Guest Virtual Machines with virsh | Red Hat Product Documentation
virsh
Guest CPU Models
# For x86
virsh cpu-models x86_64

# For PowerPC
virsh cpu-models ppc64
List the VMs
sudo virsh list --allFAQ
Operation not permitted
qemu-system-ppc64: -net nic -net tap,script=no,ifname=tap0: could not configure /dev/net/tun (tap): Operation not permitted
Solution:
sudo setcap CAP_NET_ADMIN=ep /usr/bin/qemu-system-ppc64Install Error
Running postconf script '/home/alang/文件/worktmp/qemu-9.1.0/build/pyvenv/bin/python3 /home/alang/文件/worktmp/qemu-9.1.0/scripts/symlink-install-tree.py'
Traceback (most recent call last):
File "/home/alang/文件/worktmp/qemu-9.1.0/scripts/symlink-install-tree.py", line 17, in <module>
out = subprocess.run([*introspect.split(' '), '--installed'],
File "/usr/lib/python3.10/subprocess.py", line 503, in run
with Popen(*popenargs, **kwargs) as process:
File "/usr/lib/python3.10/subprocess.py", line 971, in __init__
self._execute_child(args, executable, preexec_fn, close_fds,
File "/usr/lib/python3.10/subprocess.py", line 1863, in _execute_child
raise child_exception_type(errno_num, err_msg, err_filename)
FileNotFoundError: [Errno 2] No such file or directory: "'/home/alang/文件/worktmp/qemu-9.1.0/build/pyvenv/bin/meson'"
Fix bug: edit symlink-install-tree.py
import shlex

out = subprocess.run([*shlex.split(introspect), '--installed'],
Proxmox VE
Proxmox VE(英語:Proxmox Virtual Environment,通常簡稱為PVE、Proxmox),是一個開源的伺服器虛擬化環境Linux發行版。
Learning Proxmox
Proxmox VE(英語:Proxmox Virtual Environment,通常簡稱為PVE、Proxmox),是一個開源的伺服器虛擬化環境Linux發行版。
Getting started
- Getting Started With Proxmox Backup Server - OSTechNix
- Proxmox Docker Containers Monster - 13000 containers on a single host - Virtualization Howto
- Getting Started With Proxmox (linuxhandbook.com)
- Proxmox Install Beginners Guide - Virtualization Howto
Monitoring
- Pulse - A lightweight monitoring application for Proxmox VE that displays real-time status for VMs and containers via a simple web interface.
Proxmox Datacenter Manager
管理多個 PVE nodes (不是叢集軟體)
- Proxmox Datacenter Manager Beta Documentation - Proxmox VE
- Proxmox Datacenter Manager is an underrated tool for your PVE servers
ProxCenter
類似 vCenter 的管理軟體
HA Cluster
- High-Availability (HA) Proxmox Clusters: Do’s & Don’ts - Virtualization Howto
- I clustered budget-friendly devices into a Proxmox HA lab, and it's more useful than I thought
Advanced Tips
- LACP Network
- ClusterShell - 多 PVE nodes 的管理工具
- sysctl optimization
- 5 Proxmox Management Tools I Use in My Home Lab in 2026 - Virtualization Howto
- Proxmox firewall setup and configuration - Virtualization Howto
- GPU PassThrough
5 common mistakes
- Staying on Enterprise repositories
You should switch to No-Subscription repos after installing PVE - Not keeping backups
Use vzdump when you’re new; switch to PBS once you become a veteran - Forgetting about documentation tools and monitoring services
They are a godsend for troubleshooting - Running mission-critical virtual guests on your experimentation server
High-availability or standalone nodes: Pick your poison - Clustering when you’re a beginner
Unless you have the hardware and skillset, it’s best to avoid clusters
Ceph Storage
Ceph 作為軟體定義的分散式儲存系統,具有高可用性、可平行擴展、無單點失敗、且具有一定自我修復能力等特性。
- Try Microceph for an Easy Ceph Install - Virtualization Howto
- I Built a Ceph Erasure-Coded NVMe Cluster in My Home Lab. Here’s What Actually Happened - Virtualization Howto
- I Bought a 10 Gig Switch to Fix My Proxmox Ceph Cluster and It Changed Everything - Virtualization Howto
- Jumbo frames: Cannot connect to host VMware storage Migration - Virtualization Howto
PECU
PECU - Proxmox Enhanced Configuration Utility
Professional Proxmox VE automation:
- GPU passthrough
- VM templates
- kernel optimization
- enterprise-grade configuration management in one powerful tool.
Tutorials:
- PECU - Proxmox Enhanced Configuration Utility | GPU Passthrough & VM Templates
- Proxmox Enhanced Configuration Utility is just what I needed for my home lab
Proxmox Backup Server
Nested Virtualization
內嵌虛擬化 - 在 Promox 的 VM 安裝另一個虛擬平台,例如 Proxmox、VMware ESXi。
一般用途為:
- 軟體開發與測試
- 學習環境
- 舊系統應用
教學:
- How to Enable Proxmox Nested Virtualization - Virtualization Howto
- Home Lab Nested Virtualization E-book Download - Virtualization Howto
LXC Container
PegaProx
The Ultimate Datacenter Management Solution for Proxmox VE
- PegaProx - The Ultimate Datacenter Management Solution for Proxmox VE
- This Open Source Project Just Killed the Proxmox GUI! - YouTube
Post-Install
Tutorials
- YT: the ULTIMATE Proxmox Guide - Post-Install, ZFS, GPU Passthrough, and more! - YouTube
- Proxmox VE for Beginners Guide with NetBird LXC
- Proxmox Defaults I Leave Alone (And the Ones I Always Change) - Virtualization Howto
Repositories
Disable Enterprise Repositories
local-lvm
Delete local-lvm and Resize local (read warning)
Warning: This assumes a fresh installation without advanced storage settings during the installation, such as ZFS. These steps are only recommended if you have a small boot drive and you need to reclaim space.
- Delete local-lvm manually from web interface under Datacenter > Storage.
- Run the following commands within Node > Shell.
lvremove /dev/pve/data
lvresize -l +100%FREE /dev/pve/root
resize2fs /dev/mapper/pve-root
BIOS
Other Defaults
- VM CPU Type: Host
- Memory ballooning configuration: Disable
FAQ
安裝後無法正常開機
VFS: Unable to mount root fs on unknown-block(0,0)
Solution: 不要使用 Ventoy 方式安裝,改用 ISO 檔直接寫入 USB 方式。
系統突然不能正常開機
開機程序停在這個畫面
Loading Linux 6.17.13 ...
Loading initial ramdisk ...
原因:開機前可能有改過 kernel 的開機參數,不小心導致無法開機。
解決:
- 使用 PVE ISO USB 開機
- 進入 Advanced Options ➜ Rescue Boot
- 修改 GRUB 開機參數
/etc/default/grub
GRUB_TIMEOUT=5  # 0 改成 5, 方便以後管理
GRUB_CMDLINE_LINUX_DEFAULT="quiet amd_iommu=on iommu=pt"  # 移除有問題的參數
套用變更
update-grub
rebootGPU PassThrough
Tutorials
- Proxmox GPU PassThrough: Step-by-step Guide - Virtualization Howto
- How to Enable GPU Passthrough to LXC Containers in Proxmox - Virtualization Howto
- PCI Passthrough - Proxmox VE
- YT: Proxmox GPU Passthrough for Bazzite Gaming - YouTube
Enable IOMMU
BIOS
proxmox
Node > Shell > Edit: /etc/default/grub
# Should look like this
GRUB_CMDLINE_LINUX_DEFAULT="quiet amd_iommu=on"
Run the command
update-grub